Update: This tutorial is now out of date. We also have a tutorial on managing Google Workspaces with Terraform that is kept up to date.
Terraform is an open source tool for managing Infrastructure as Code. Earlier this year, we showcased how Terraform pushes the boundaries on the traditional definition of "infrastructure", enabling users to Manage GitHub Teams and Permissions with Terraform. This post explores extending Terraform even further by writing our own custom extension for managing events on Google Calendar.
»Why Terraform?
The benefits of managing Infrastructure as Code are fairly straightforward. By capturing infrastructure requirements and dependencies as code, users can codify, version, automate, audit, reuse, and release changes. Managing Google Calendar with Terraform provides the same benefits. As an added bonus, most humans understand calendars, and this shared foundational knowledge provides common ground for a discussion on extending Terraform with a custom Terraform Provider. While the previous post focused on why users might leverage Terraform to manage GitHub, this post focuses on how users can extend Terraform with custom extensions.
»Core vs. Plugins
In order to comprehend both the importance and extensibility of Terraform Plugins, it is important to understand Terraform's architecture. Terraform has always had a plugin system, but early releases of Terraform were very limited. With more recent versions of the plugin system, there is a vibrant ecosystem of HashiCorp-maintained and third-party Terraform Plugins. Before writing our own plugin, we need to better understand how Terraform Core interacts with Terraform Plugins.
-
Terraform's Core is responsible for reading configuration and building the dependency graph. Terraform relies heavily on modern graph theory for managing dependencies and adhering to ordering. "Terraform Core" is the actual Terraform project on GitHub.
-
Terraform Plugins are external single static binaries. During the planning and applying phases, Terraform's Core communicates with these plugins via an RPC interface. If you are unfamiliar with RPC, just imagine that the plugin is a server and Terraform Core makes API calls to that server. Terraform has many pluggable parts, but the most common type of plugin is a Terraform Provider Plugin. Terraform Provider Plugins implement resources with a basic CRUD (create, read, update, and delete) API for communicating with third party services.
-
Upstream APIs are third party, external services or APIs with which Terraform interacts. It is important to note that Terraform Core never interacts directly with these APIs. Instead, Terraform Core asks the Terraform Provider Plugin to perform an operation, and the plugin communicates with the upstream API. This provides a clear separation of concerns - Terraform Core does not need to know anything about API nuances and Terraform Provider Plugins do not need to know anything about graph theory.
The communication between Terraform Core and Terraform Plugins is almost completely transparent to users. If you inspect the process output (ps aux | grep terraform) during an active plan or apply phase, you will see the parent process and multiple subprocess for the provider plugins. A typical interaction between Terraform Core and a Terraform Provider Plugin is as follows:
- The user runs
terraform plan - Terraform Core loads the desired configuration from disk as well as the last-known state of resources
- Terraform Core begins a refresh operation
- As part of the refresh, Terraform Core instructs each Terraform Provider Plugin activated in the last-known state to perform a
Readon each resource - Each Terraform Provider Plugin returns this result to Terraform Core
- Terraform Core calculates the difference, if any, between the last-known state and the current state
- Terraform Core presents this difference as the output of the
terraform planoperation to user in their terminal
Again, it is important to note that the Terraform Provider Plugins themselves only invoke upstream APIs for the basic CRUD operations - they are blissfully unaware of anything related to configuration loading, graph theory, etc. Because of the decoupling between Terraform Plugin Providers and Terraform Core, the work required of a provider is simpler and is merely an abstraction of a client library. This makes it super accessible to create providers without a deep knowledge of graph theory or infrastructure.
One final note is that Terraform Plugins generally consume an external client library as shown in the diagram above. While not impossible, it is highly discouraged to make a Terraform Provider Plugin also a client API library for the upstream API. Modern coding practices allow us to modularize for re-use, and we should follow those principles in Terraform as well. If your provider also requires a client library, it is best to separate these concerns into separate software projects.
»Writing a Terraform Provider Plugin
Like most software projects, the first step in writing a Terraform Provider Plugin is research. It is important that you have a solid foundational understanding of the API for which you are building a Terraform Provider Plugin. Additionally, you should identify an API client library (or write your own) that is a separate software project which manages the authentication and interaction with the API in Golang (the language in which Terraform Plugins are written).
After you understand the API, you will need to write some code to configure the provider. You can think of the provider as an abstraction of the upstream API. The provider manages the communications between Terraform Core and upstream APIs. Providers can have one or more resources. Resources are a component of a provider. For example, a provider might be an entire cloud (AWS, Google Cloud, Azure, etc), but a resource is a component of that cloud (AWS Instance, Google Cloud Firewall, Azure Storage Container, etc).
Some boilerplate code is required to get started. This code configures the binary to be a plugin and serve the proper plugin APIs. It also registers the provider and includes the upstream dependencies which do most of the hard work in creating the plugin APIs.
// main.go
// ... imports, etc.

func main() {
  plugin.Serve(&plugin.ServeOpts{
    ProviderFunc: func() terraform.ResourceProvider {
      return Provider()
    },
  })
}

func Provider() *schema.Provider {
  return &schema.Provider{
    ResourcesMap: map[string]*schema.Resource{
      "googlecalendar_event": resourceEvent(),
    },
    ConfigureFunc: providerConfigure,
  }
}

func providerConfigure(d *schema.ResourceData) (interface{}, error) {
  // TODO
  return nil, nil
}
First, create a main function. This is the function that is executed when the binary is called. That function calls Terraform's built-in plugin.Serve call, which builds all the required plugin APIs and server. We simply return our provider, which we define in our Provider() function. The Provider() function declares the list of resources and an optional configure function. The list of resources are just strings mapped to function calls. In the example above, we map the "googlecalendar_event" resource to the resourceEvent() function call. Note that we have not defined that function call yet, so this code will not compile. The name of the resource should always be prefixed with the provider, and the name of the resource defined in this map will be the name of the resource users place in their Terraform configuration files, like so:
resource "googlecalendar_event" "my_event" {
  # ...
}
Next, write the code to configure the provider. This varies heavily by provider and the API client library used. Since this Terraform provider uses the official Golang API client library for Google Cloud, we do not need any additional options and can utilize the default client.
func providerConfigure(d *schema.ResourceData) (interface{}, error) {
  client, err := google.DefaultClient(context.Background(), calendar.CalendarScope)
  if err != nil {
    return nil, err
  }

  calendarSvc, err := calendar.New(client)
  if err != nil {
    return nil, err
  }

  return calendarSvc, nil
}
The client library will automatically authenticate the local user with the gcloud CLI, environment variables, or a credentials file. Terraform delegates all this responsibility to the API client library, saving us the need to build and parse our own configuration object.
At this point, the Terraform Plugin and the Provider are configured and ready for use. However, the code still will not compile because we have not yet defined the resourceEvent() function that defines the "googlecalendar_event" resource.
»Writing a Resource
Recall from above that a resource is a component of a provider. To phrase that another way, resources belong to a provider, and they have full access to the underlying client libraries to make the required API calls as instructed. Resources are usually defined in their own file, since most providers have multiple resources. This provides a clear separation between different resources and keeps the code neatly organized. Additionally, as a somewhat standard convention, resource files are named resource_[thing].go where "thing" is the name of the resource.
// resource_event.go

func resourceEvent() *schema.Resource {
  return &schema.Resource{
    Create: resourceEventCreate,
    Read:   resourceEventRead,
    Update: resourceEventUpdate,
    Delete: resourceEventDelete,

    Schema: map[string]*schema.Schema{}
  }
}

func resourceEventCreate(d *schema.ResourceData, meta interface{}) error {
  // TODO
  return nil
}

func resourceEventRead(d *schema.ResourceData, meta interface{}) error {
  // TODO
  return nil
}

func resourceEventUpdate(d *schema.ResourceData, meta interface{}) error {
  // TODO
  return nil
}

func resourceEventDelete(d *schema.ResourceData, meta interface{}) error {
  // TODO
  return nil
}
Hopefully now it is abundantly clear that Terraform resources truly implement a CRUD API - create, read, update, and delete. Take note that all functions also return an error object. Terraform is built to handle errors exceptionally well. As long as you have a well-behaved Read operation, then you can return an error at any point and terraform apply will gracefully handle the error. This again showcases the benefits of the separation of concerns between Terraform Core and Terraform Plugins. Terraform Core always makes the more difficult decisions of what needs to be done and when it needs to be done. The Terraform Plugin only needs to know about how to perform the operation.
But before we can define any of those functions, we need to define the schema. Every Terraform resource defines a schema - the list of arguments, attributes, types, legal values, etc. for the resource. This schema is loaded and used multiple times in Terraform's lifecycle, and it directly maps to the Terraform configuration files that users will write when using your Terraform Provider Plugin.
At this point, sometimes it is helpful to practice "README-driven development" or user-focused development. Before actually defining the schema, think about what API would make you happy as a user. I went through five different iterations before I settled on the API for the Terraform Google Calendar Provider. On your first pass, avoid the temptation to expose too much functionality or bring the complexity of the upstream API into the resource. Remember - Terraform is an abstraction framework. We want to give users power and flexibility, but we do not want to overload them with all the nuances of the upstream APIs.
»Defining a Schema
After you have decided on what you want the user's definition to be, it is time to write the schema. The schema is just a mapping of a configuration key (a string) to a type and some metadata. For example, one of the required arguments for a Google Calendar event is the event summary or title. We can express this in the schema:
Schema: map[string]*schema.Schema{
  "summary": &schema.Schema{
    Type:     schema.TypeString,
    Required: true,
  },
},
This tells Terraform's configuration loader to accept a summary field in the Terraform configuration, that the field must be a string, and that the field is required. This translates to the following Terraform user configuration:
resource "googlecalendar_event" "my_event" {
  summary = "My Special Event"
}
Each field in the schema must have a type, and it must be explicitly marked as Required, Optional, or Computed. Computed values are values that are only known after the resource is created. For example, Google Calendar automatically assigns a unique event ID and hangout link to the event after it is created. These are not arguments that the creator can supply, nor are they known in advance. Therefore these options are "computed" and must be marked as such in the schema:
Schema: map[string]*schema.Schema{
  // ...

  "event_id": &schema.Schema{
    Type:     schema.TypeString,
    Computed: true,
  },

  "hangout_link": &schema.Schema{
    Type:     schema.TypeString,
    Computed: true,
  },
},
Marking a value as Computed tells Terraform to disallow the user to set this value themselves:
# Not allowed because "event_id" is computed
resource "googlecalendar_event" "my_event" {
  event_id = "event-12ae48df"
}
For more complex resources, you may need to create a resource within a resource as a "Set". For example, event attendees (guests) must have an email address, but their attendance may be optional. One way we could define the user interface is like this:
resource "googlecalendar_event" "my_event" {
  required_attendees = [
    "jane@company.com",
  ]

  optional_attendees = [
    "joe@company.com",
  ]
}
This would functionally work, but it creates a disconnect. Humans usually think in terms of attendee-attendance, not attendance-attendee. As such, a better experience would be to make each attendee a set like this:
resource "googlecalendar_event" "my_event" {
  attendee {
    email = "jane@company.com"
  }

  attendee {
    email    = "joe@company.com"
    optional = true
  }
}
The Terraform schema definition for this type of field looks like this:
Schema: map[string]*schema.Schema{
  "attendee": &schema.Schema{
    Type:     schema.TypeSet,
    Optional: true,
    Elem: &schema.Resource{
      Schema: map[string]*schema.Schema{
       "email": &schema.Schema{
          Type:     schema.TypeString,
          Required: true,
        },

        "optional": &schema.Schema{
          Type:     schema.TypeBool,
          Optional: true,
          Default:  false,
        },
      },
    },
  },
},
Notice that the "Type" of the field is a "set", and the element itself is another resource schema, exactly as we have been defining. In this manner, it is possible to create deeply-nested arguments and fields.
»Implementing Functionality
Now that the schema is defined, it is time to implement the actual interactions with the upstream APIs. This blog post will only cover the Create and Read operations, but the code is on GitHub for all API methods to satisfy any curiosity.
To implement the Create operation, complete the resourceEventCreate function from above:
func resourceEventCreate(d *schema.ResourceData, meta interface{}) error {
  svc := meta.(*calendar.Service)

  var event calendar.Event
  event.Summary = d.Get("summary").(string)
  event.Location = d.Get("location").(string)
  // ...

  eventAPI, err := svc.Events.Insert("primary", &event).Do()
  if err != nil {
    return err
  }

  d.SetId(eventAPI.Id)

  return resourceEventRead(d, meta)
}
First, extract the calendar service from the provider metadata. The metadata is an interface, so coerce it to the proper type. Next, build the calendar event from the schema. To access schema values, use the Get function with the name of the schema field. Earlier we defined a schema field named "summary", which is available as d.Get("summary"). That value comes back as an interface, but since we declared the type as a string, coerce the value into a string with .(string). Next, call the API client library with the constructed event object, returning an errors that occur. Next, and most importantly, set the "id" of the resource internally. The "id" is stored in the state, and it's the single piece of information Terraform uses to identify this resource in the future. Finally, read the resource back from the API by calling the resourceEventRead function (not yet defined).
As you can see, one of the primary jobs of the Terraform Provider Plugin is to map the schema onto the underlying API calls and visa-versa. The resourceEventRead function looks very similar, except instead of putting values from the schema into the API, it puts values from the API into the schema:
func resourceEventRead(d *schema.ResourceData, meta interface{}) error {
  svc := meta.(*calendar.Service)

  event, err := svc.Events.Get("primary", d.Id()).Do()
  if err != nil {
    return err
  }

  d.Set("summary", event.Summary)
  d.Set("location", event.Location)
  // ...

  return nil
}
Notice that the Read operation pulls a fresh copy of the resource from the upstream API using the resource ID (d.Id()). This ID is stored in the statefile and used to retrieve upstream information about the resource.
»Masking Complexity
When working with upstream APIs, you may find a single operation takes multiple requests, requires retries, or simply does not match the behavior users expect. The Google Calendar API is a perfect example of this anomaly. In Google Calendar, it is possible to create events that do not show as "busy" on a user's calendar. In the web interface, this is called "Show me as":

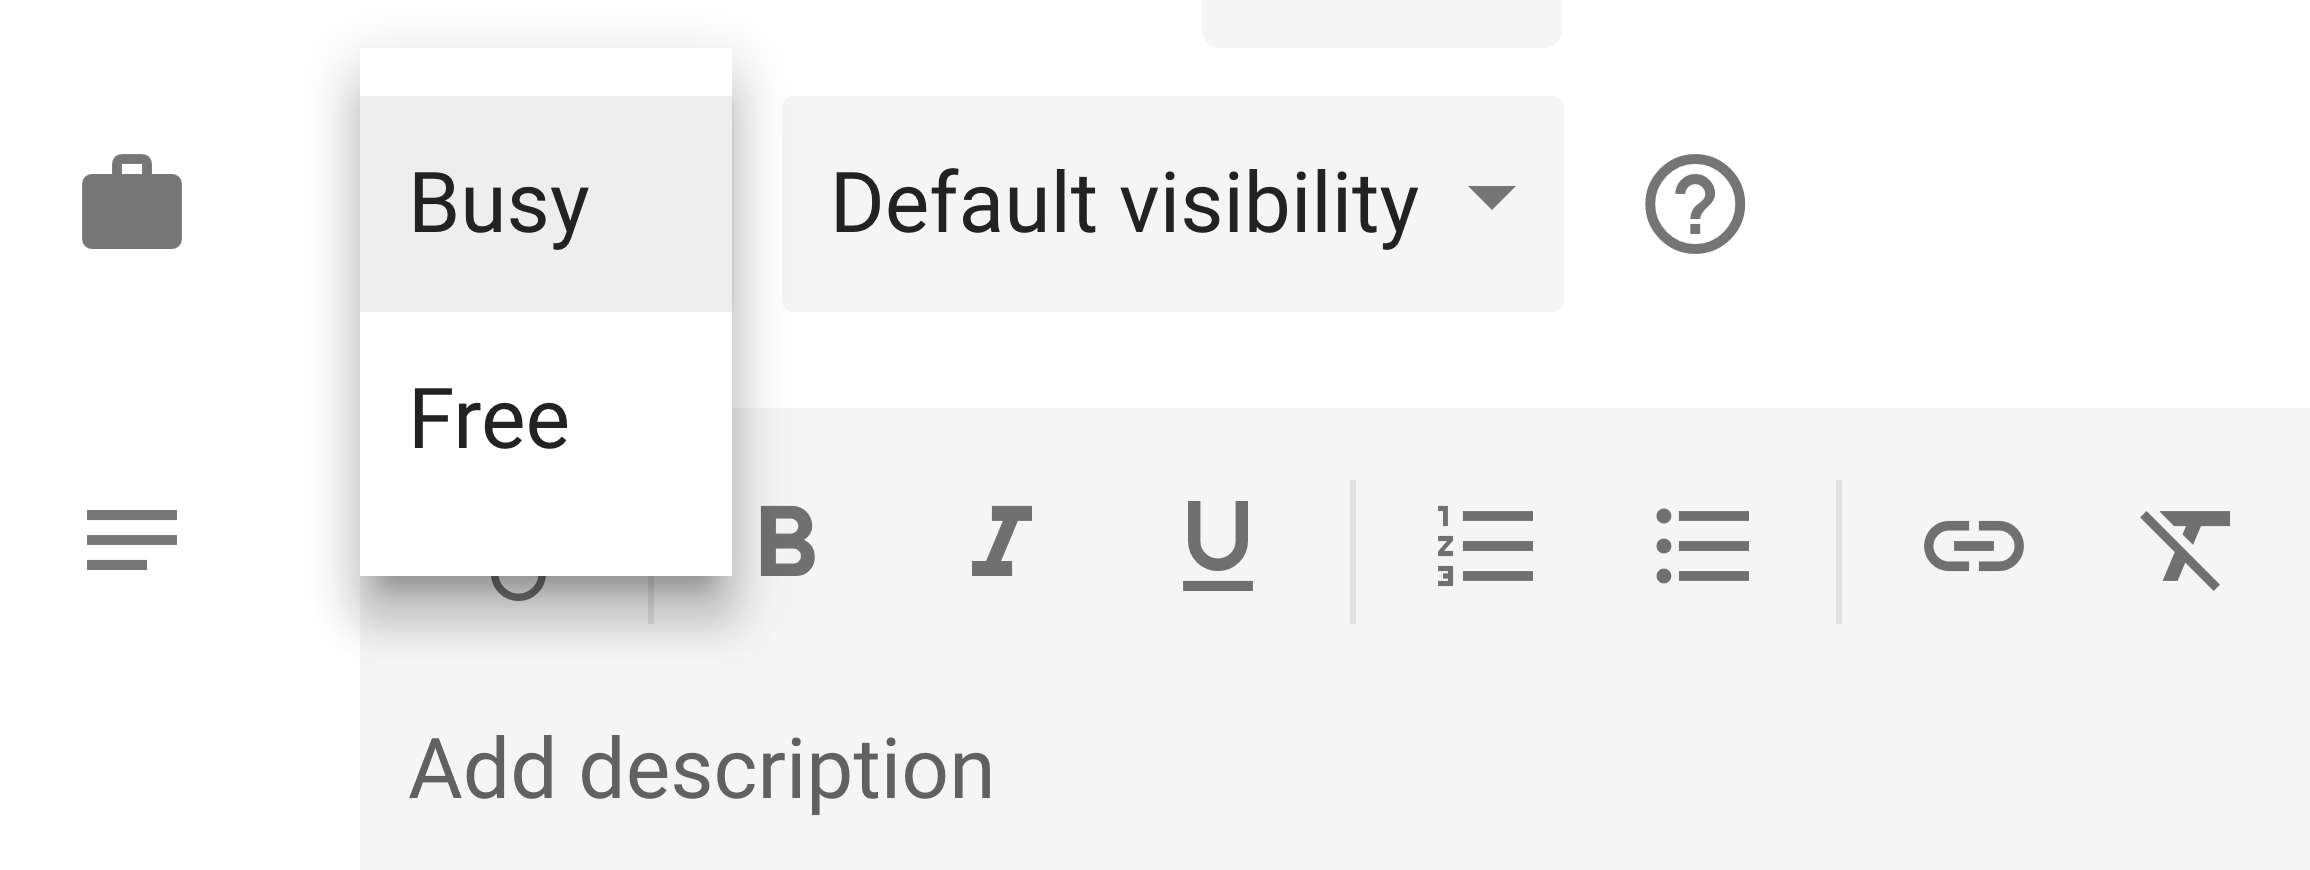
In the newly-launched interface, it has been renamed to "Busy" and "Free":

In both cases, the Google Calendar UI presents information very differently than the Google Calendar API. This particular field in the API is called "transparency", and it accepts two possible values: "opaque" and "transparent". I personally have never seen that terminology used in the Google Calendar UI, and it threw me for a loop.
If we chose to mirror the upstream API directly, we would bring this shock and complexity to the user. Instead, we can consciously choose to mask this complexity and make the Terraform API similar to what users already expect with the web interface.
Again, focusing on user-driven development, I decided that the best Terraform interface for this particular option was a boolean like this:
resource "googlecalendar_event" "my_event" {
  // ...
  show_as_available = true # or false
}
To make this possible, we define this as a boolean field on the schema:
Schema: map[string]*schema.Schema{
  // ...

  "show_as_available": &schema.Schema{
    Type:     schema.TypeBool,
    Optional: true,
    Default:  false,
  },
},
Internally, Terraform will need translate this field to and from the necessary Google Cloud API fields automatically. To accomplish this, write some tiny helper functions:
func boolToTransparency(showAsAvailable bool) string {
  if !showAsAvailable {
    return "opaque"
  }
  return "transparent"
}

func transparencyToBool(s string) bool {
  switch s {
  case "opaque":
    return false
  case "transparent":
    return true
  default:
    log.Printf("[WARN] unknown transparency: %s", s)
    return false
  }
}
When building the resource from user input, delegate to boolToTransparency:
event.Transparency = boolToTransparency(d.Get("show_as_available").(bool))
When reading data back from the API to populate the resource, delegate to transparencyToBool:
d.Set("show_as_available", transparencyToBool(event.Transparency))
This adaptation does not change the behavior, but it masks some of the complexity of the upstream API by bringing the existing UX that Google Calendar users expect to Terraform. Small improvements like these can go a very long way in driving adoption for your Terraform Provider Plugin.
»Conclusion
Extending a tool as powerful as Terraform may seem intimidating, but hopefully this post has convinced you otherwise. By leveraging the existing Google Calendar APIs, we were able to build a custom Terraform Provider Plugin that extended Terraform's powerful DSL to create, update, and delete calendar events. The source code for the Terraform Google Calendar plugin is available on GitHub, and you can view the source for many other Terraform Provider Plugins on the Terraform Providers GitHub Organization. The Terraform project also features a step-by-step guide for creating your own provider. We look forward to seeing what custom Terraform Plugins you build!


