

This blog addresses the remote access and security challenges that still plague many organizations with Windows environments, specifically issues with static credentials and overly broad network access. We will then focus on how you can address these challenges with Boundary and Vault. Configuration steps will also be provided for anyone who wishes to test this out.
»The persistent problem of static credentials
Despite years of advancements in secrets management, many organizations still rely on static credentials for accessing critical infrastructure — including Windows servers and workstations. In many environments, users authenticate to Windows machines using:
Shared local administrator accounts
Long-lived domain accounts
Service accounts with static passwords
Manually provisioned privileged credentials
Due to the lack of automation in place and the burden of manual rotation, these credentials often remain valid for months and sometimes years, destined to fall into the wrong hands.
While multi-factor authentication (MFA) and directory integrations have improved identity verification at login, many organizations still rely on an underlying credential model with static passwords that are often reused across sessions. In many Windows environments, shared administrative accounts and credentials are common for remote desktop protocol (RDP) access, troubleshooting issues, and emergency break-glass scenarios. This increases the risk of exposures.
This should be a concern for many CISO, DevOps, and security teams.
»The broad access challenge with VPNs
As organizations seek to improve security posture, overly broad access needs to be considered. Many organizations take the traditional castle and moat approach and secure the perimeter with a VPN. While VPNs provide secure access into a network, it is often much more complex to limit lateral movement throughout the network. Organizations can use traditional firewalls, security groups, and network segmentation, which all control access based on IP addresses rather than a user’s unique identity. This method can be brittle, especially when in modern cloud environments where IP addresses are dynamic and ephemeral. Other tools may need to be deployed, which leads to operational sprawl and management complexity. Traditional VPNs solve connectivity — but not access control at the user-to-resource level in dynamic environments.
Organizations need a solution that can address both the credential issue and the access issue.
»A better model: access and credential management
IBM Boundary fundamentally changes the model by combining authentication and authorization onto a single platform. Rather than granting broad network access, it provides access directly between a user and a target resource based on a user’s identity. Secondly, Boundary handles credentials on the user’s behalf with capabilities like credential injection. When an authorized user initiates an RDP session using their preferred RDP client tool, Boundary can inject credentials resulting in a passwordless connection. This ensures users do not see or handle credentials, eliminating the risk of credential exposure. This also streamlines the user’s connection experience as well. No need to fuss with usernames and passwords or keys. Lastly, Boundary tightly integrates with IBM Vault for advanced credential features like short-lived dynamic credentials or auto-rotation. This provides a secondary line of defence to ensure credentials are rendered useless if ever exposed.
»How Boundary and Vault work to improve security for Windows environments
How does Boundary work with Vault to provide a seamless experience for end users? Here is the sequence of events to show the relationship between Boundary, Vault, and Windows Active Directory Domain Services (AD DS) to generate dynamic short-lived credentials when a developer accesses a Windows machine in the domain.
1. A user who has already authenticated to Boundary initiates a new RDP session to a target machine using their preferred RDP client tool.
2. Boundary will detect the connection and automatically send an API to Vault requesting a new dynamic credential with a limited lifespan (TTL).
3. Vault will use its LDAP secrets engine to request a new Windows user from the Windows AD DS server.
4. The Windows Active Directory Domain Server will respond with a new credentials (username and password) for the new user.
5. Vault will pass new credentials to Boundary.
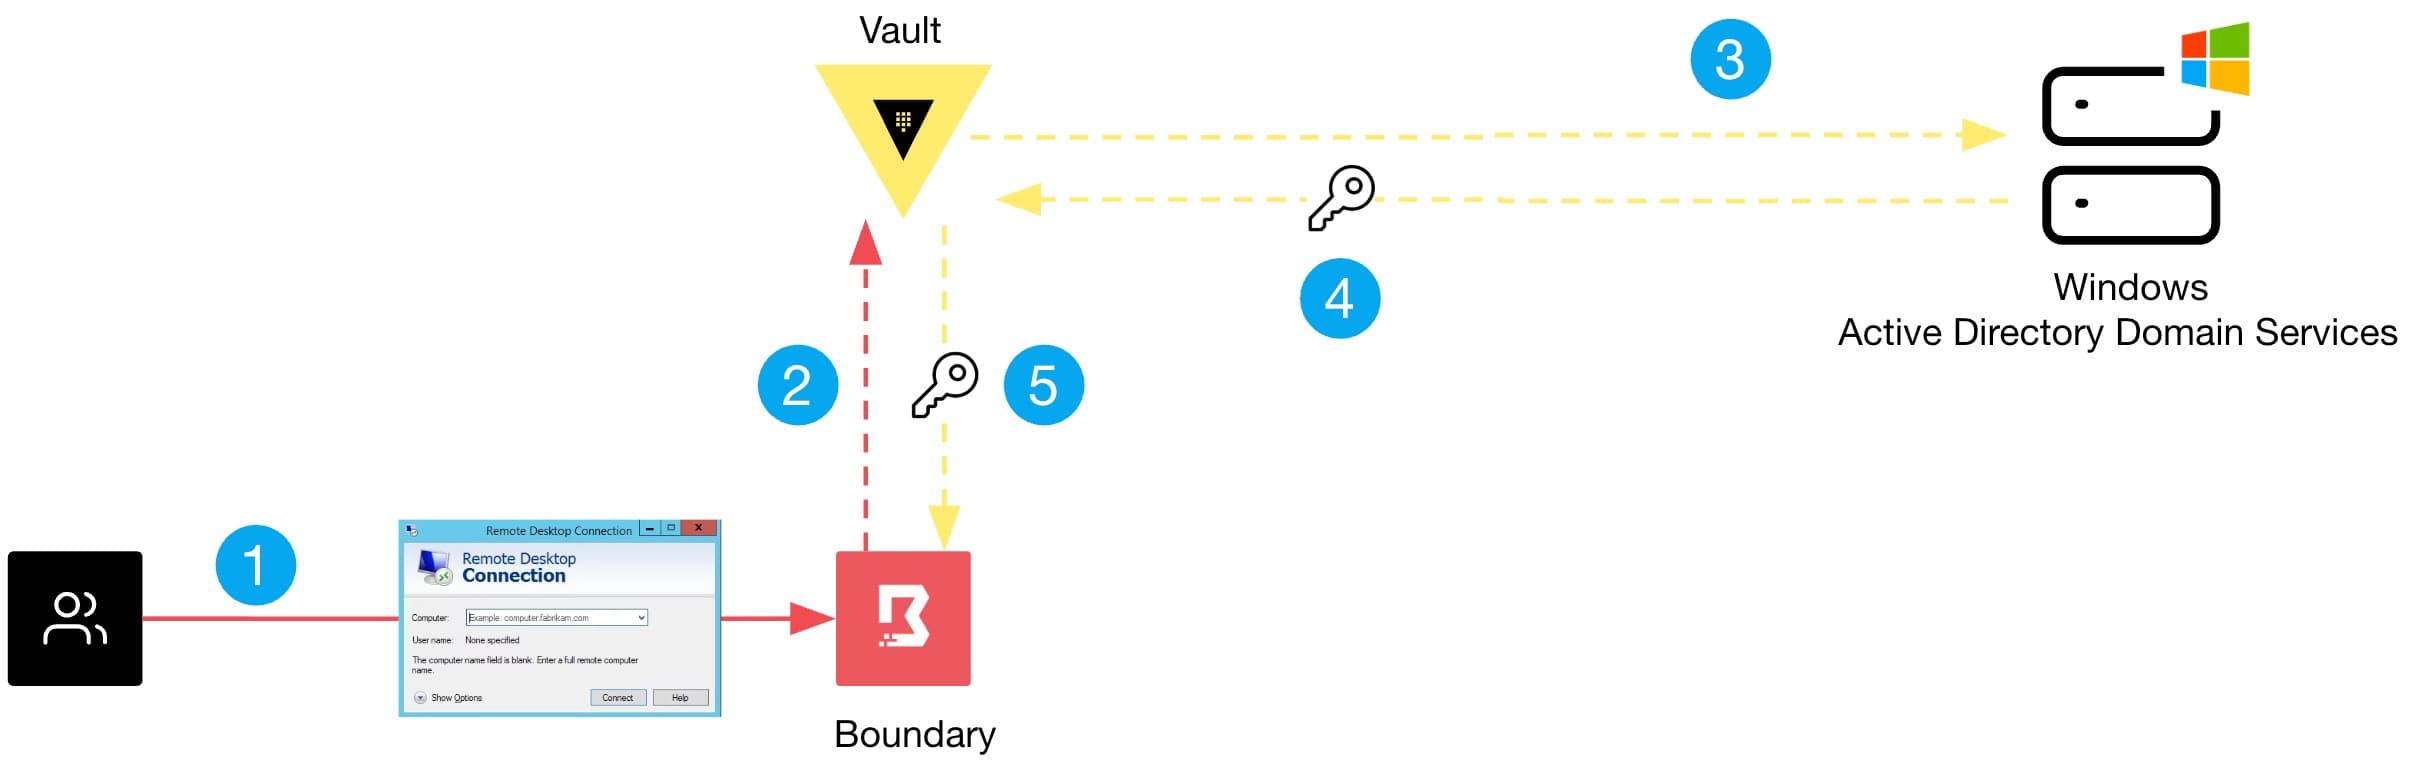
6. Boundary will proxy the RDP connection from the user’s local machine to the Windows target machine and inject credentials on behalf of the end user, resulting in a new session.
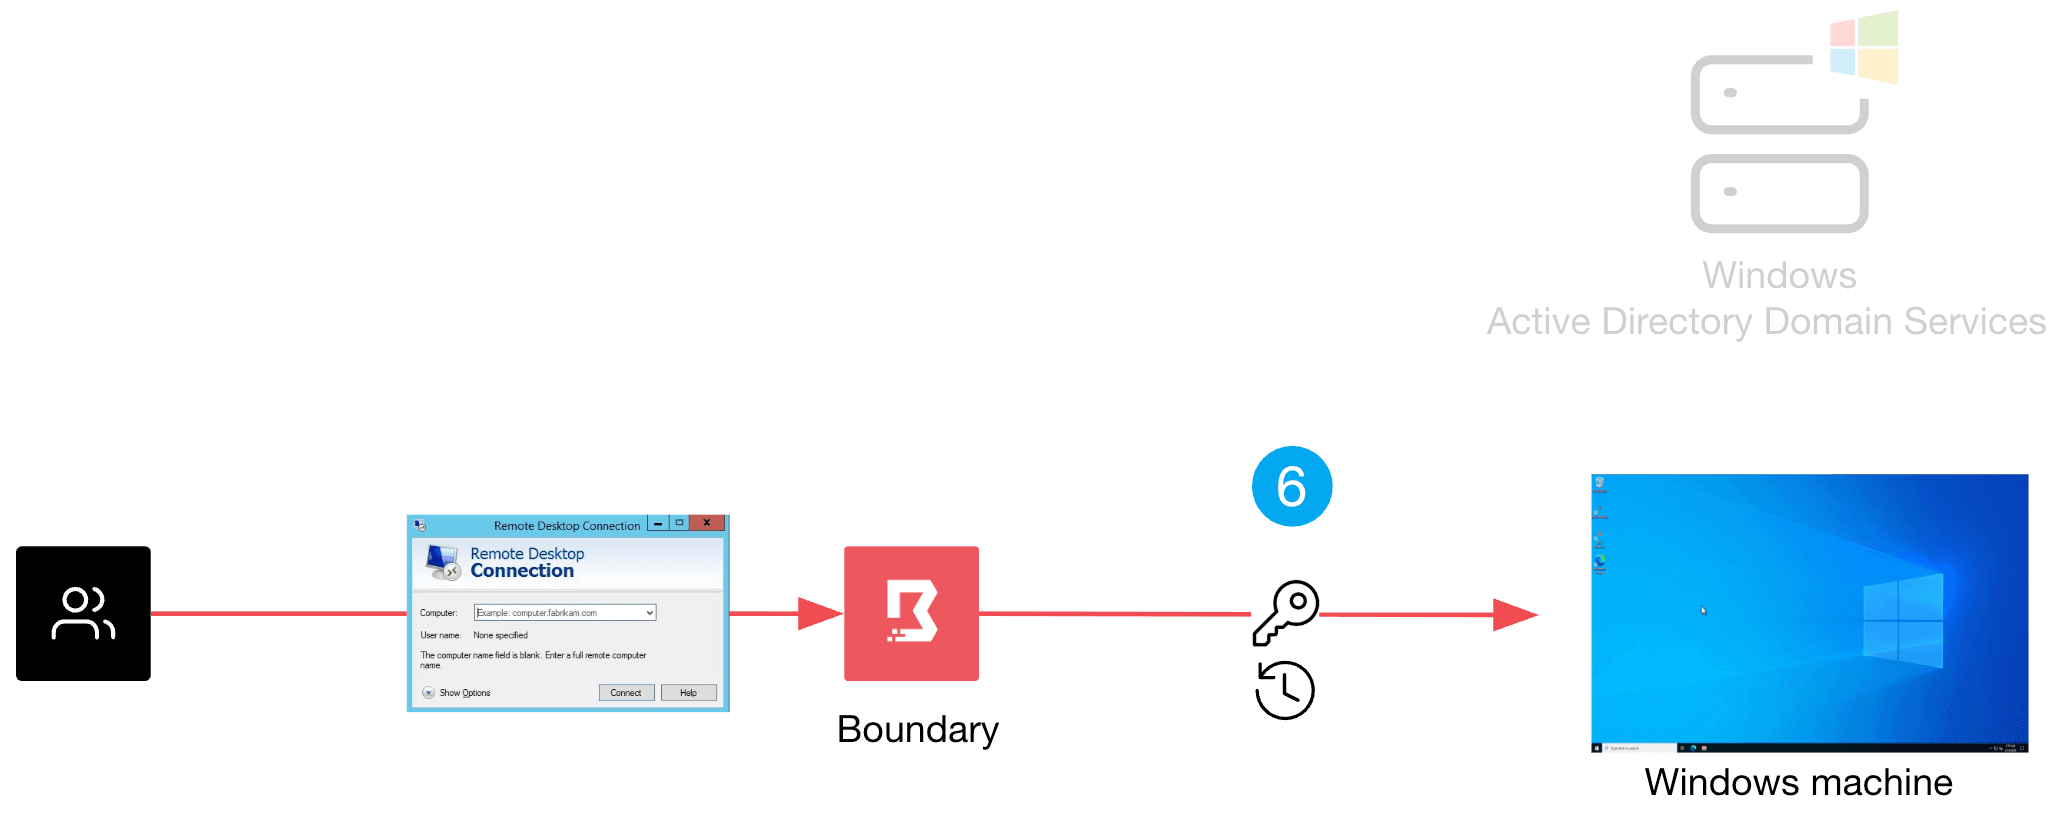
The lifespan of a session and a credential are customizable and determined by the administrator. Once a session expires, Boundary will terminate the session, and the user will need to initiate a new session. Similarly, when a credential time expires, Vault will automatically send a request to the Windows AD DS to delete the user account.
»Getting started
Want to set this up yourself? Below is a step-by-step guide to set up a proof-of-concept with Boundary, Vault, and Windows AD DS. For simplicity and brevity purposes, the steps provided may not include every security best practice. You can adjust accordingly to meet security requirements in your environment. We also strongly recommend that you test this in a non-production environment.
Prerequisites:
Basic knowledge on Boundary and Vault.
A Vault server (version 1.21+). HCP Vault is the easiest and quickest to get running.
Vault installed on your local machine. You will need it to run CLI commands against your Vault server.
A Boundary instance (version 0.21+). HCP Boundary is the easiest and quickest to get running.
Boundary Desktop or CLI client installed on your local machine. These will be used to test the end user’s connection to a Windows target. Install both using Boundary Installer.
An AWS environment with CLI credentials set as environments variables. The AWS environment will be used to deploy a Windows server with Active Directory Domain Services (AD DS).
Terraform installed on local machine (version 1.13+). Terraform will be used to deploy a Windows AD DS server in your AWS environment.
Note: You can opt to use your own Windows AD DS server, but you’ll need to adjust some of the names, IPs, etc in the configuration instructions to match your setup. For simplicity, it is recommended to use the Windows AD DS server deployed by Terraform. We also recommend testing this setup in a non-production environment.
»Deploy Windows AD using Terraform
1. In your terminal, set AWS CLI credentials as environment variables:
Example:
export AWS_ACCESS_KEY_ID=ASIARKCH47FUFBMA3SET
export AWS_SECRET_ACCESS_KEY=...
export AWS_SESSION_TOKEN=...
2. Clone this repo to your local machine:
git clone https://github.com/hashicorp-education/learn-boundary-ad-ldap.git 3. Go into the learn-boundary-ad-ldap folder. Create a file called terraform.tfvars and include the lines below. Edit with your preferred region if needed. Only set a password value if you don't want a randomly generated password for the Windows AD DS server. Make sure it conforms to Microsoft complexity requirements.
aws_region ="us-east-1"
domain_name = "adldap.lab"
instance_type = "t3.medium"
password = ""
4. Run Terraform commands below to deploy a Windows AD DS server in your AWS environment.
terraform init
terraform apply
Note: Once deployed, it will take approximately 15 minutes to complete the configuration.
Example output:
Outputs:

Deployment_Status = <<EOT
================================================================
DEPLOYMENT STARTED SUCCESSFULLY
================================================================
Server IP:     100.95.220.189
Domain:        adldap.lab
Subnet CIDR:   172.31.10.0/24
Username:      Administrator
Password:      H4fE9t_3U-e*ABCDJ>uH
CA Cert: Saved to 'ca.pem' »Configure Windows AD DS server
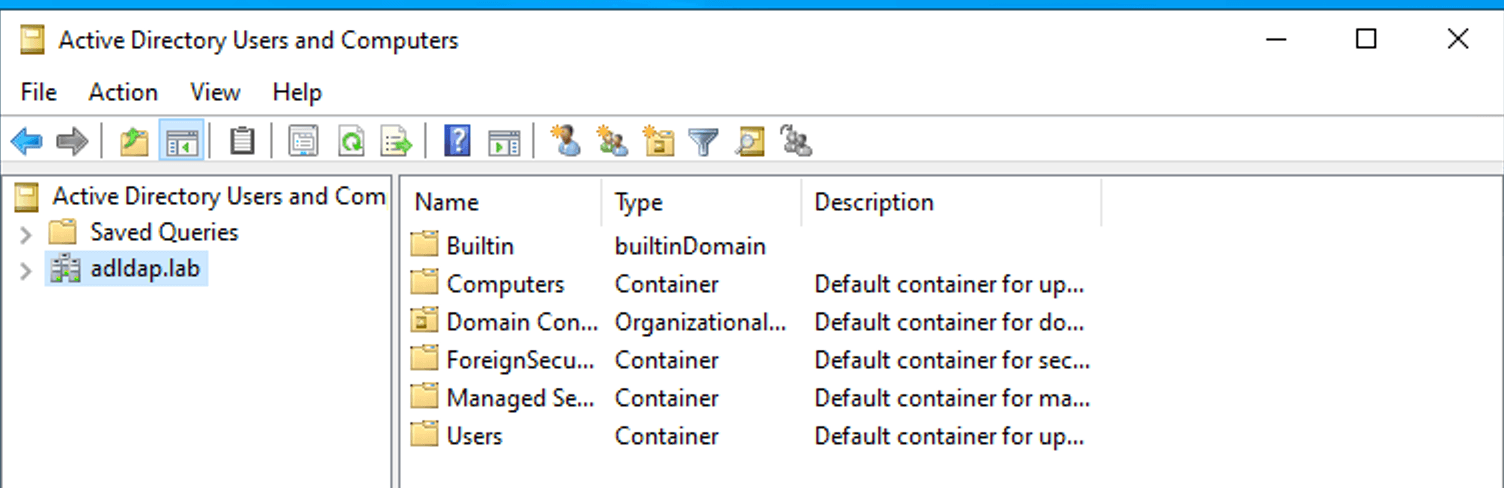
In this section, you will create a new user account (vault-svc) and two new groups (vault-user and vault-svc-admin) in Windows Active Directory. The vault-svc account and vault-svc-admin group will allow Vault to log onto Windows Active Directory and dynamically create or delete users. New users created by Vault will be placed in the vault-user group.
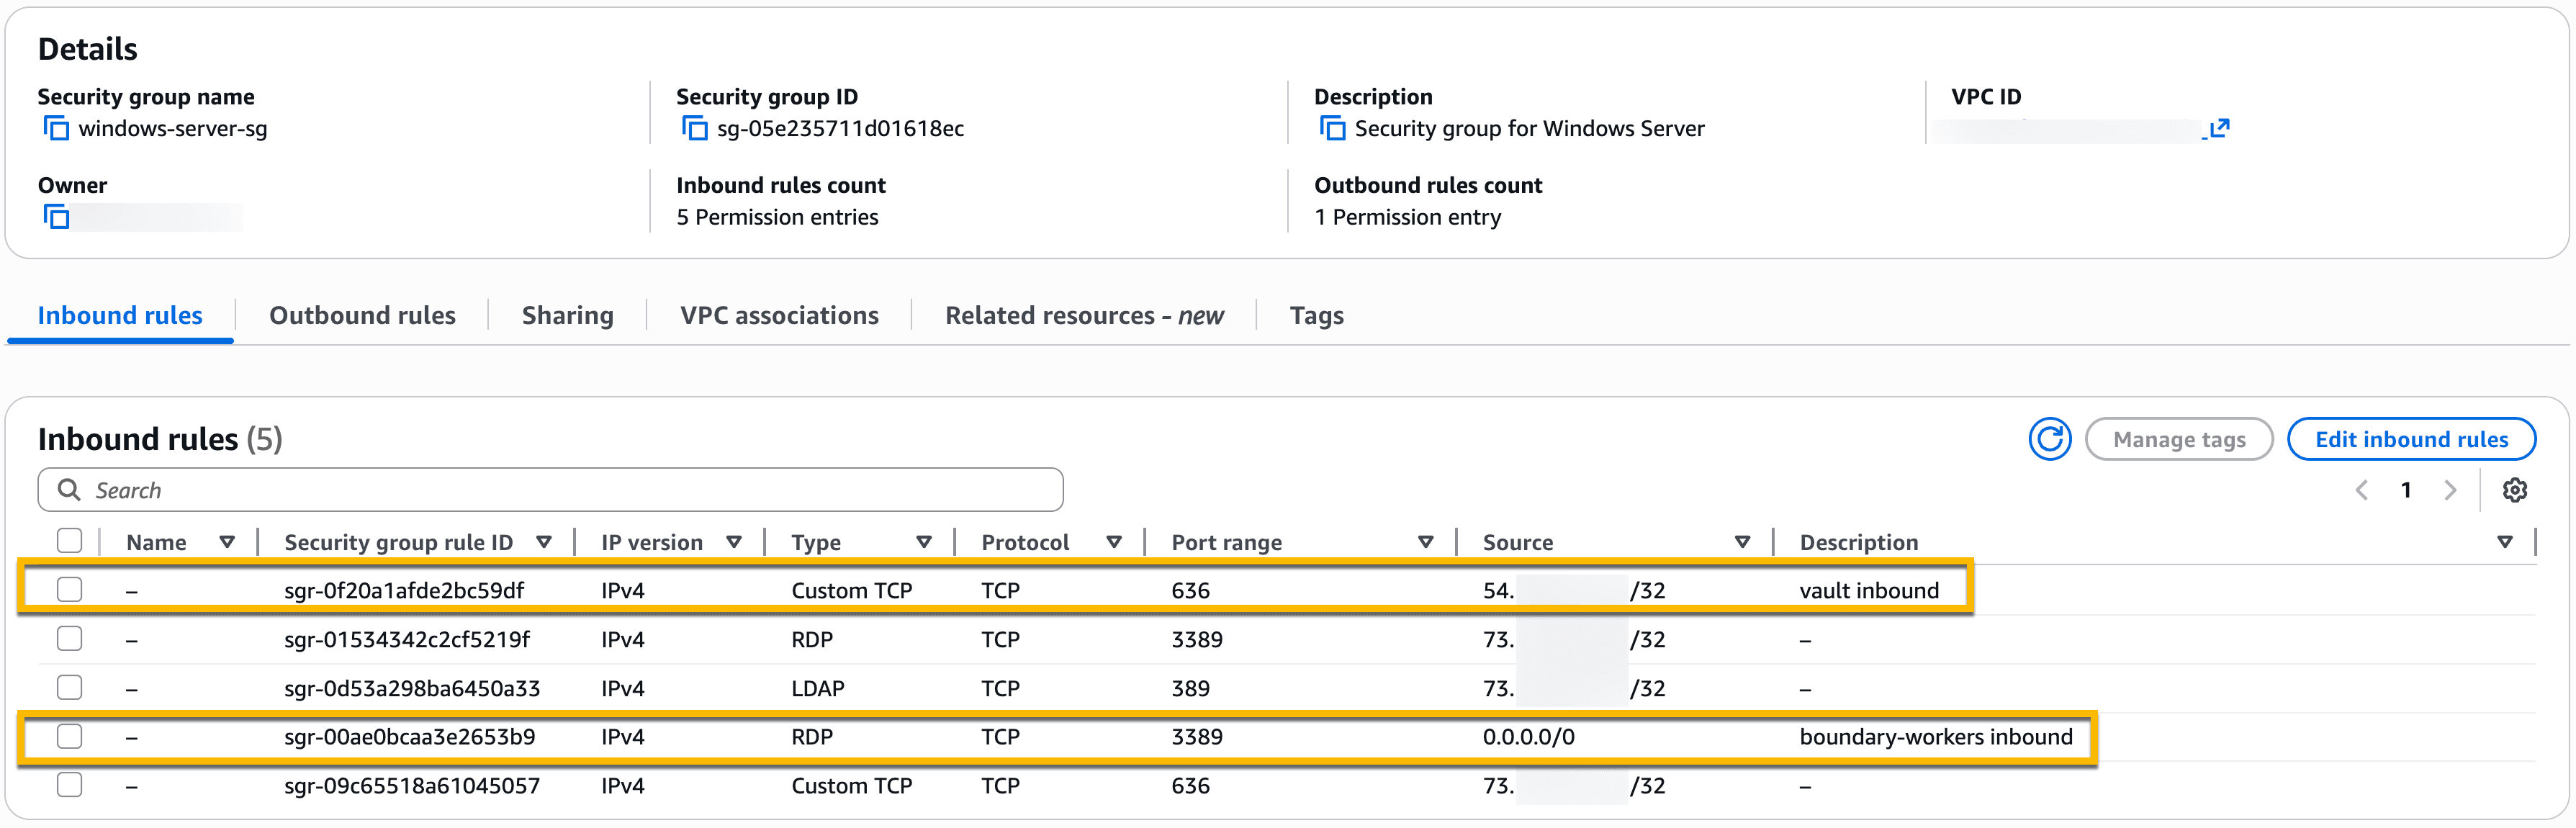
1. In your AWS environment, you should see a new EC2 instance for your Windows AD DS server. It is named ldapserver and it is part of a “windows-server-sg" security group. Update the “windows-server-sg" security group:
2. Add a new inbound rule allowing Custom TCP port 636 with the Source set to your Vault server’s IP address. This will allow inbound access from your Vault server on port 636 to the Windows AD DS server.
3. Add new inbound rule allowing RDP on port 3389 with the Source set to 0.0.0.0/0. This will provide RDP access to the Windows AD server from any Boundary worker. If preferred, you can narrow it down to specific IP addresses of your Boundary workers.
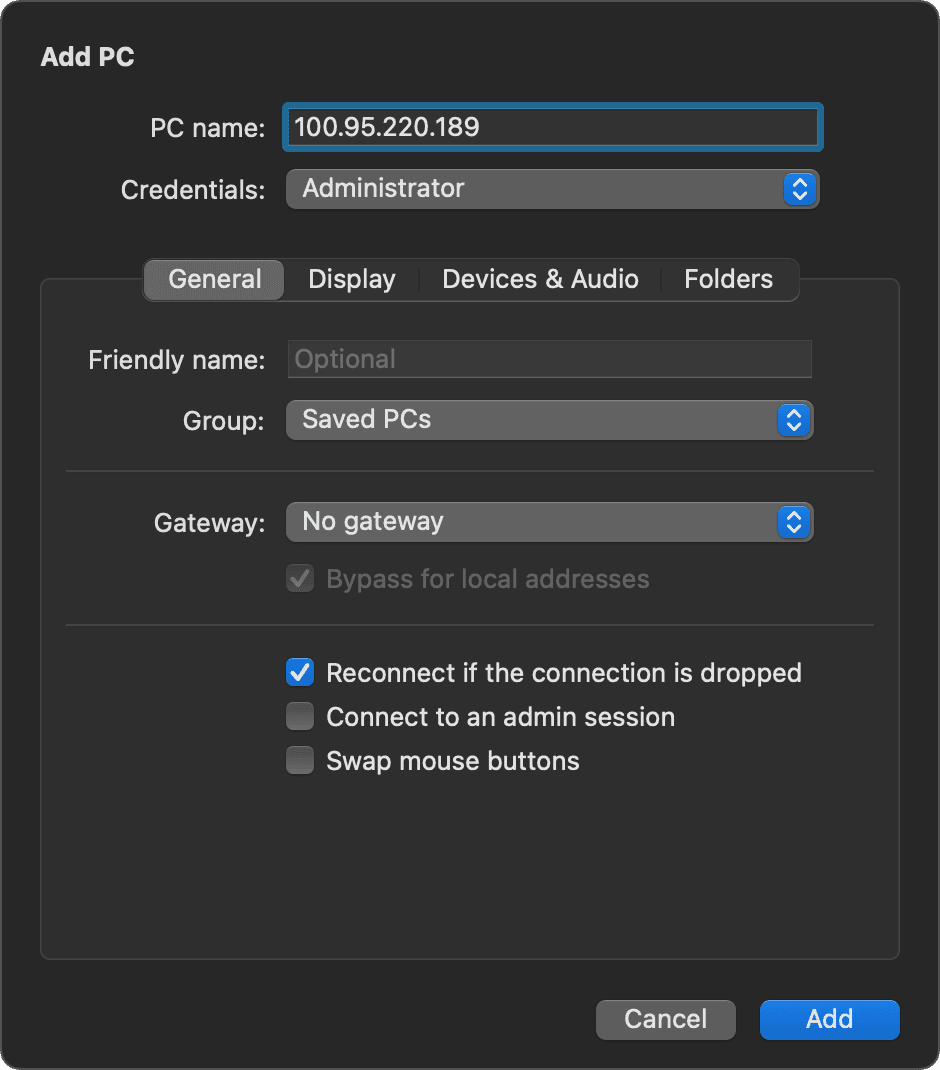
4. Log on to your Windows AD DS server via the Remote Desktop Connection tool (or Windows App if you are on a MacOS). Refer to the server IP address and username/password provided by the Terraform output.
5. Example of Windows App RDP client on MacOS:
6. Once logged onto the Windows AD DS server, open the Active Directory Administrative Center. Create a new user:
On left side panel, double-click on adlap (local)
Right-click on Users
Select New
Select User
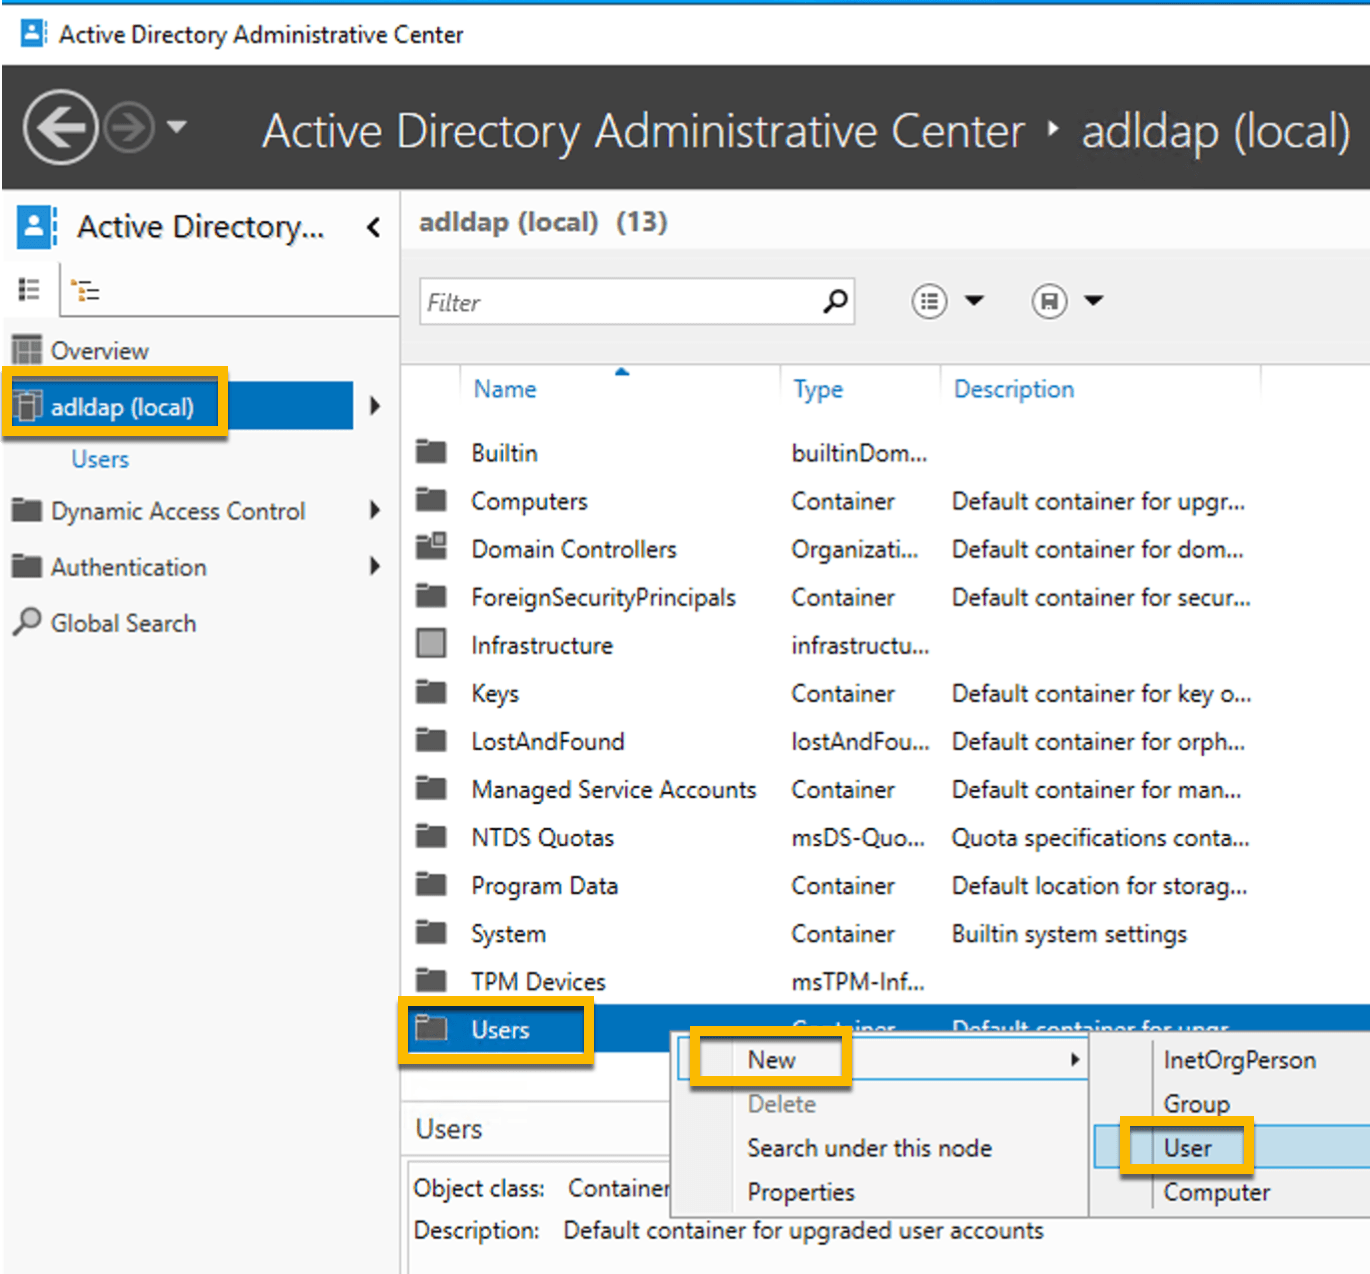
Note: Vault will be using this service account to create and delete users in Windows Active Directory (AD).
7. Enter the following fields.
Full name:
vault-svcUser UPN logon:
vault-svcPassword:
P@ssw0rd123Password options:
Other password options
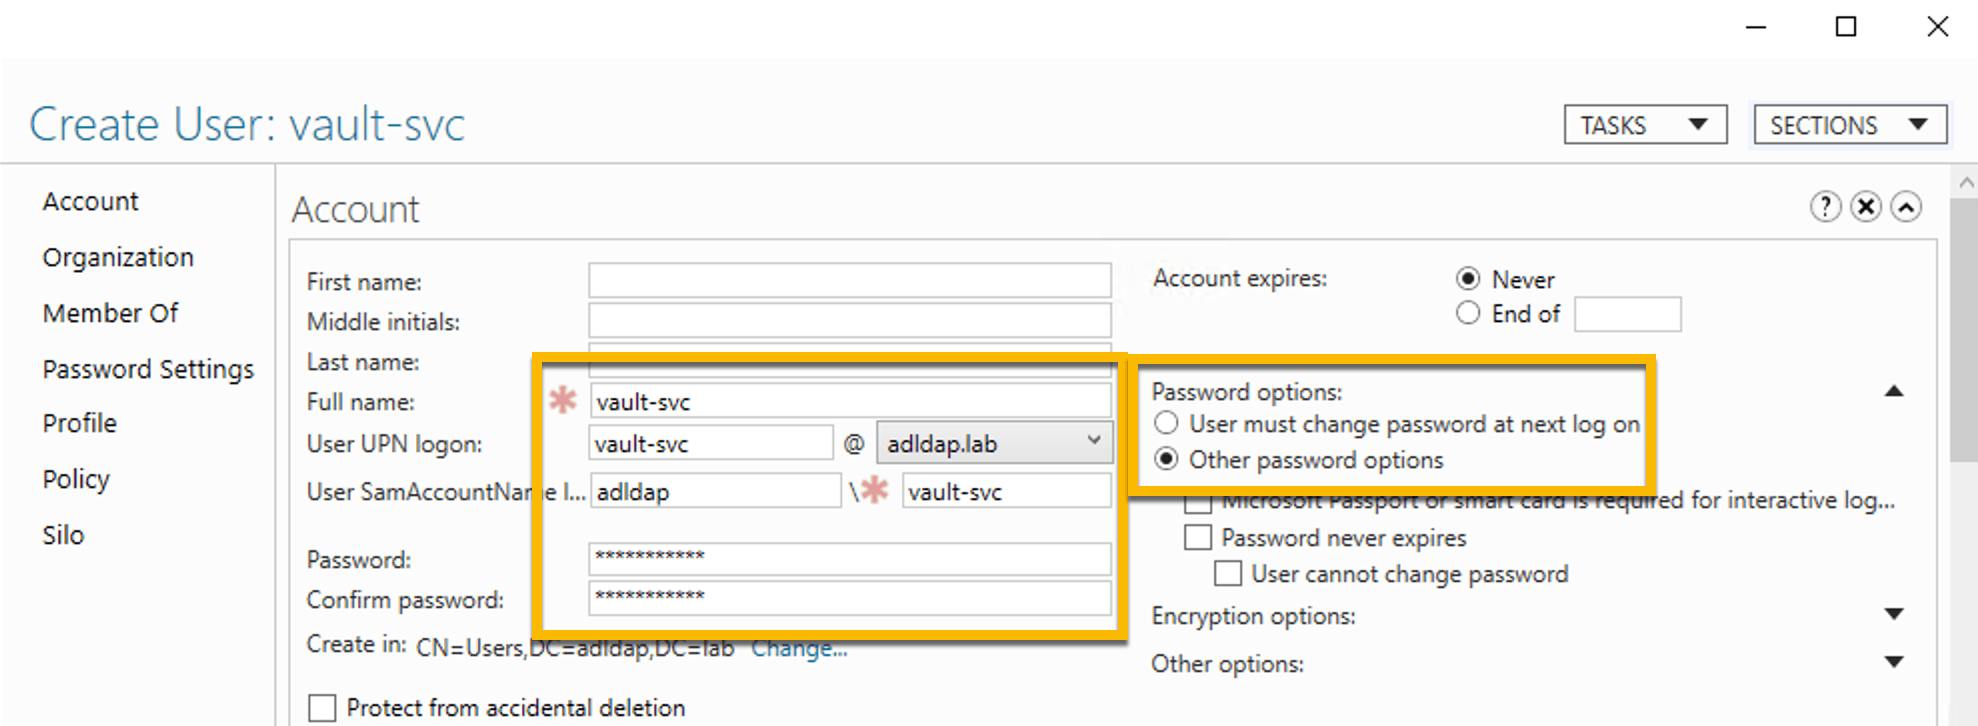
Note: The password P@ssw0rd123 is temporary and will be rotated in subsequent steps.
8. Click OK to complete the new vault-svc user creation.
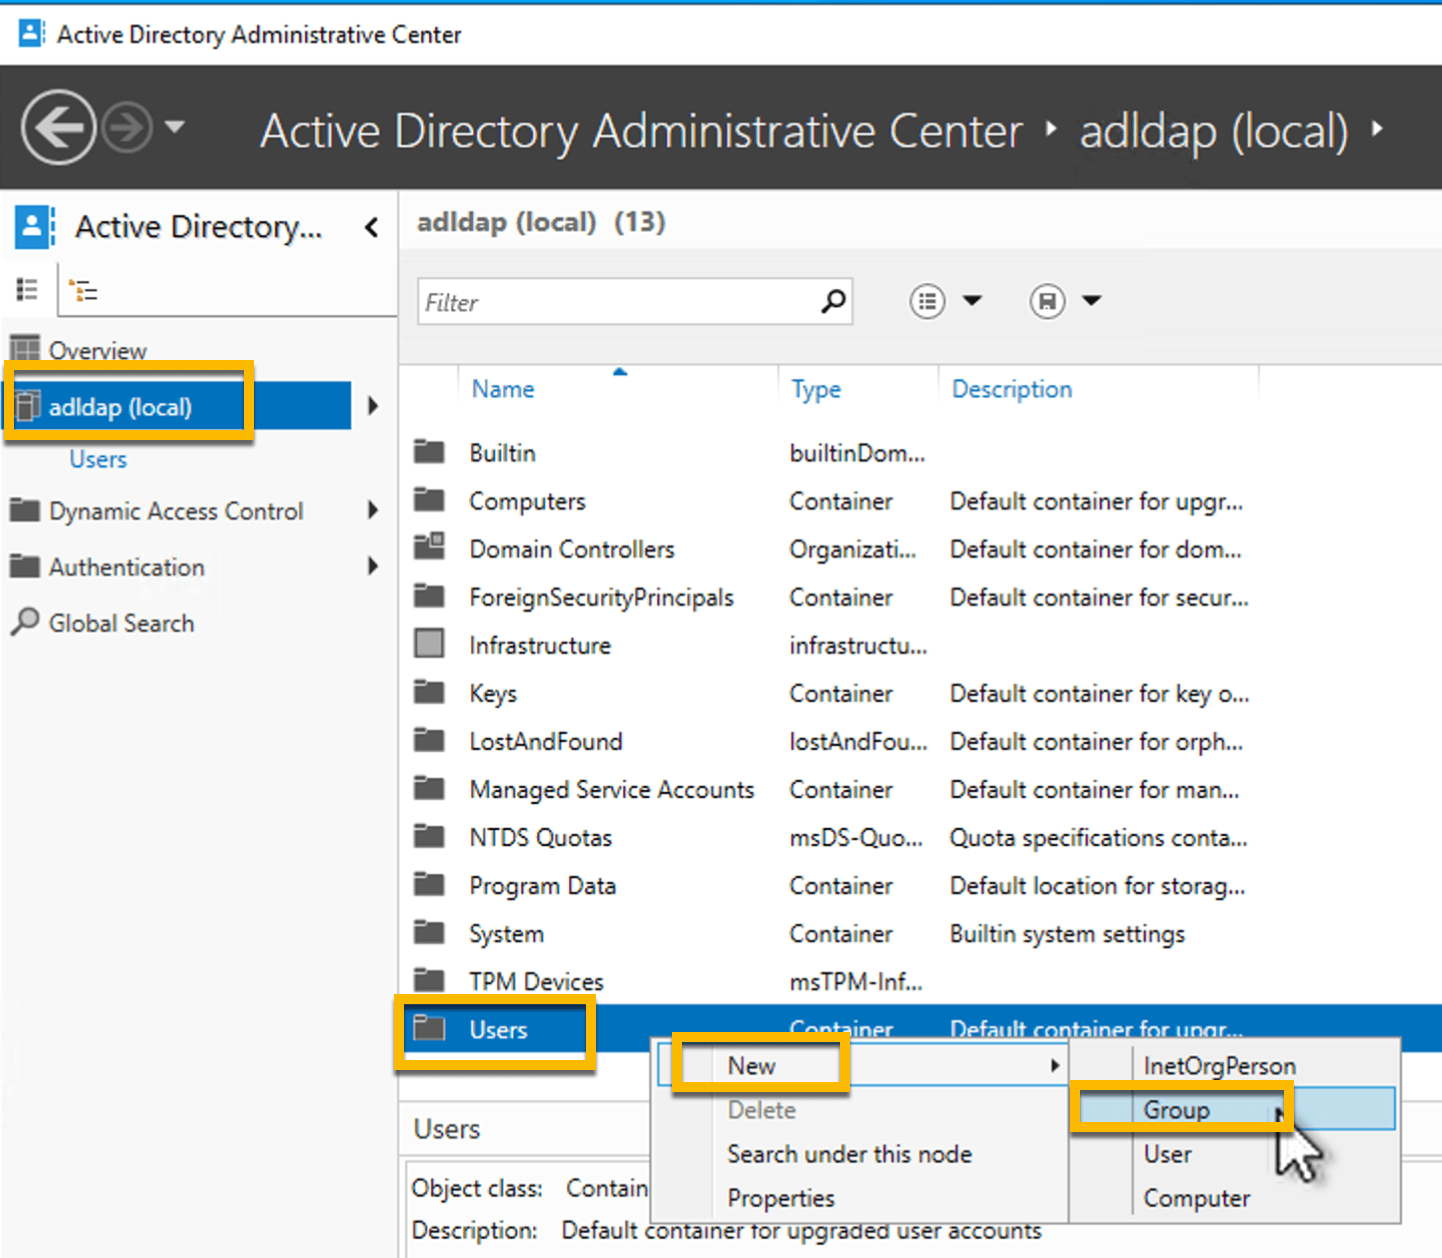
9. Create a new group from the Active Directory Administrative Center:
On left side panel, double-click on adlap (local)
Right-click on Users
Select New
Select Group
10. Enter the following fields.
Group name:
vault-svc-adminGroup (SamAccountName) name:
vault-svc-admin
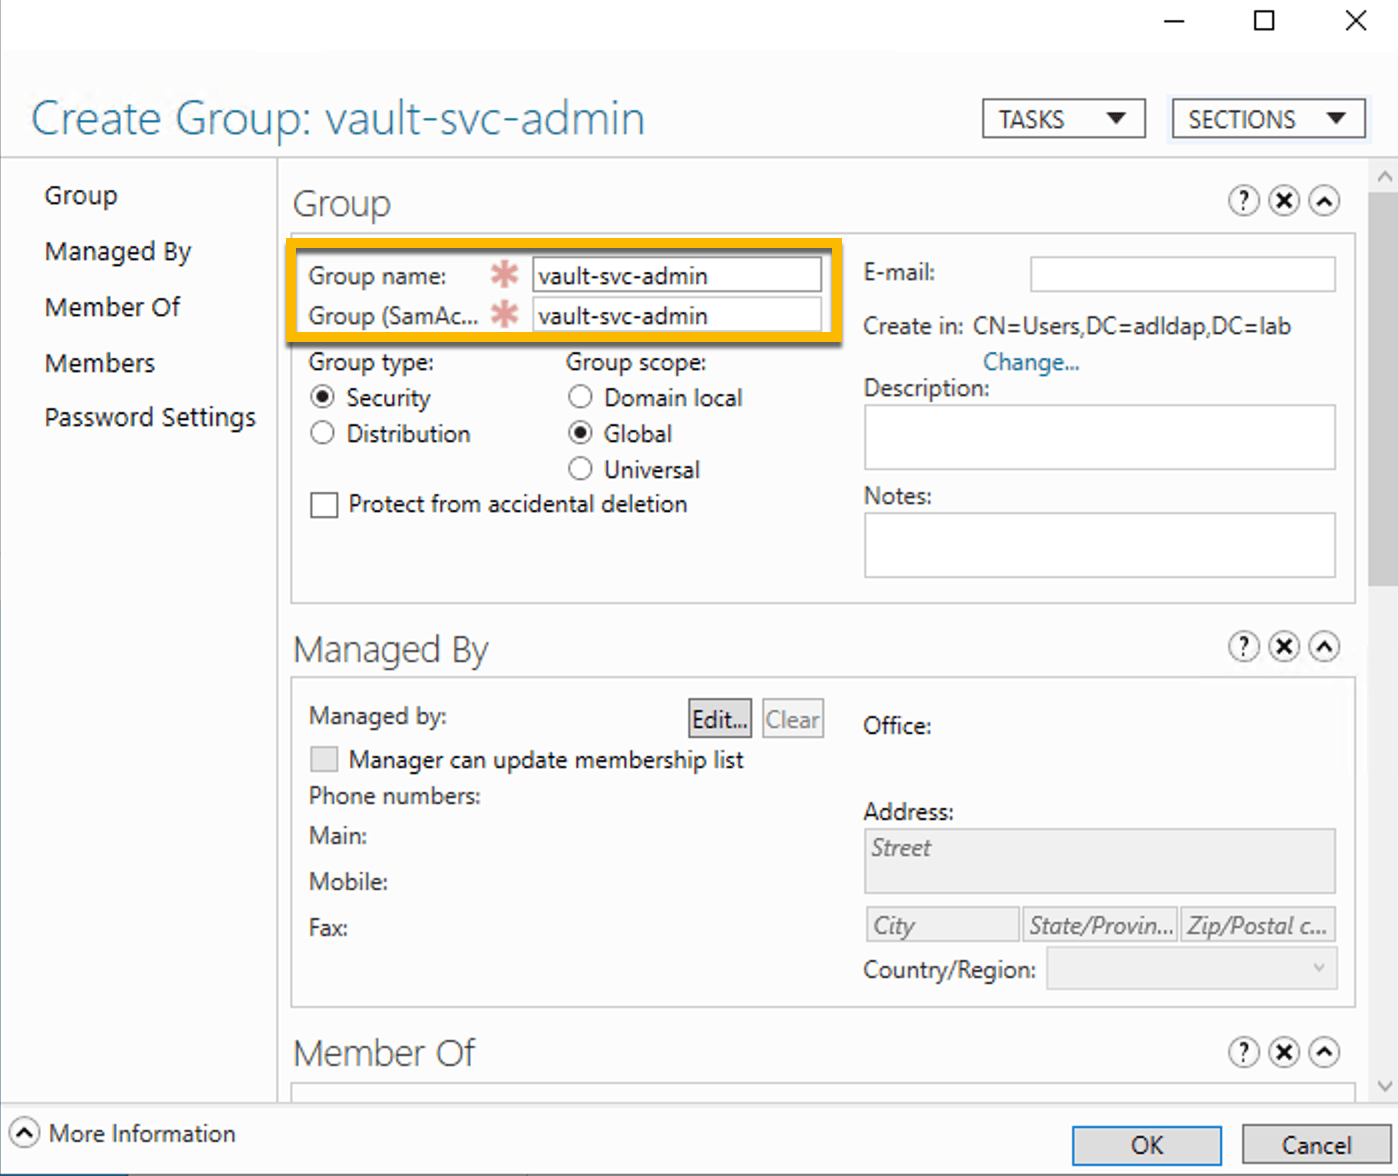
Note: The reason you are creating this group is to assign specific permissions that will allow the vault-svc account to create and delete new users.
11. Click on Members on the left panel.
Click Add
Type vault-svc into the field and click Check Names
Click OK
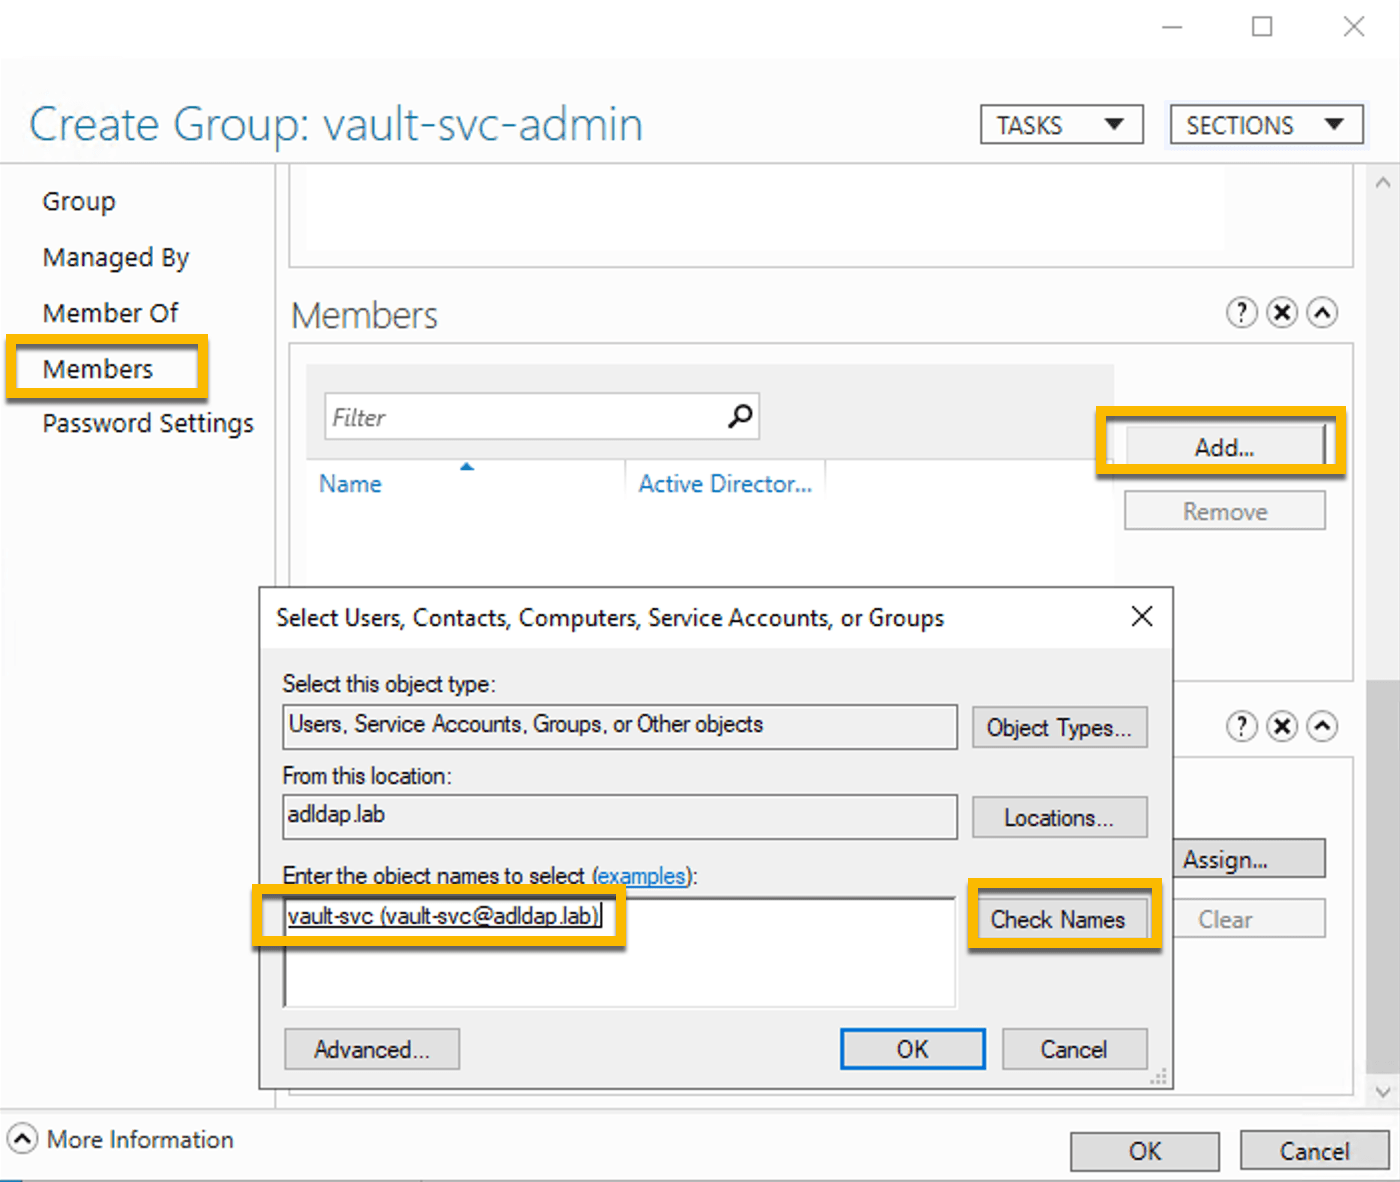
12. Click OK to complete the vault-svc-admin group creation.
13. Create another new group from the Active Directory Administrative Center:
On left side panel, double-click on adlap (local)
Right-click on Users
Select New
Select Group
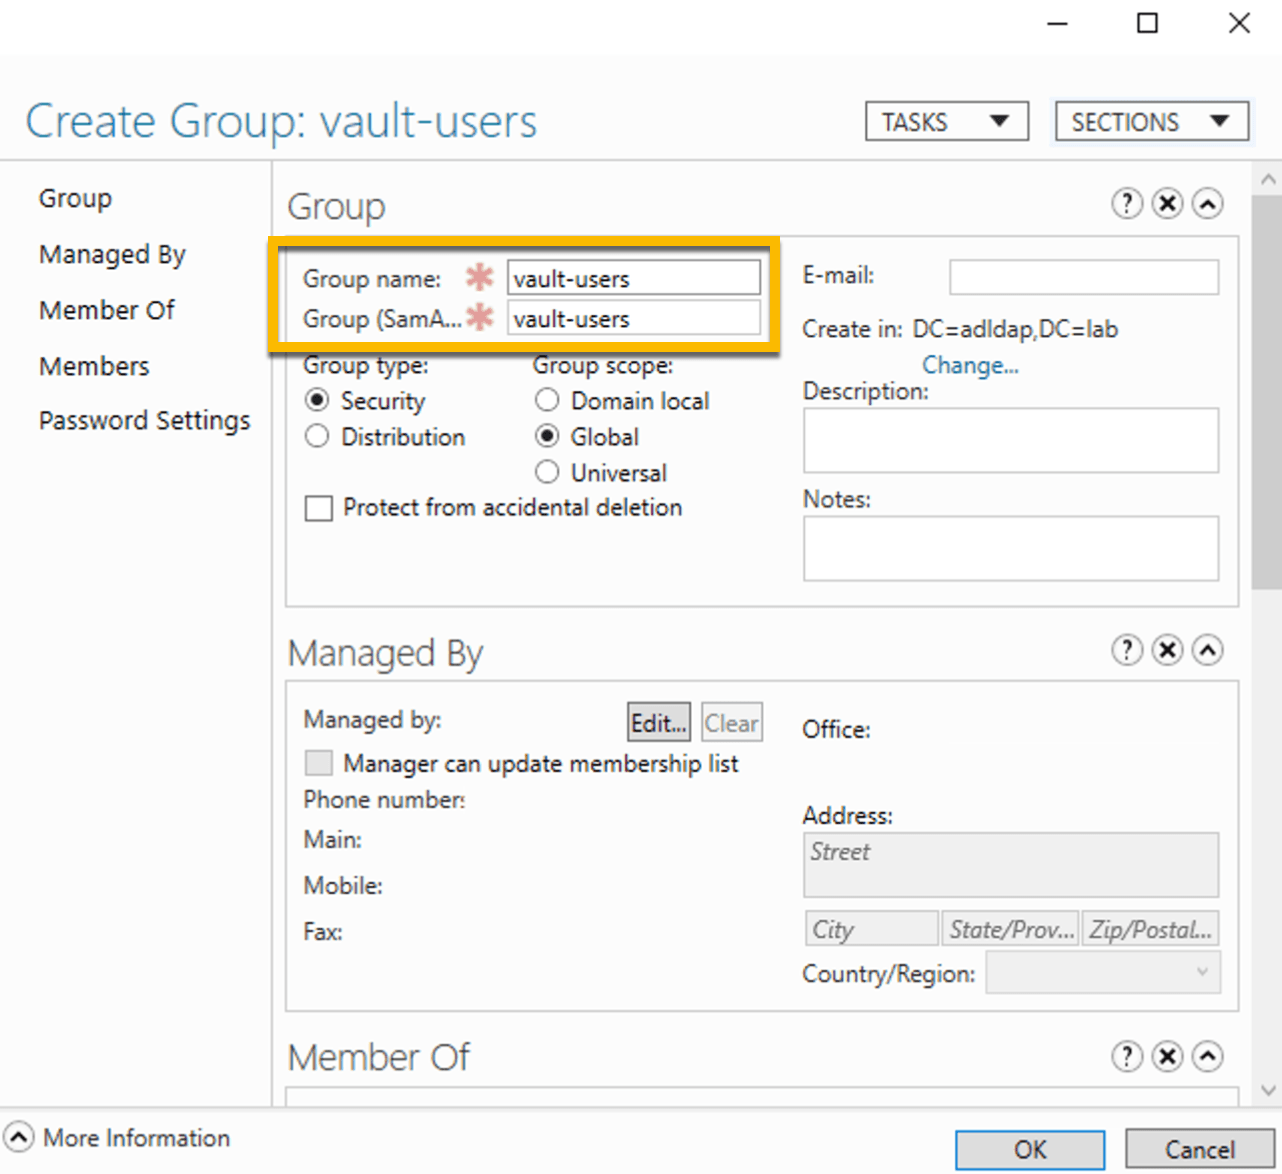
Note: The reason you are creating this group is because when a Boundary user connects to a Windows target in this domain, a temporary user account will be created in this group. This will result in a dynamic credential for the temp user account that will be passed back to Boundary for end user authentication.
14. Enter the following fields.
Group name:
vault-usersGroup (SamAccountName) name:
vault-users
15. On the left panel, click on “Members of”.
Click Add
Type Remote Desktop Users into the field and click Check Names
Click OK
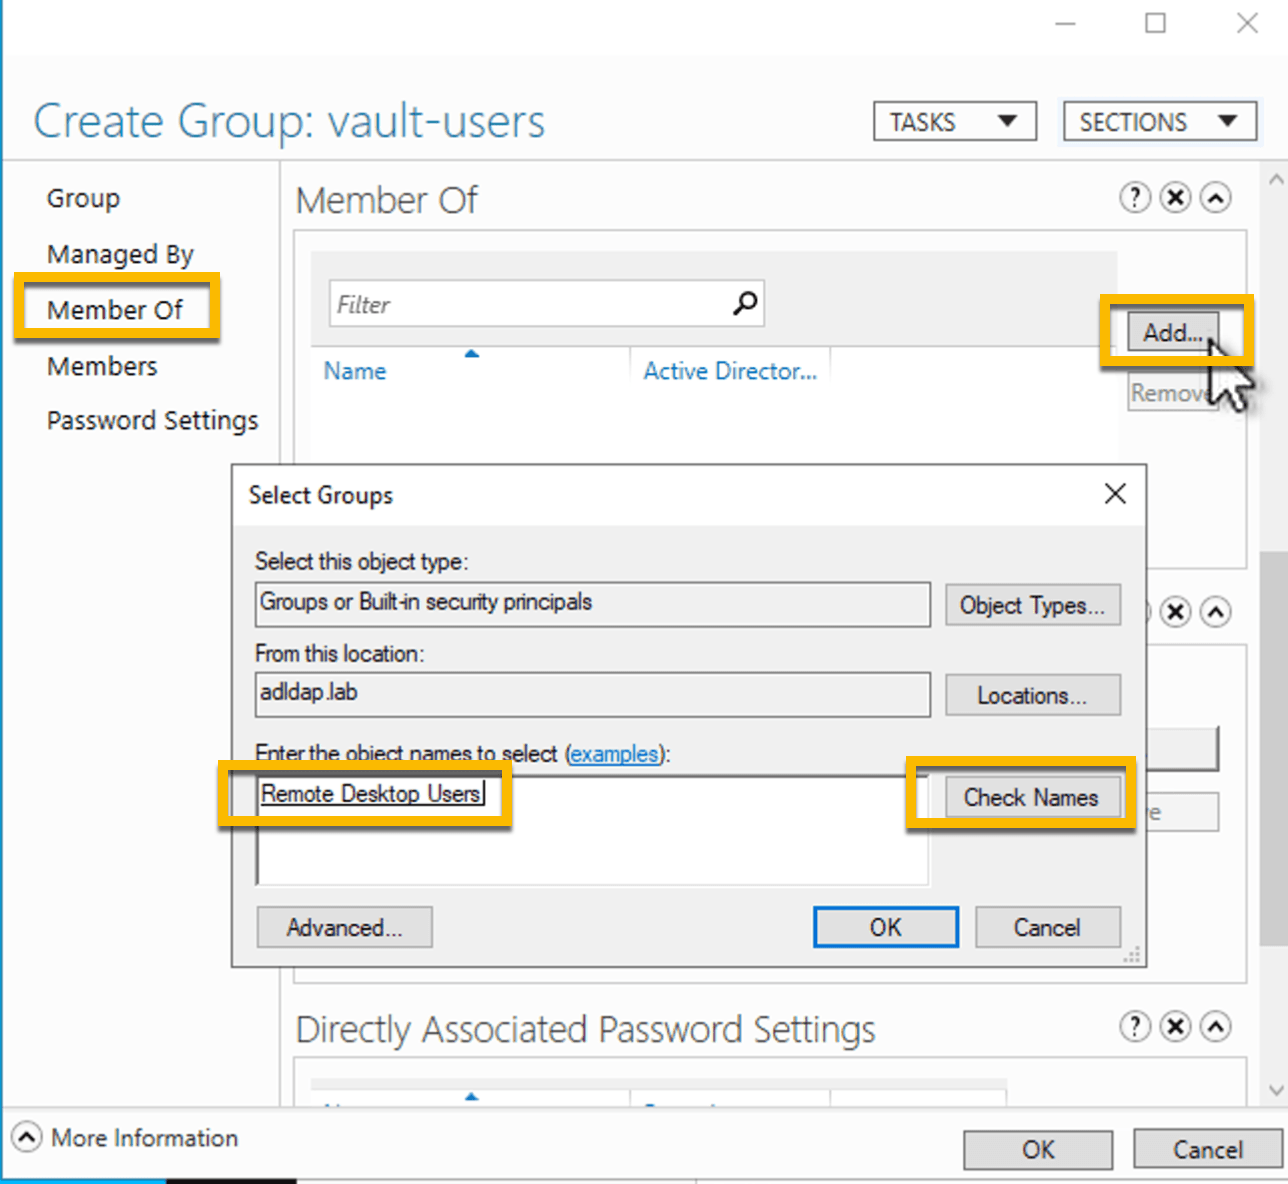
16. Click OK to complete the vault-users group creation.
17. Set permissions for the vault-svc-admin group:
In the Windows search box, type Active Directory Users and Computers and launch the

18. Right-click on adlap.lab and select Delegate Control

19. Click Next
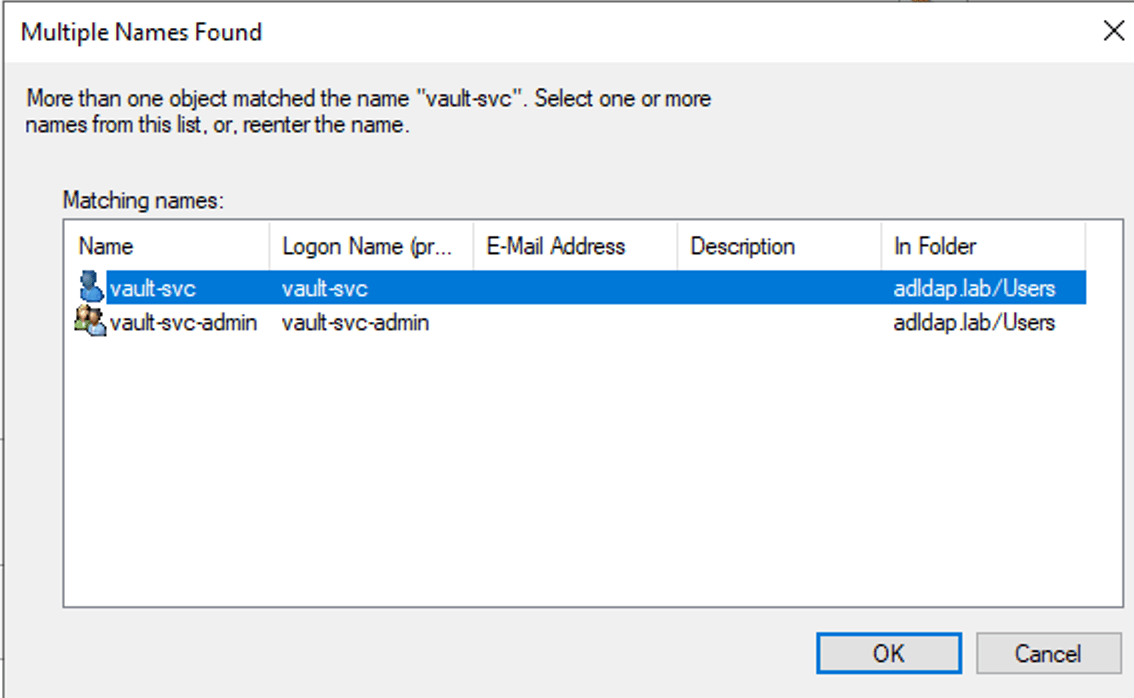
20. Click Add and enter vault-svc as the object name and click Check Names
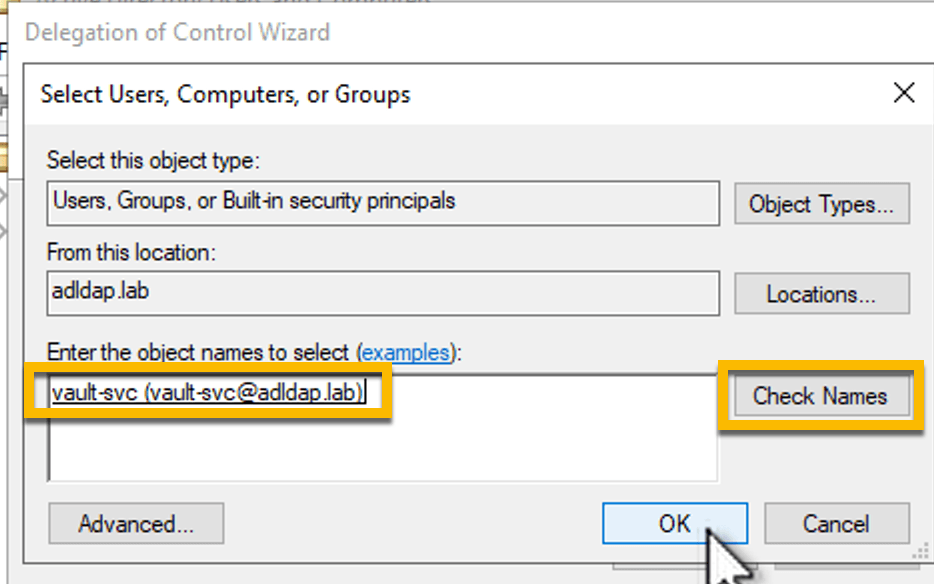
21. Select vault-svc and click OK
22. Click Next
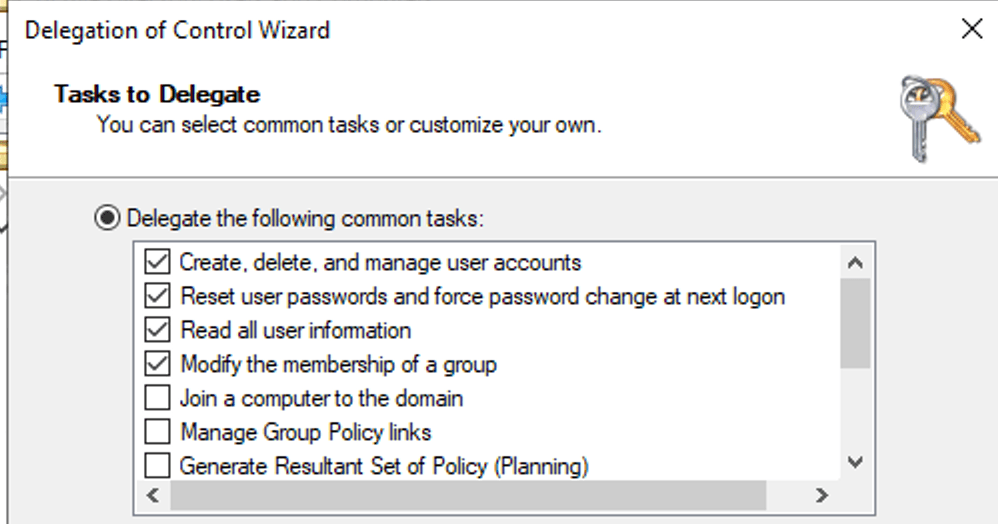
23. Select following permissions:
Create, delete, manage user accounts
Reset user passwords
Read all user information
Modify the membership of a group
24 Click Next
25. Click Finish to complete the permissions delegation process
The vault-svc-admin group now has permissions to create and delete new users. As a member of this group, the vault-svc user account will inherit the same permissions.
»Configure Vault
In this section, you will configure Vault to access Windows Active Directory using the vault-svc account.
1. Log onto your Vault cluster via browser as an administrator.
2. Go to Secrets Engines and click + Enable new engine.
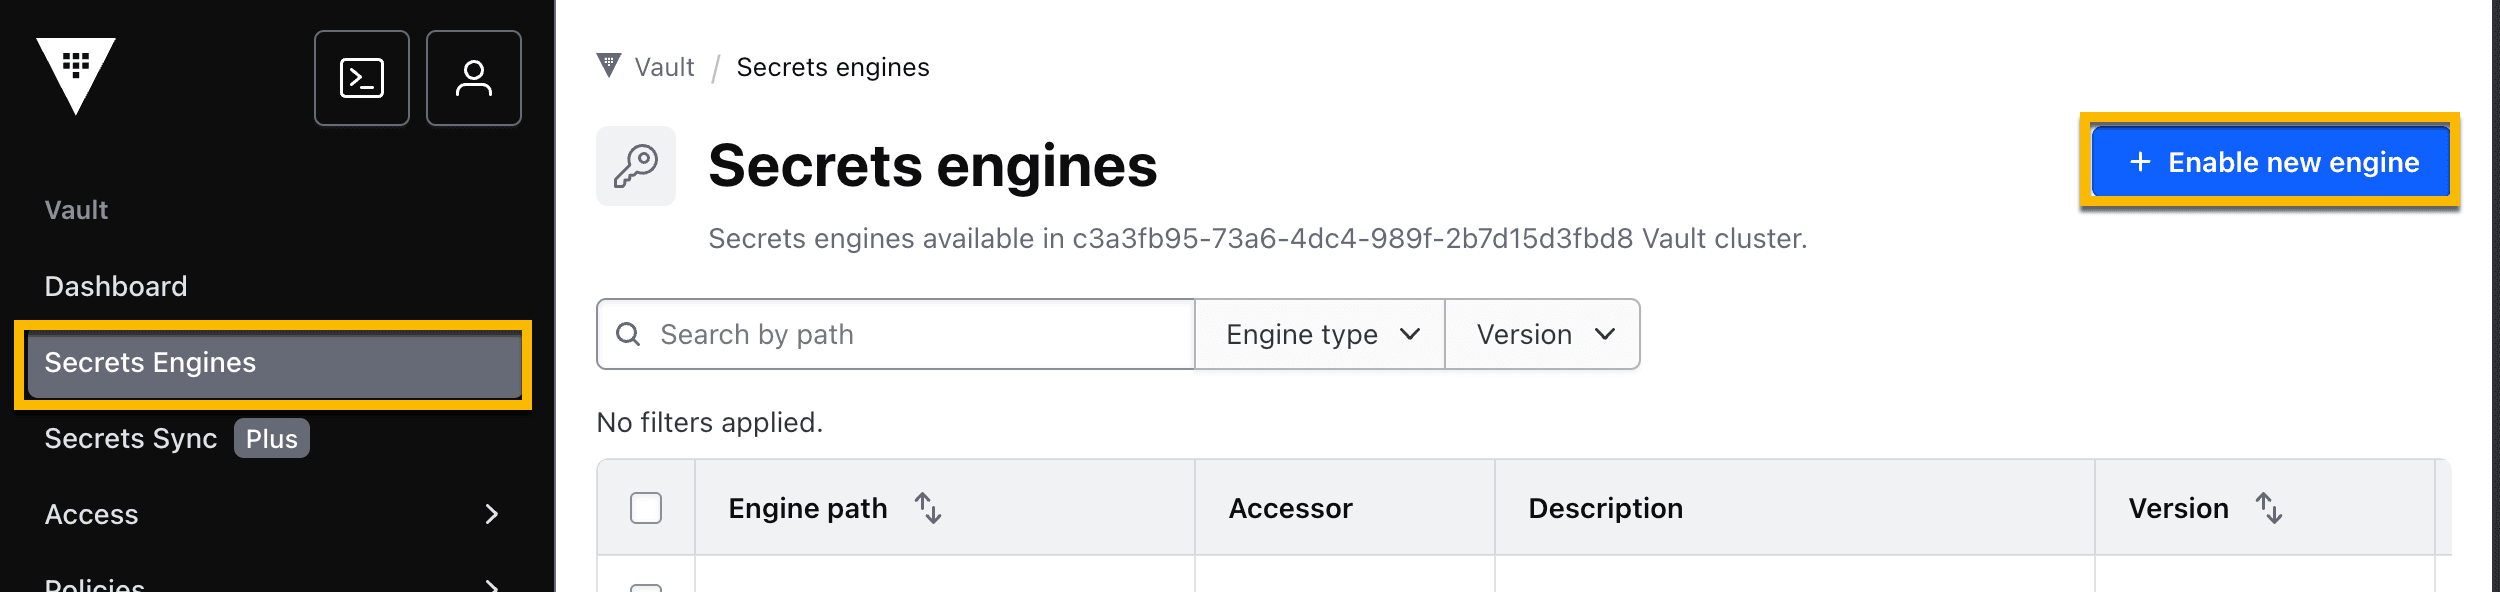
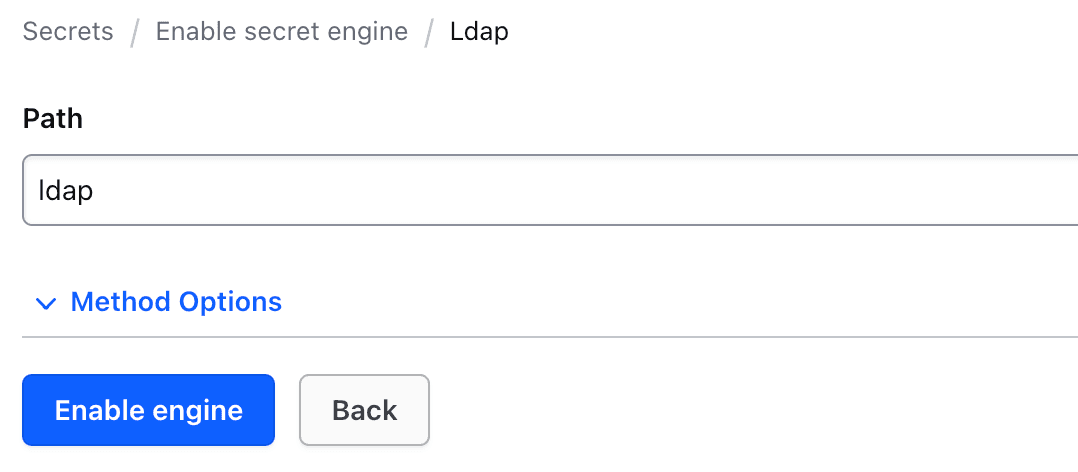
3. Select the LDAP engine.
4. Click Enable engine.
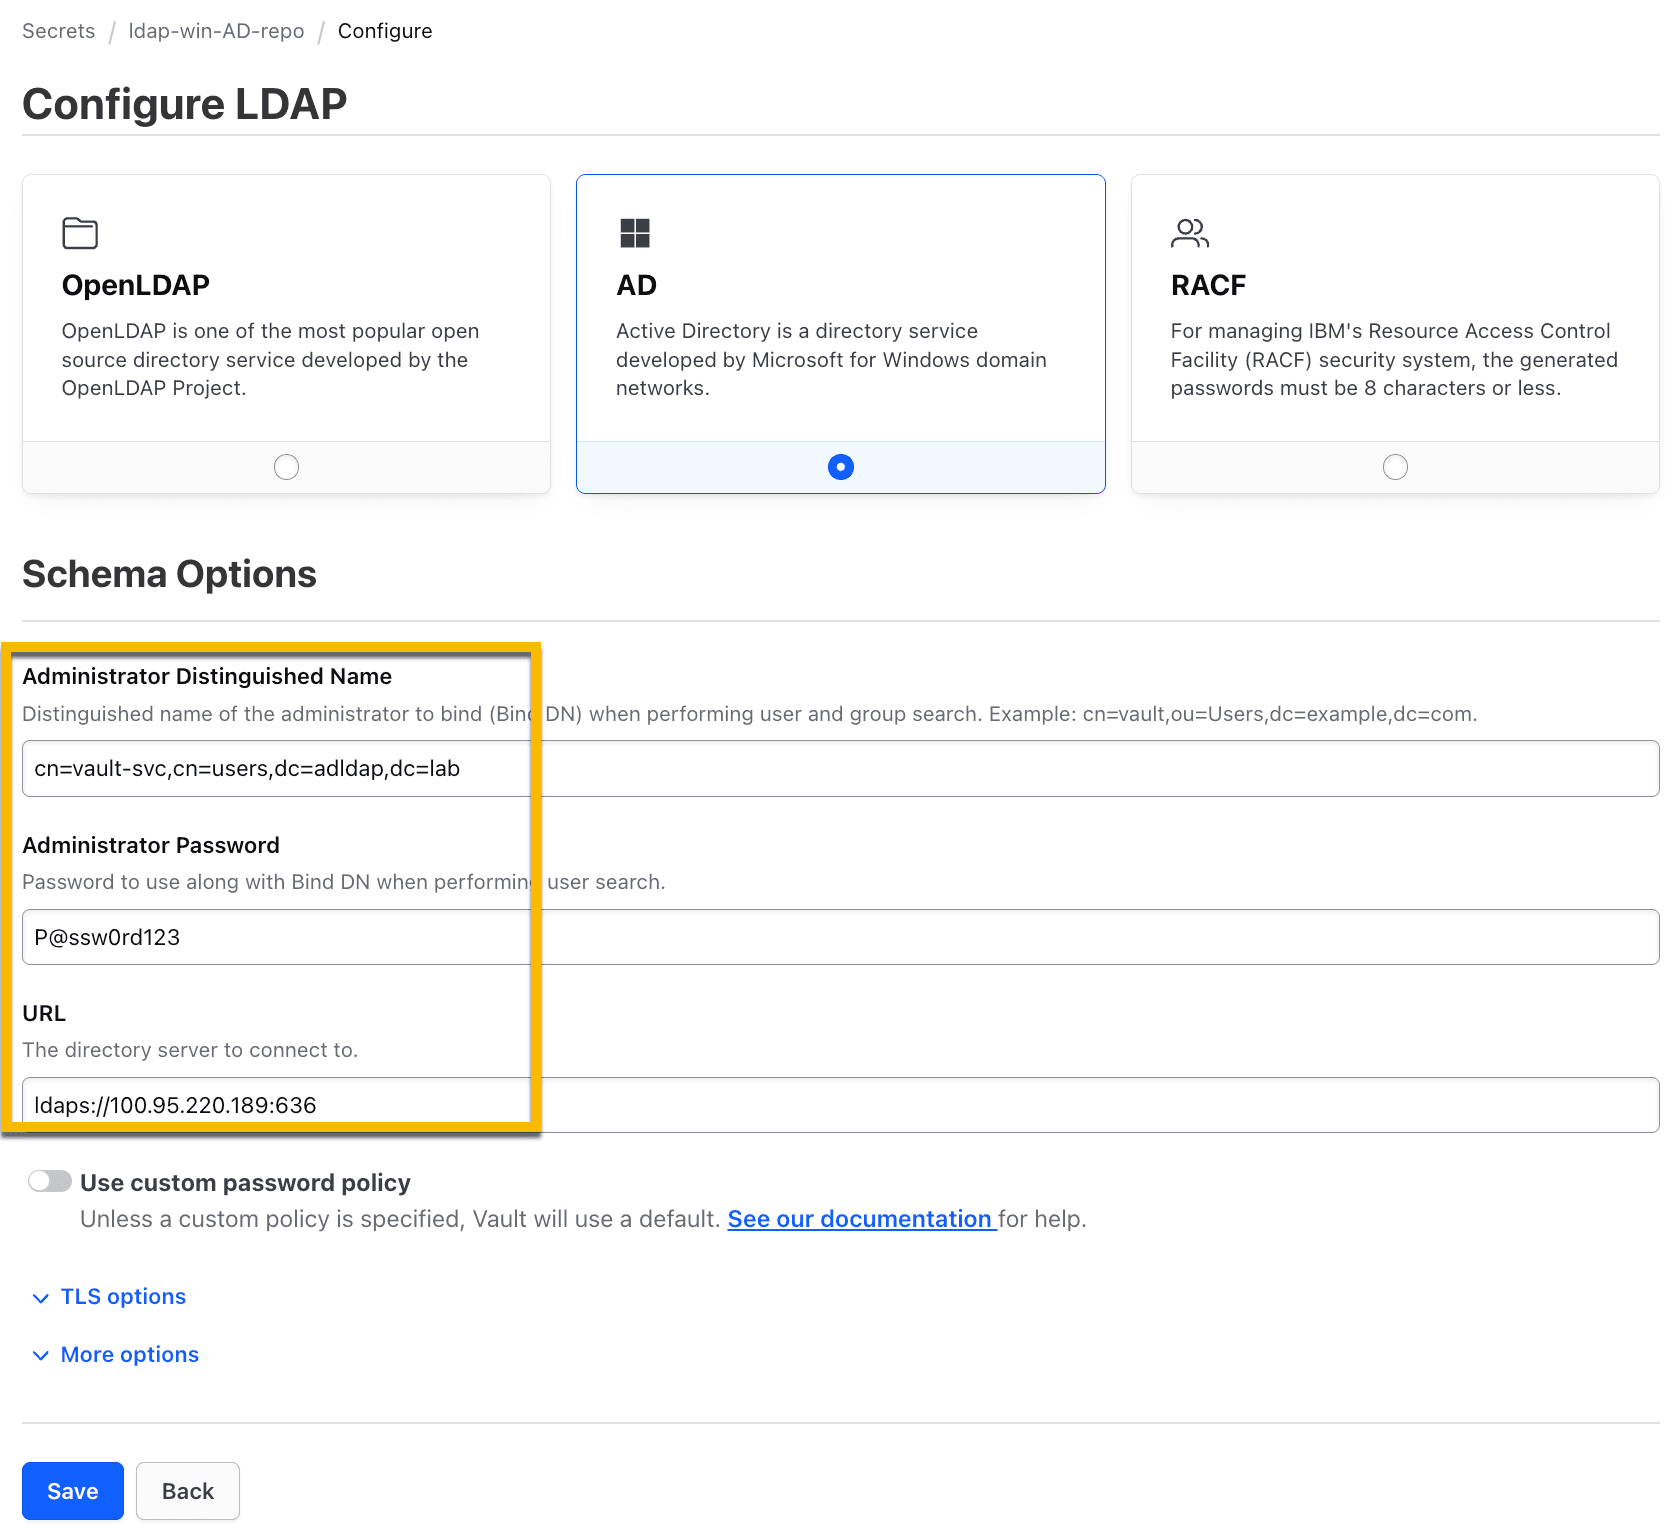
5. Once created, click Configure LDAP.
6. Select AD.
7. Enter the following fields. Make sure you replace the Win-AD-Server-IP with the IP address of your Windows AD Server.
Administrator Distinguished Name:
cn=vault-svc,cn=users,dc=adldap,dc=labAdministrator Password:
P@ssw0rd123URL:
ldaps://<Win-AD-Server-IP>:636Note 1: Your Win-AD-Server-IP was provided as an output when you deployed with Terraform.
Note 2: Use the Administrator password
P@ssw0rd123above. It is temporary and will be rotated. \
8. Click to expand TLS Options.
9. In the CA Certificate field, click Choose File, and select the ca.pem file that was created as an output when you deployed with Terraform.

10. Click Save.
Vault can now log onto the Windows AD DS server using the vault-svc account that you created in the previous section.
11. Select Save and Rotate.
Once rotated, only Vault will have the credentials to authenticate to the vault-svc account.
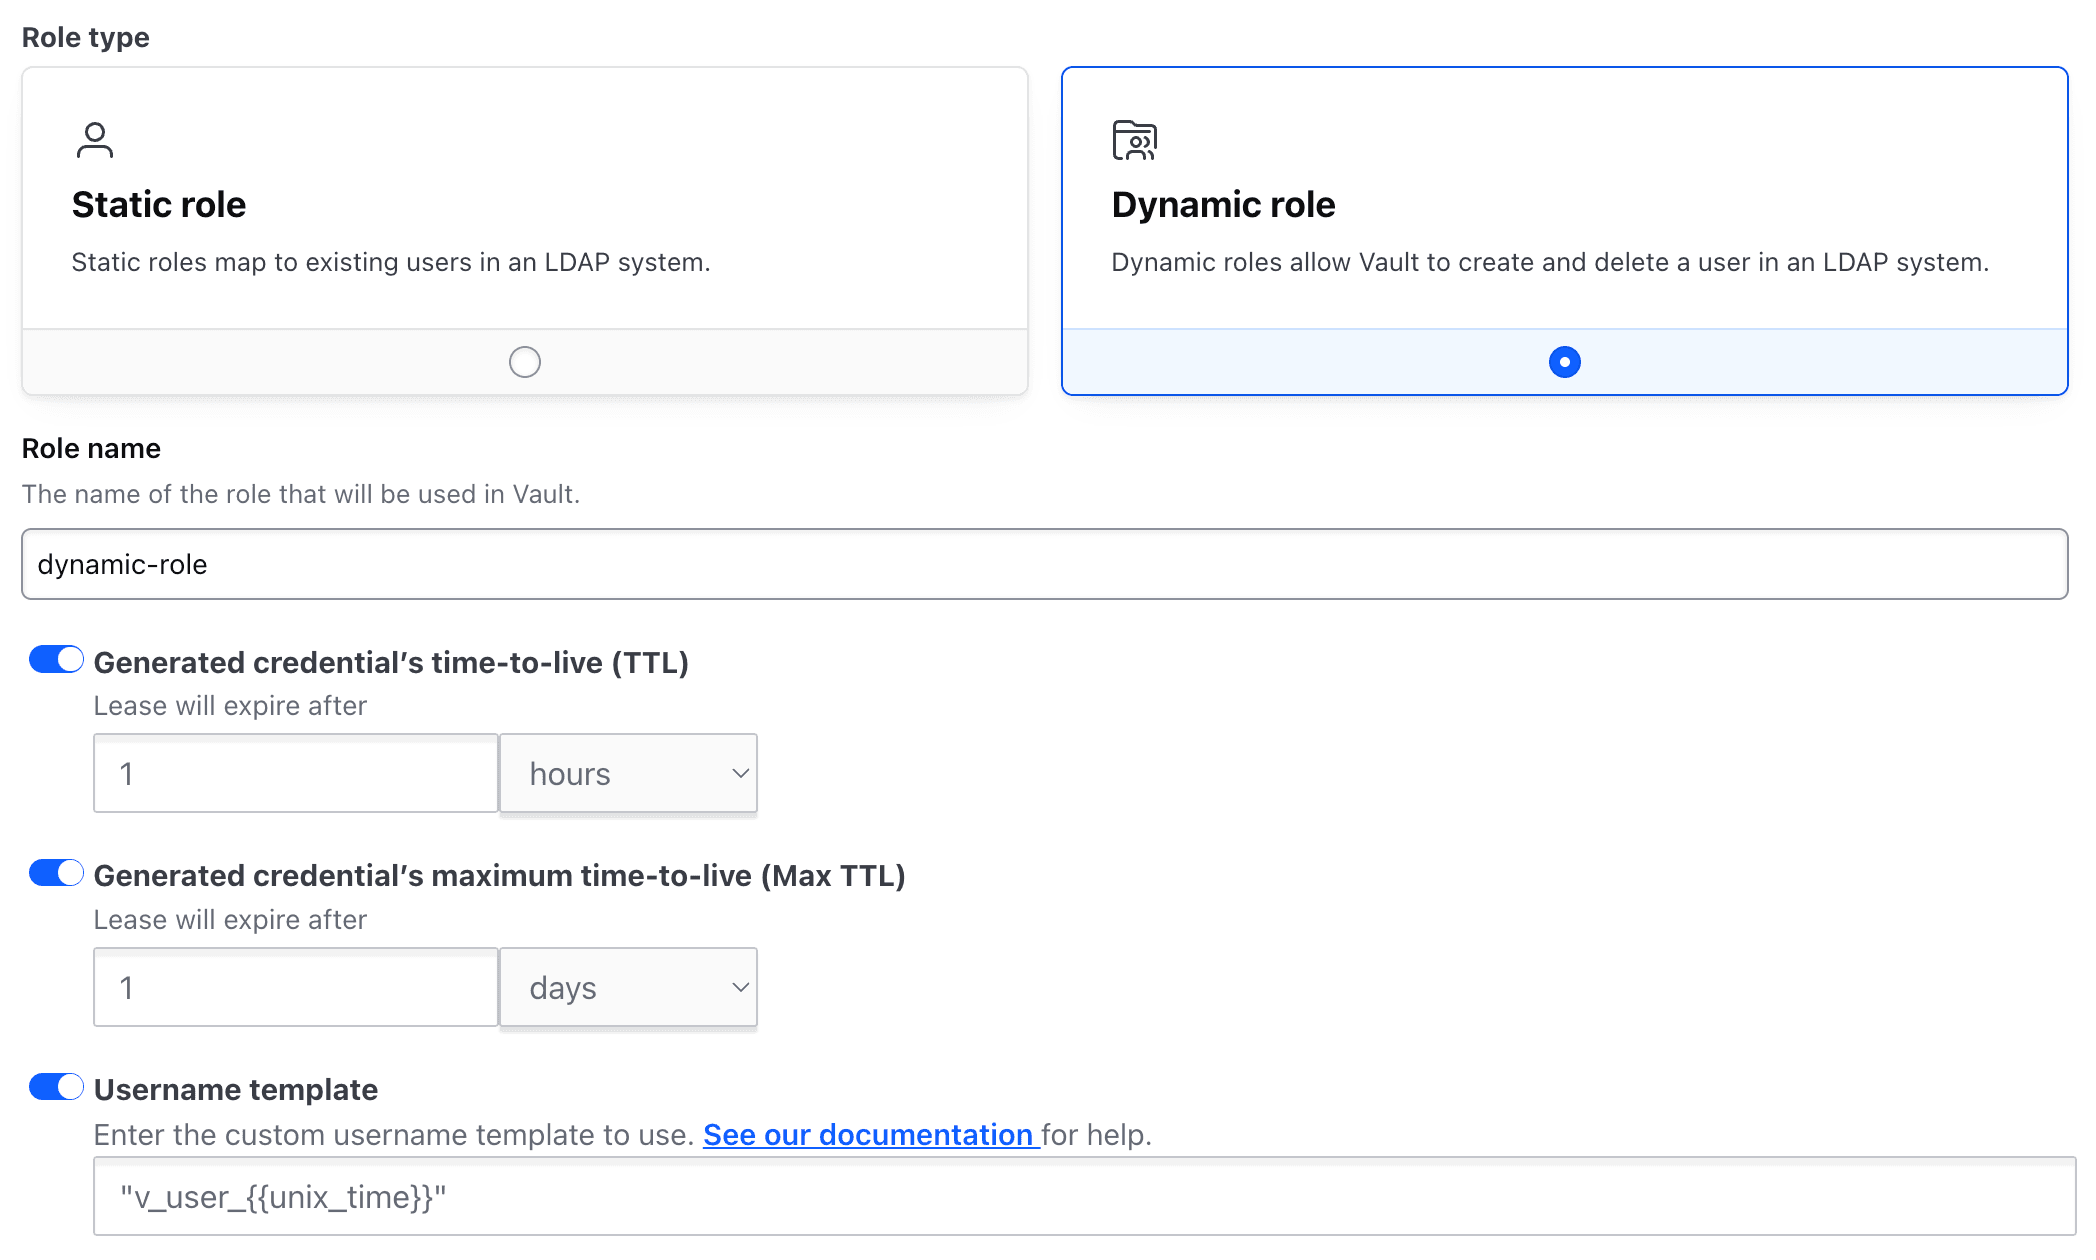
12. In the next step, you will configure a Vault role to perform specific actions using an LDIF file, like create and delete users in Windows AD. Navigate to the Roles tab and click Create role.
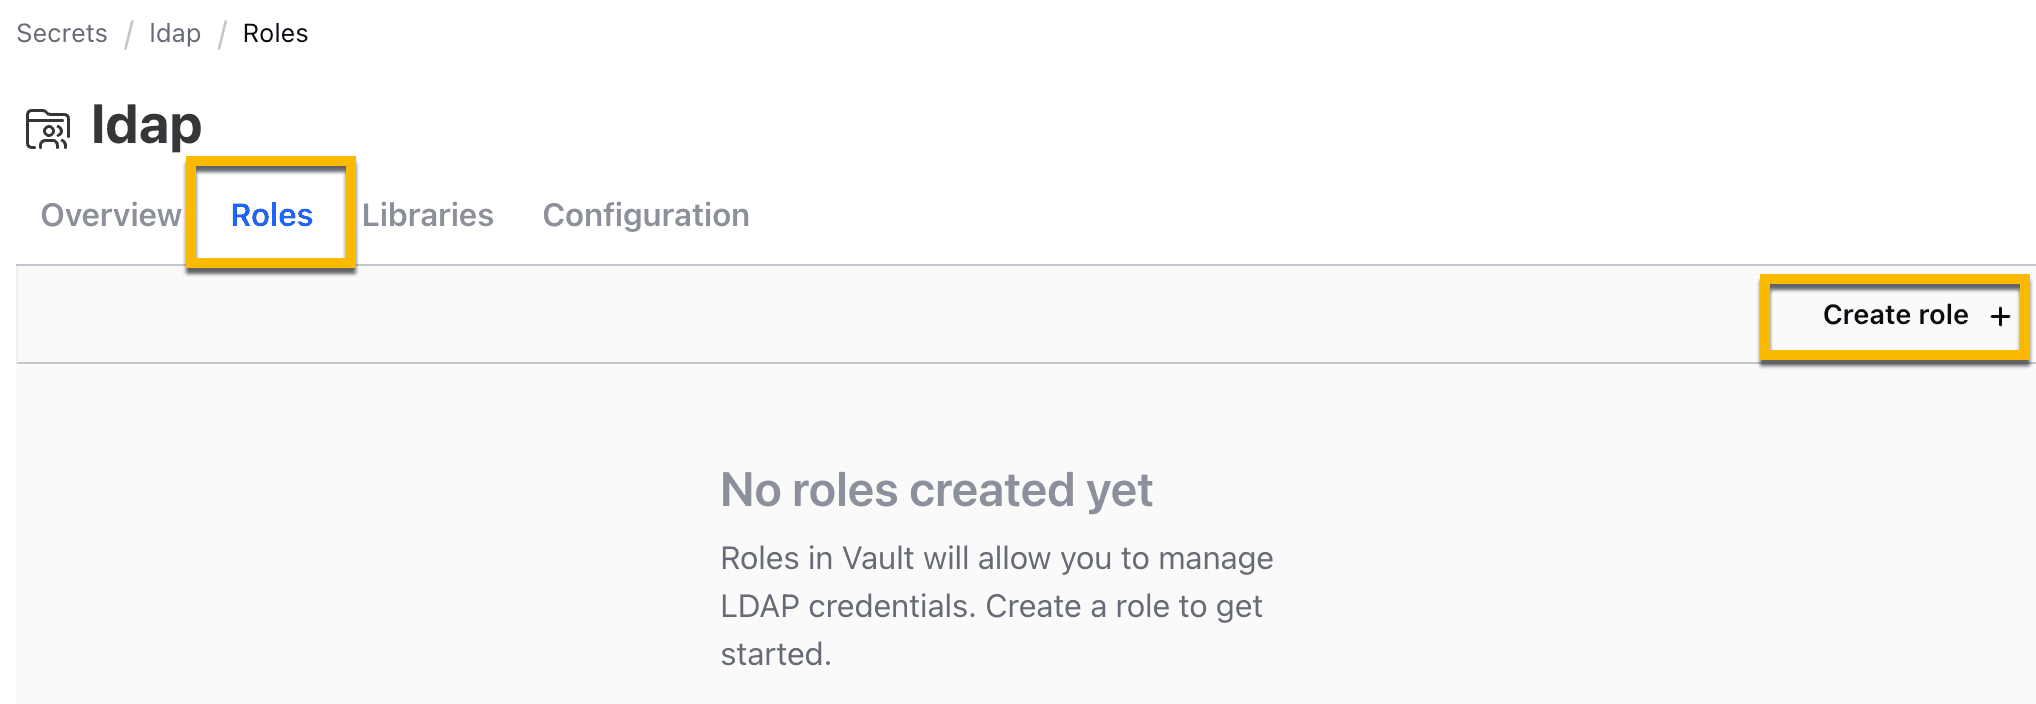
13. Select Dynamic role.
14. Provide role name: dynamic-role
15. Click to enable Username template and enter: v_user_{{unix_time}}
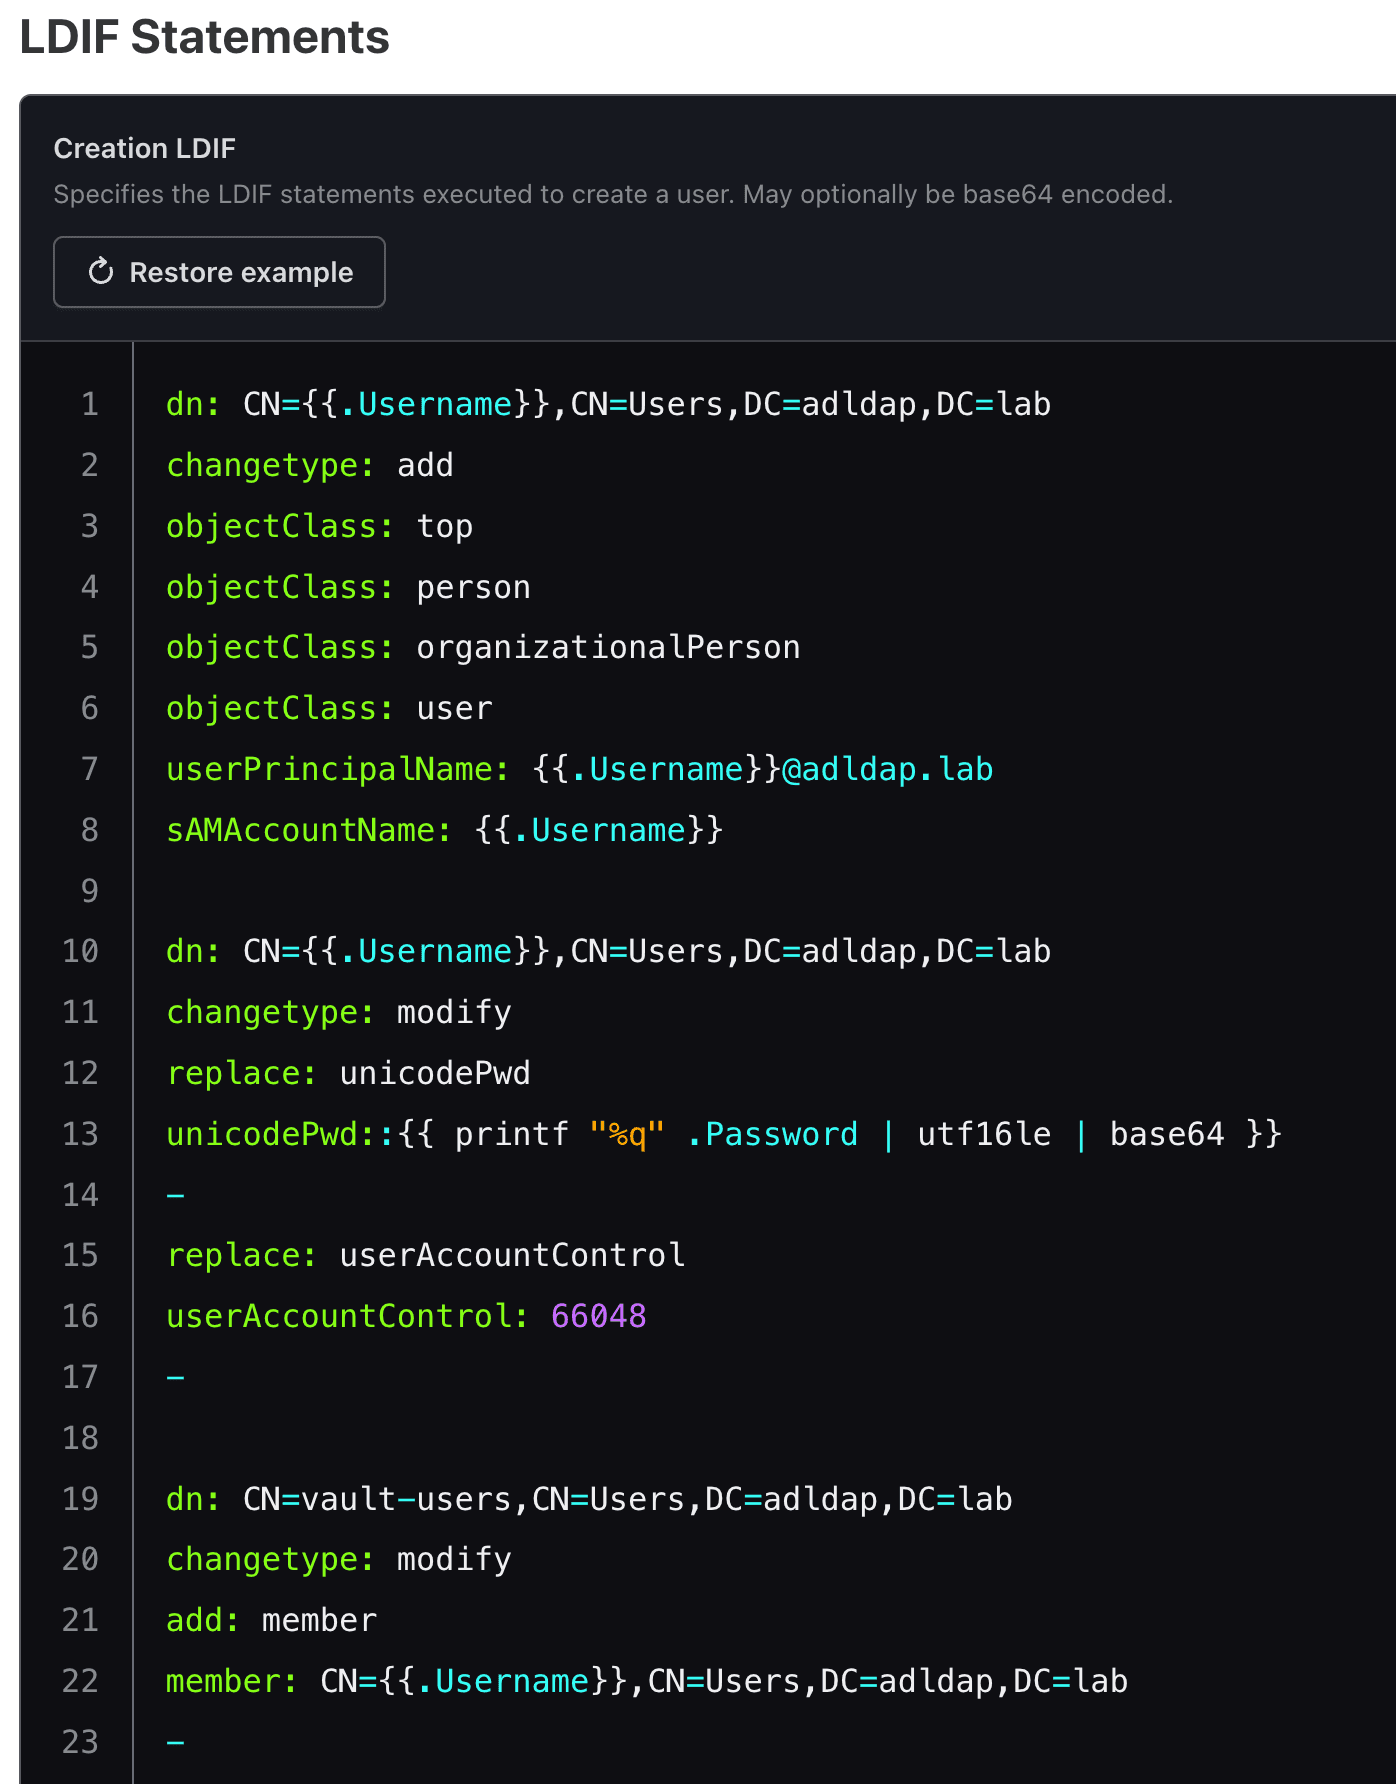
16. In the provided Create LDIF section, copy/paste the following LDIF configuration:
dn: CN={{.Username}},CN=Users,DC=adldap,DC=lab
changetype: add
objectClass: top
objectClass: person
objectClass: organizationalPerson
objectClass: user
userPrincipalName: {{.Username}}@adldap.labmailto:{{.Username}}@adldap.lab
sAMAccountName: {{.Username}}

dn: CN={{.Username}},CN=Users,DC=adldap,DC=lab
changetype: modify
replace: unicodePwd
unicodePwd::{{ printf "%q" .Password | utf16le | base64 }}
-
replace: userAccountControl
userAccountControl: 66048
-

dn: CN=vault-users,CN=Users,DC=adldap,DC=lab
changetype: modify
add: member
member: CN={{.Username}},CN=Users,DC=adldap,DC=lab
-
Note: Vault will use this LDIF configuration to dynamically create Active Directory users on your Windows AD server. The configuration contains information that defines the new user.
Example:
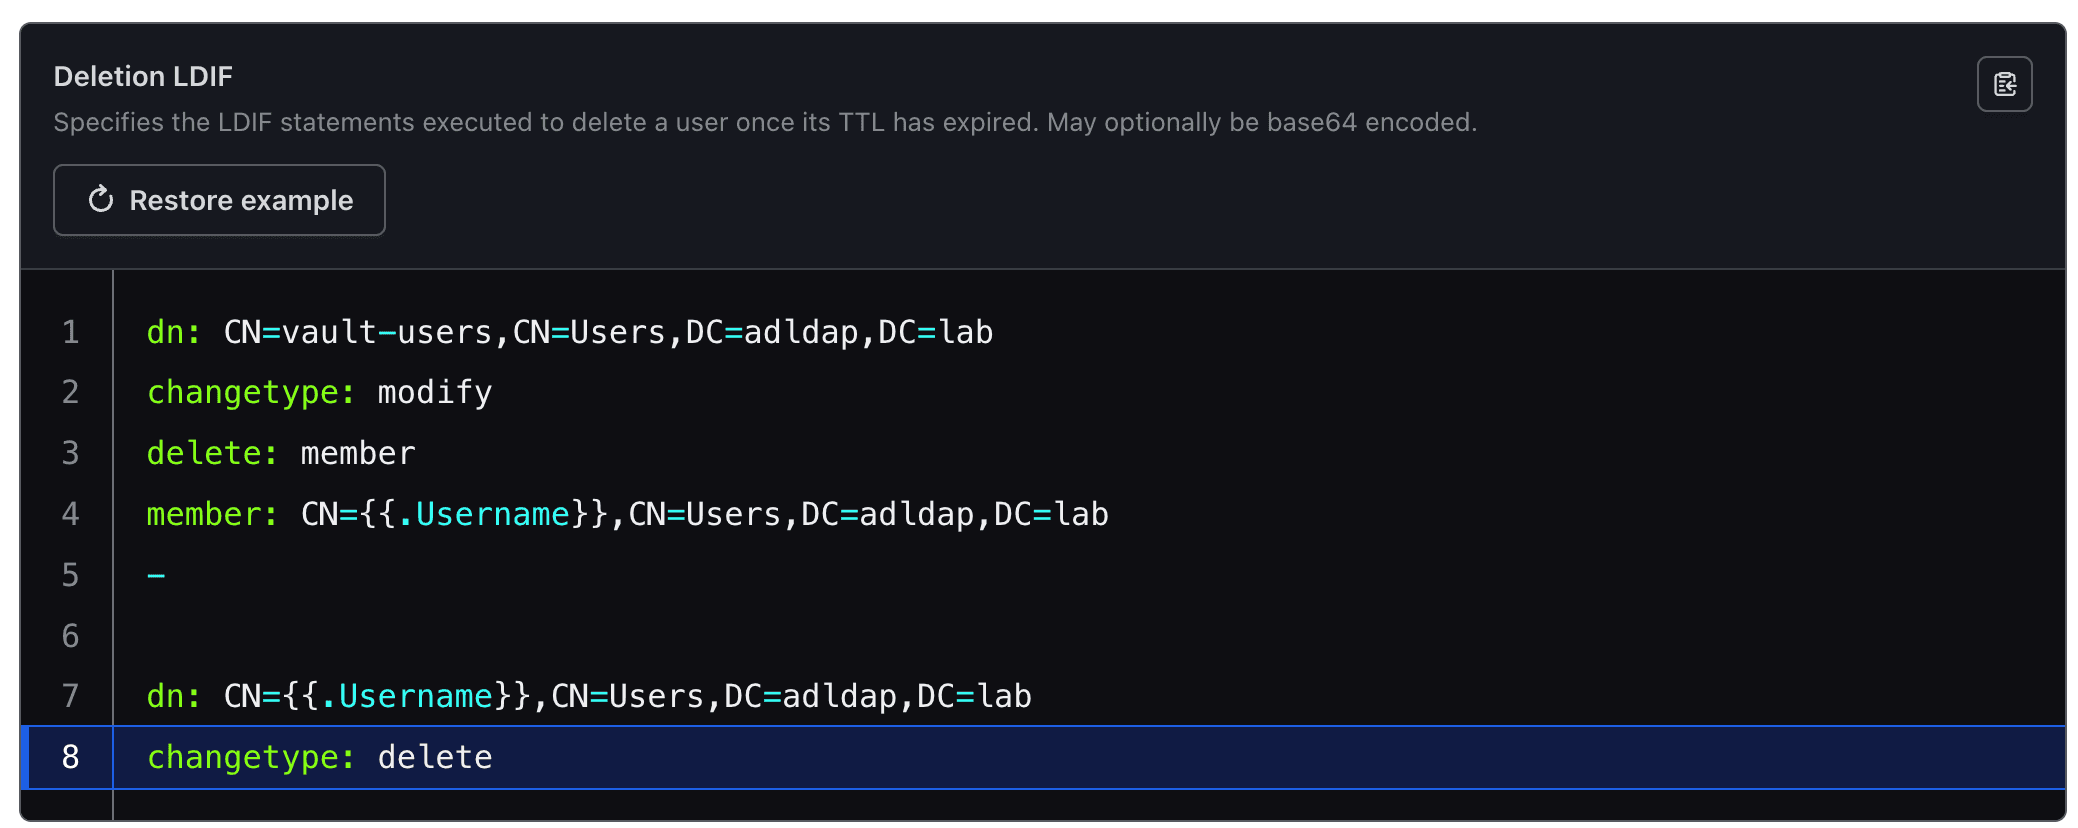
17. In the provided Deletion LDIF section, copy/paste the following LDIF configuration:
dn: CN=vault-users,CN=Users,DC=adldap,DC=lab
changetype: modify
delete: member
member: CN={{.Username}},CN=Users,DC=adldap,DC=lab
-

dn: CN={{.Username}},CN=Users,DC=adldap,DC=lab
changetype: delete
Note: Vault will use this LDIF configuration to dynamically delete a user on your Windows Active Directory server that was previously created by Vault.
Example:
18. Click Create Role.
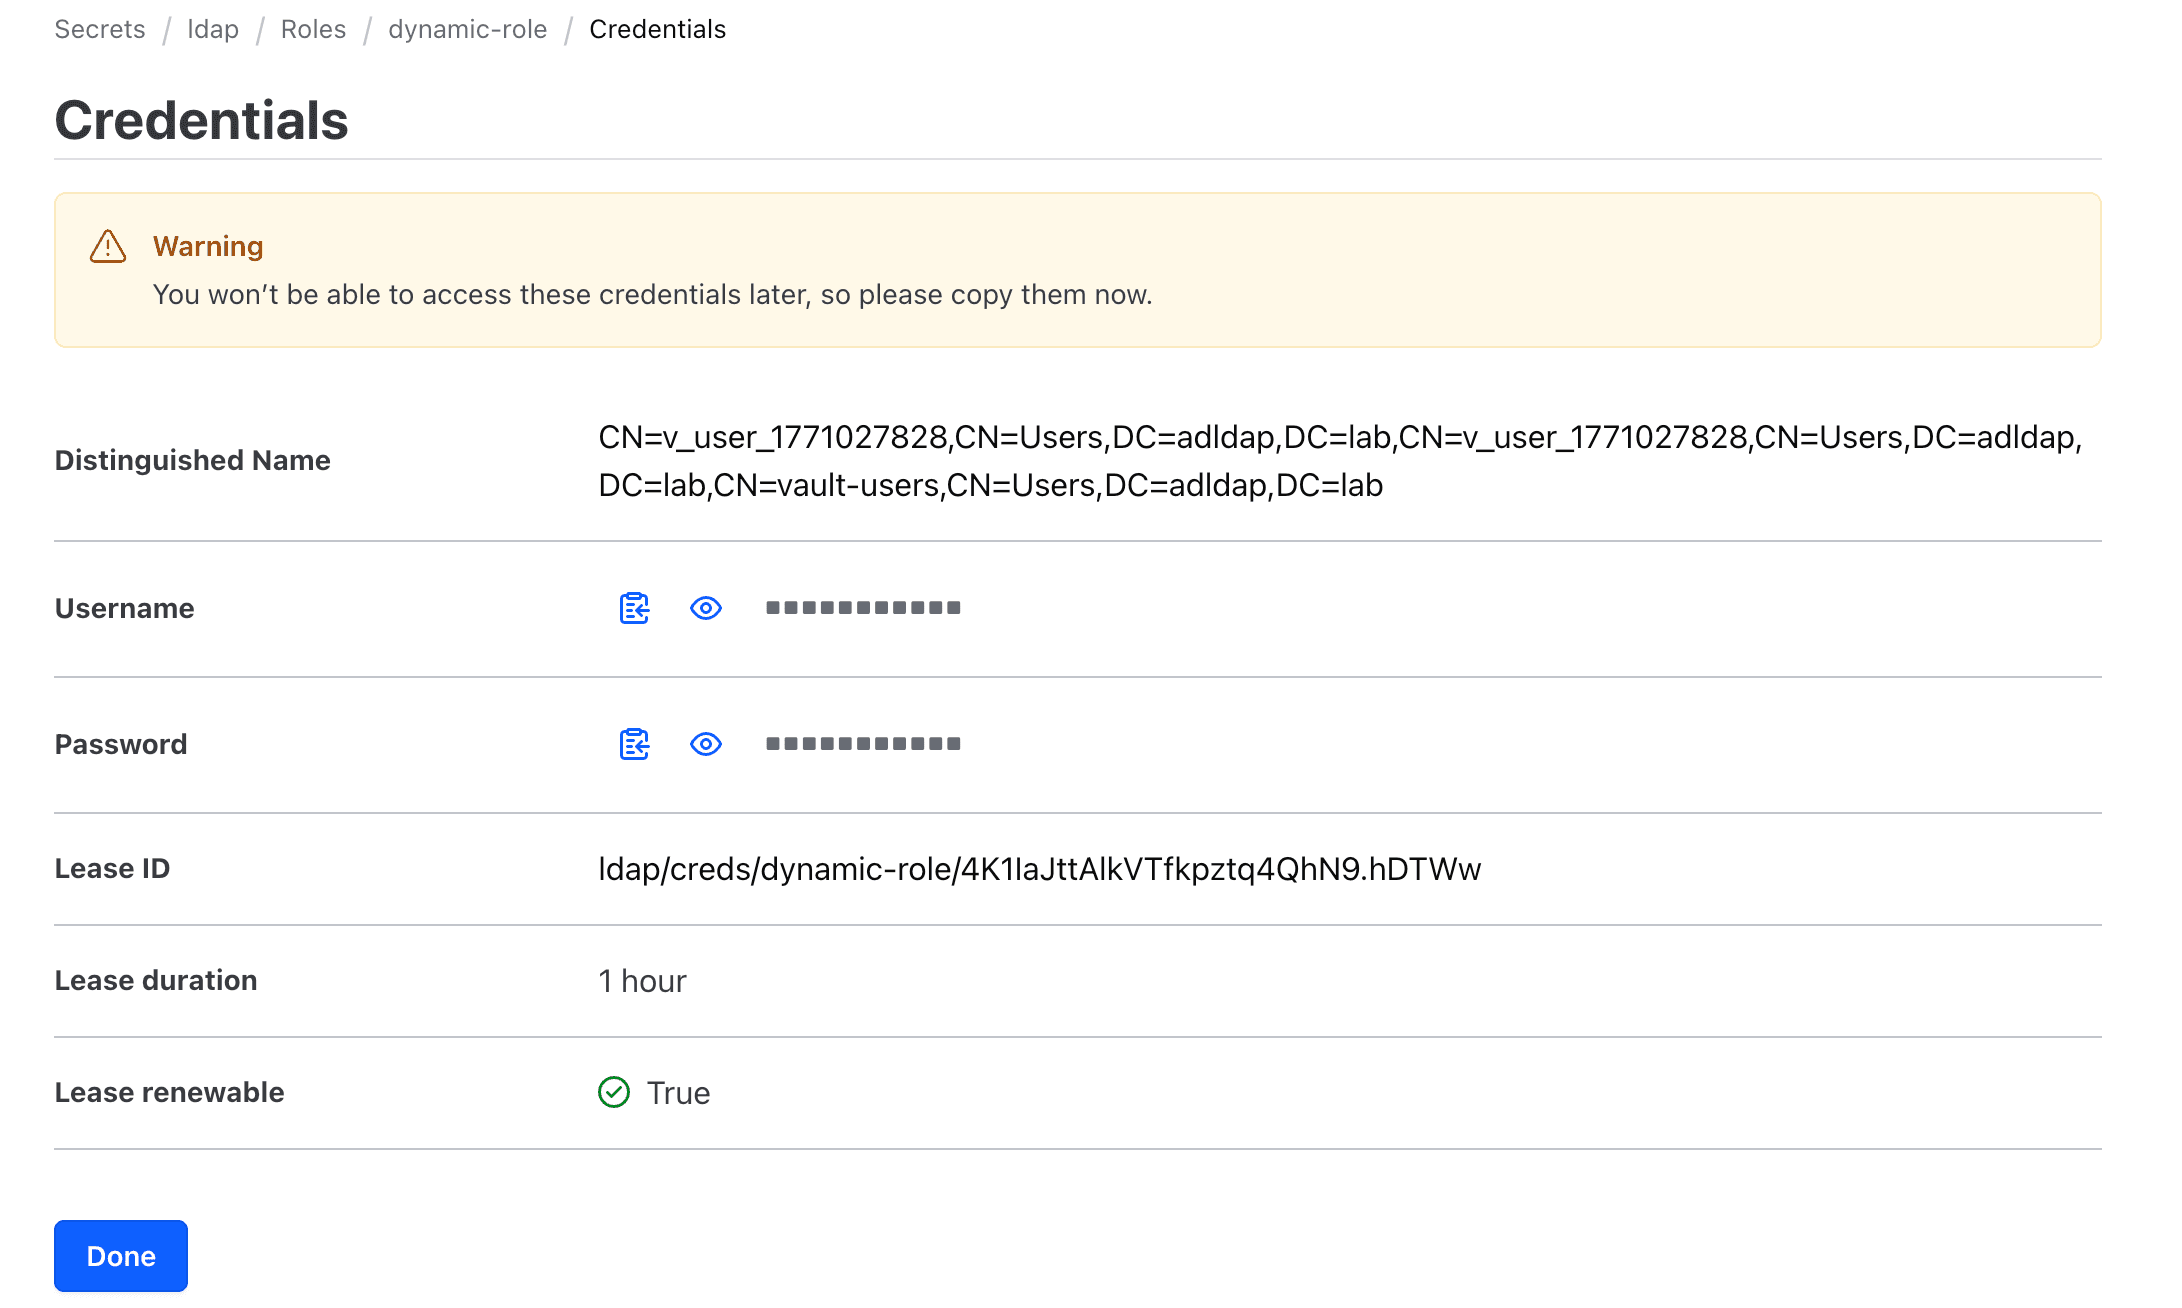
19. As a test, click Get Credential to generate a new Windows domain user and credential.
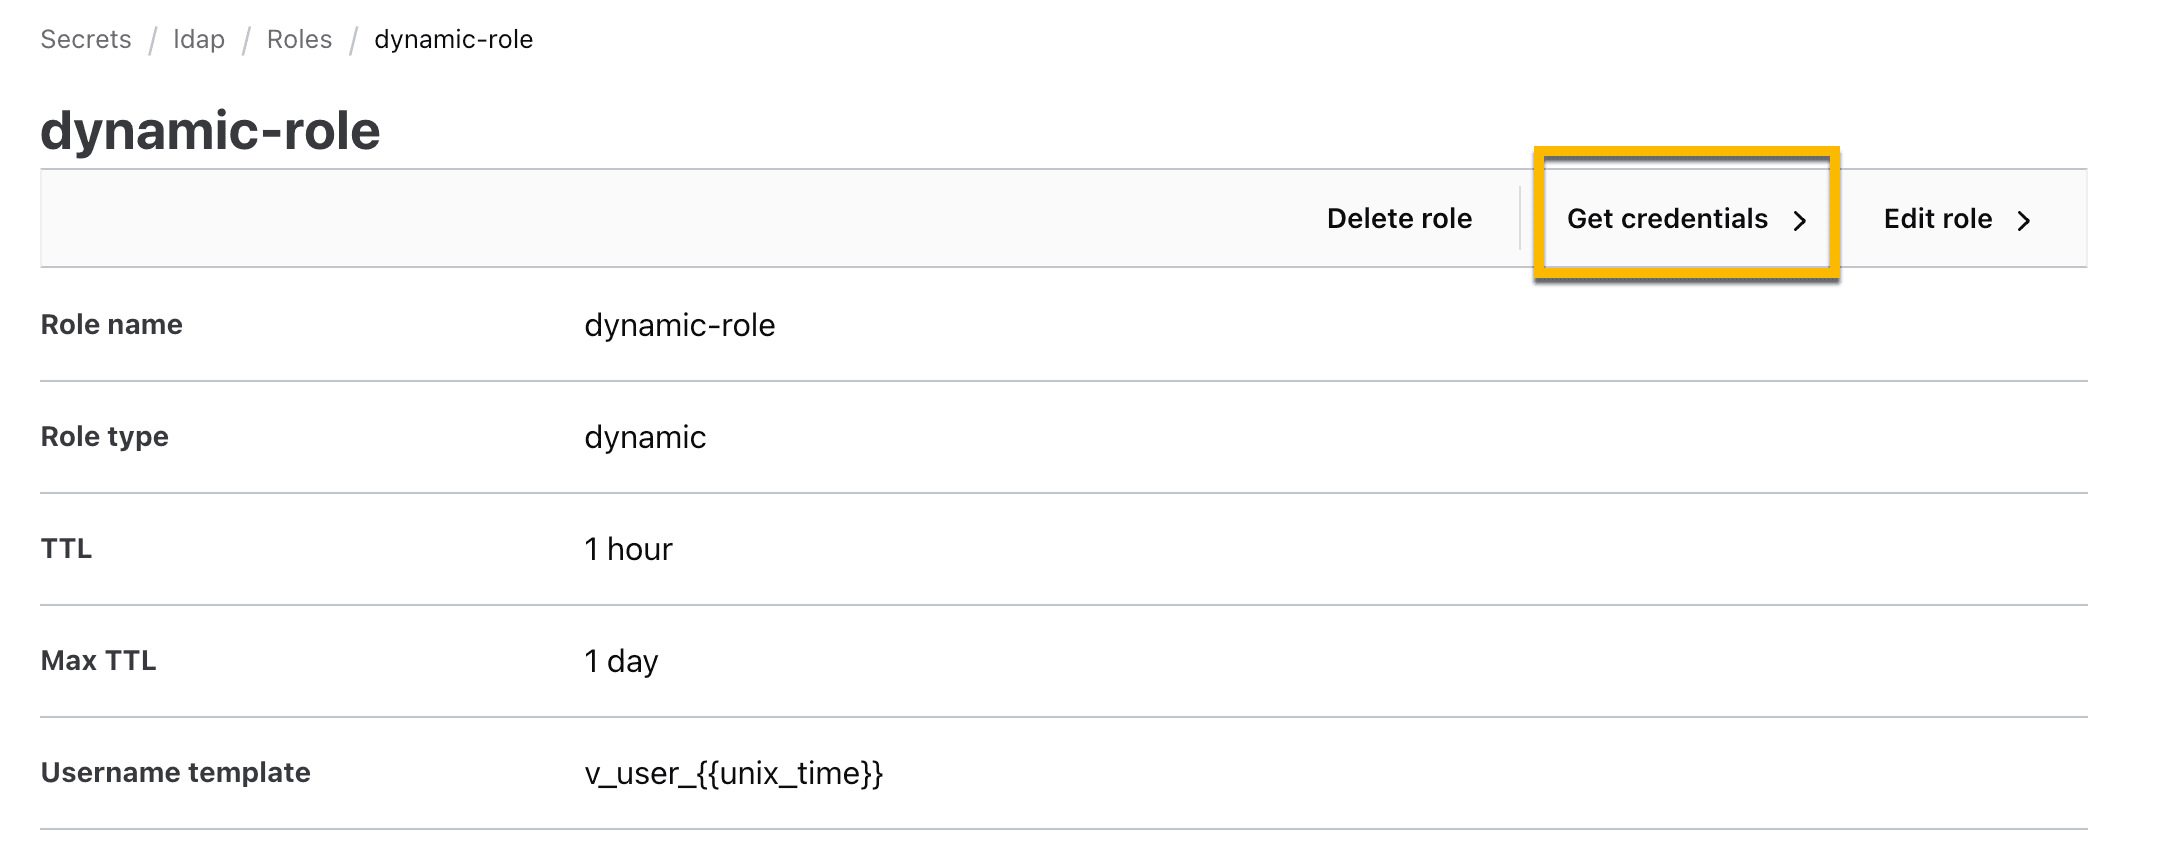
A temporary username and password should be dynamically created and will automatically delete after the expiration.
»Configure Boundary with Vault
In the previous section, you configured Vault to access Windows Active Directory and create or delete new users. Next, you will configure Boundary to request a dynamic user and credential from Vault.
»Create Vault credentials for Boundary
In this section, you will use the Vault CLI to create credentials that will allow Boundary to access the Vault LDAP secrets engine.
1. Log onto your Vault server as an Administrator using the Vault CLI.
2. On your command line terminal, run the command below to create an ACL policy file called boundary-access-policy.hcl.
cat << EOF > boundary-access-policy.hcl
path "auth/token/lookup-self" {
  capabilities = ["read"]
}
path "auth/token/renew-self" {
  capabilities = ["update"]
}
path "auth/token/revoke-self" {
  capabilities = ["update"]
}
path "sys/leases/renew" {
  capabilities = ["update"]
}
path "sys/leases/revoke" {
  capabilities = ["update"]
}
path "sys/capabilities-self" {
  capabilities = ["update"]
}
path "ldap/creds/*" {
  capabilities = ["create","read","update","list"]
  }
path "ldap/creds/*" {
  capabilities = ["create","read","update","list"]
}
EOF
Note: This policy file determines what permissions Boundary will have when it connects to Vault. For example, Boundary will be allowed to access Vault’s LDAP secrets engine.
3. Apply the boundary-access-policy.hcl file to your Vault server.
vault policy write boundary-access-policy boundary-access-policy.hcl 4. Generate a temporary Vault token using the boundary-access-policy policy.
vault token create \
    -format=json \
    -no-default-policy=true \
    -policy="boundary-access-policy" \
    -orphan=true \
    -period=24h \
    -renewable=true | \
    jq -r '.auth.client_token'
5. You will be issued a temporary Vault token that Boundary will use to access the Vault LDAP secrets engine. Store the token locally as it will be used in a later step.
»Configure Boundary
In this section, you will configure Boundary to use the Vault LDAP secrets engine to generate dynamic credentials each time a Boundary user creates a new RDP session.
1. Log onto your Boundary server as an administrator using your browser.
2. Navigate to your desired Org and Project. (Or create a new Org and project if you don’t have one)
3. On the left side panel, select the Credential store tab, and click New.
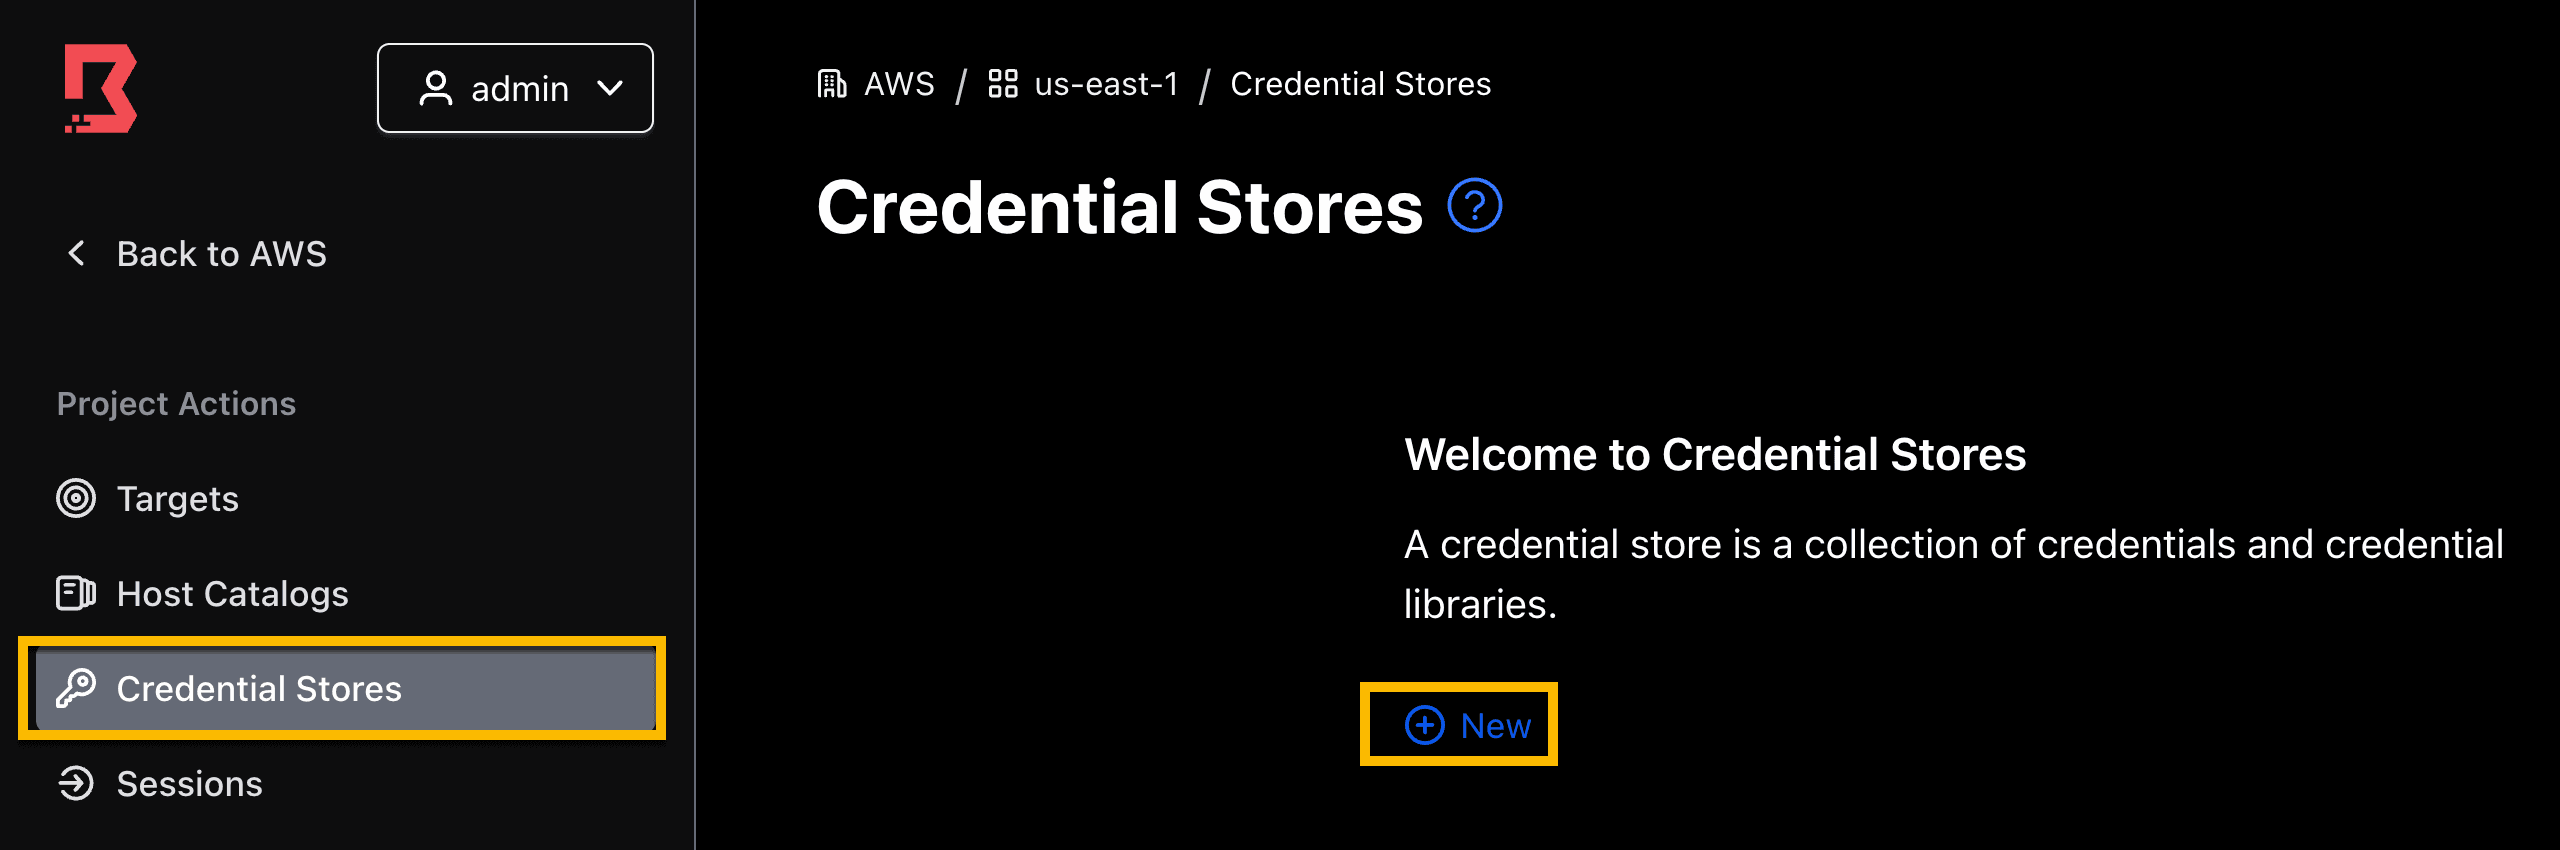
4. Provide a name for your credential store.
Select Vault type.
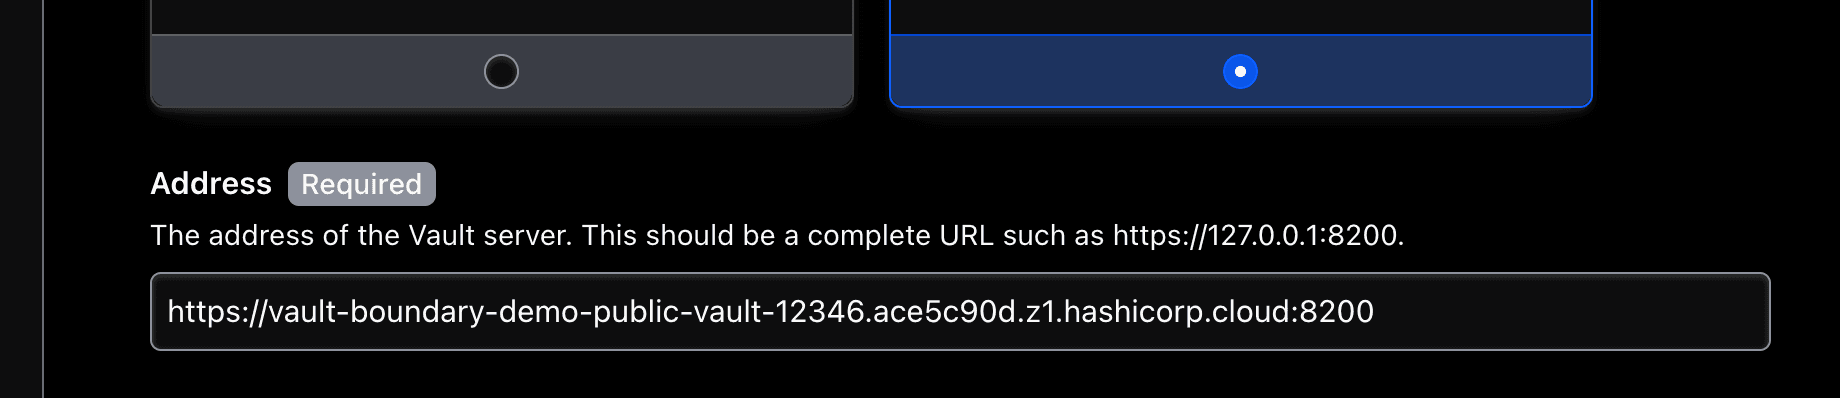
5. Enter the URL of your Vault server. Include port 8200 in the URL. Make sure your Vault cluster is reachable by your Boundary cluster.
Example:
https://vault-boundary-demo-public-vault-12346.ace5c90d.z1.hashicorp.cloud:8200
6. [Optional] - Add Boundary worker filters if you have a self-managed Vault server that is exclusively reachable through a Boundary self-managed worker.
7. Provide the temporary Vault token that you generated at the end of the last section.

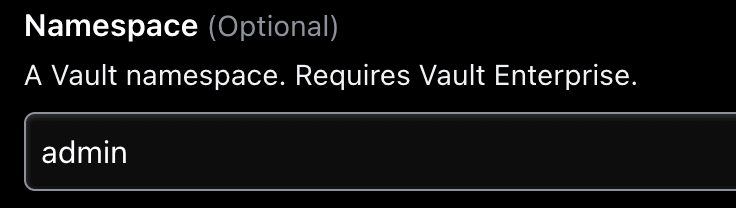
8. If you are using HCP Vault, set Namespace to admin.
9. Click Save to create your Vault credential store.
You have established a connection between Boundary and Vault.
Next, you will create a credential library that will include the Vault LDAP secrets engine path location.
10. Within your new Vault credential store, click on the Credential Libraries tab, and click New.
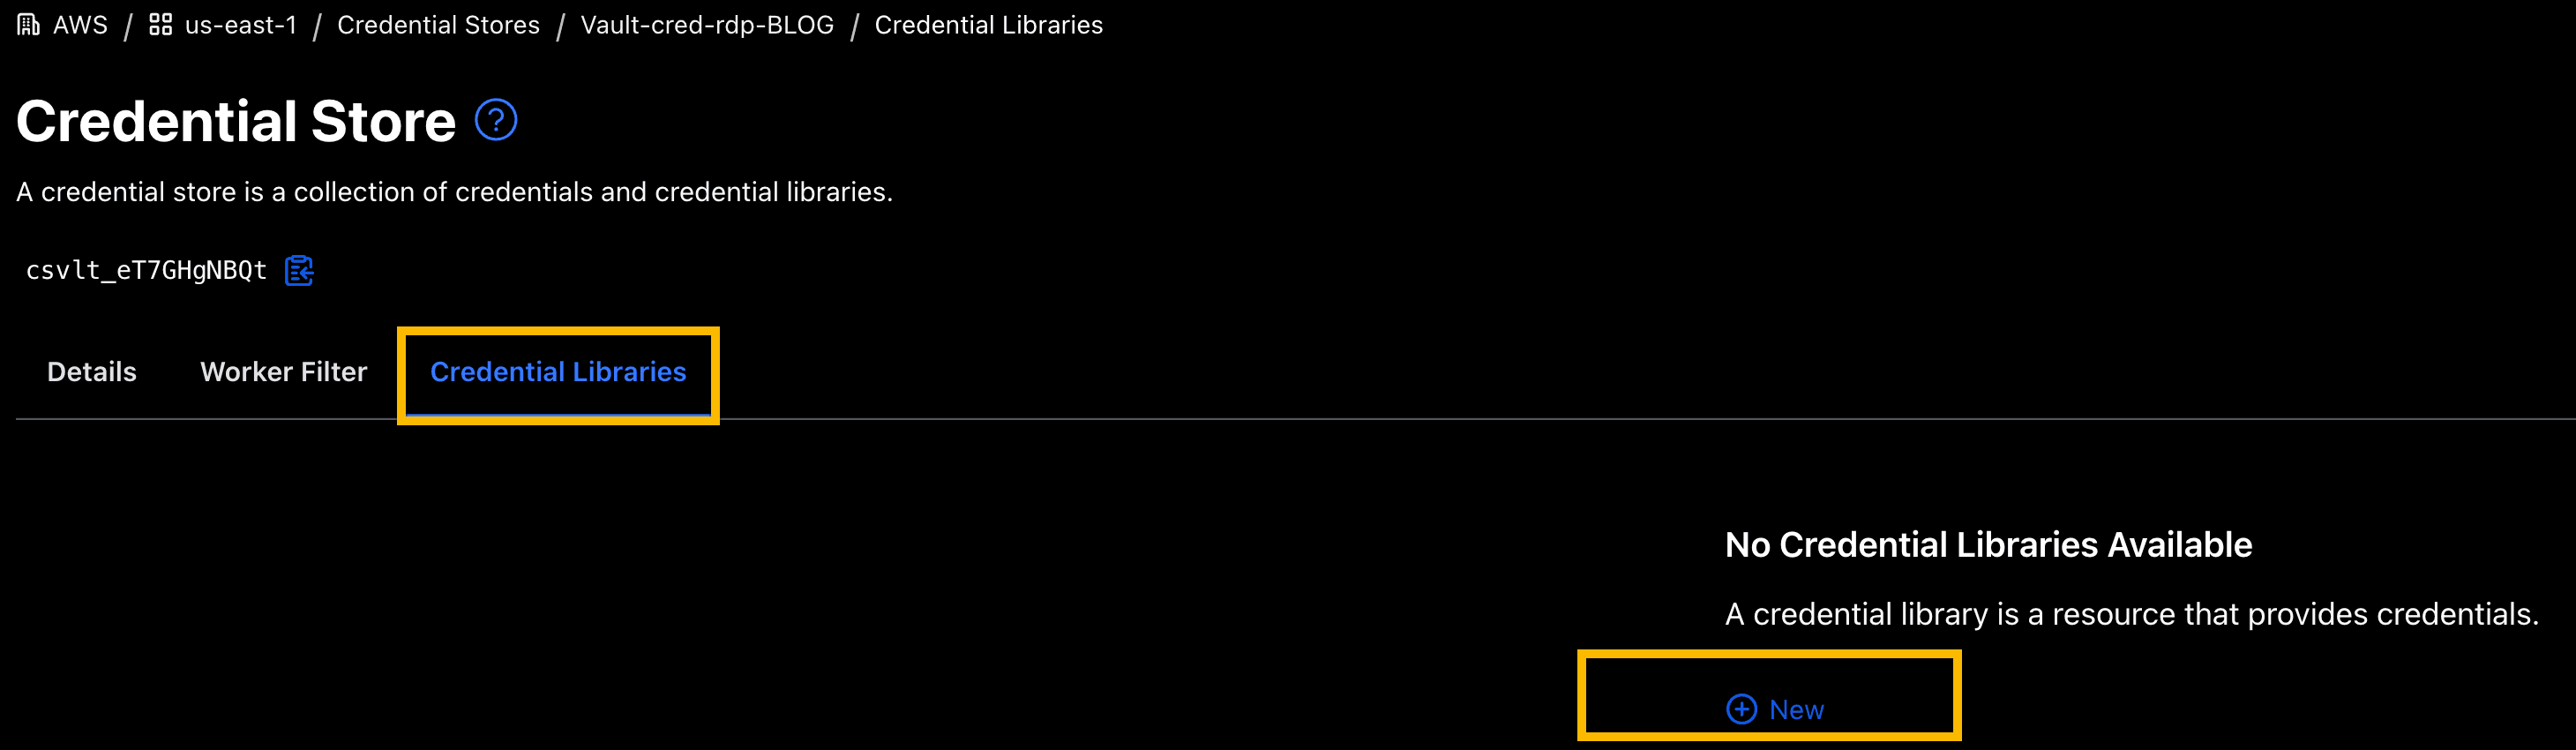
11. Provide follow parameters:
Name:
dynamic-win-adldapType:
LDAPVault Path:
ldap/creds/dynamic-role
12. Click Save.
You just created a credential library that will be used to access the Vault LDAP secrets engine.
»Create Boundary target
Now you will create a target to test your connection. For simplicity, we will use the Windows AD DS server as the test target and connect through its public IP address. This is for testing purposes. If preferred, you can test using a different Windows target machine that is attached to the domain.
If you have Boundary self-managed workers, you can also configure the connection to your target using its private IP address. Refer to this demo video to understand more about Boundary workers.
1. On the left panel, navigate to Targets and click New.

2. Fill in the following fields:
Name: win-ad-server
Type:
RDPTarget Address:
<Win-AD-Server-IP>Default port:
3389Alias:
win-ad-server(click Add)Note 1: Your
Win-AD-Server-IPwas provided as an output when you deployed with Terraform.
3. Click Save.
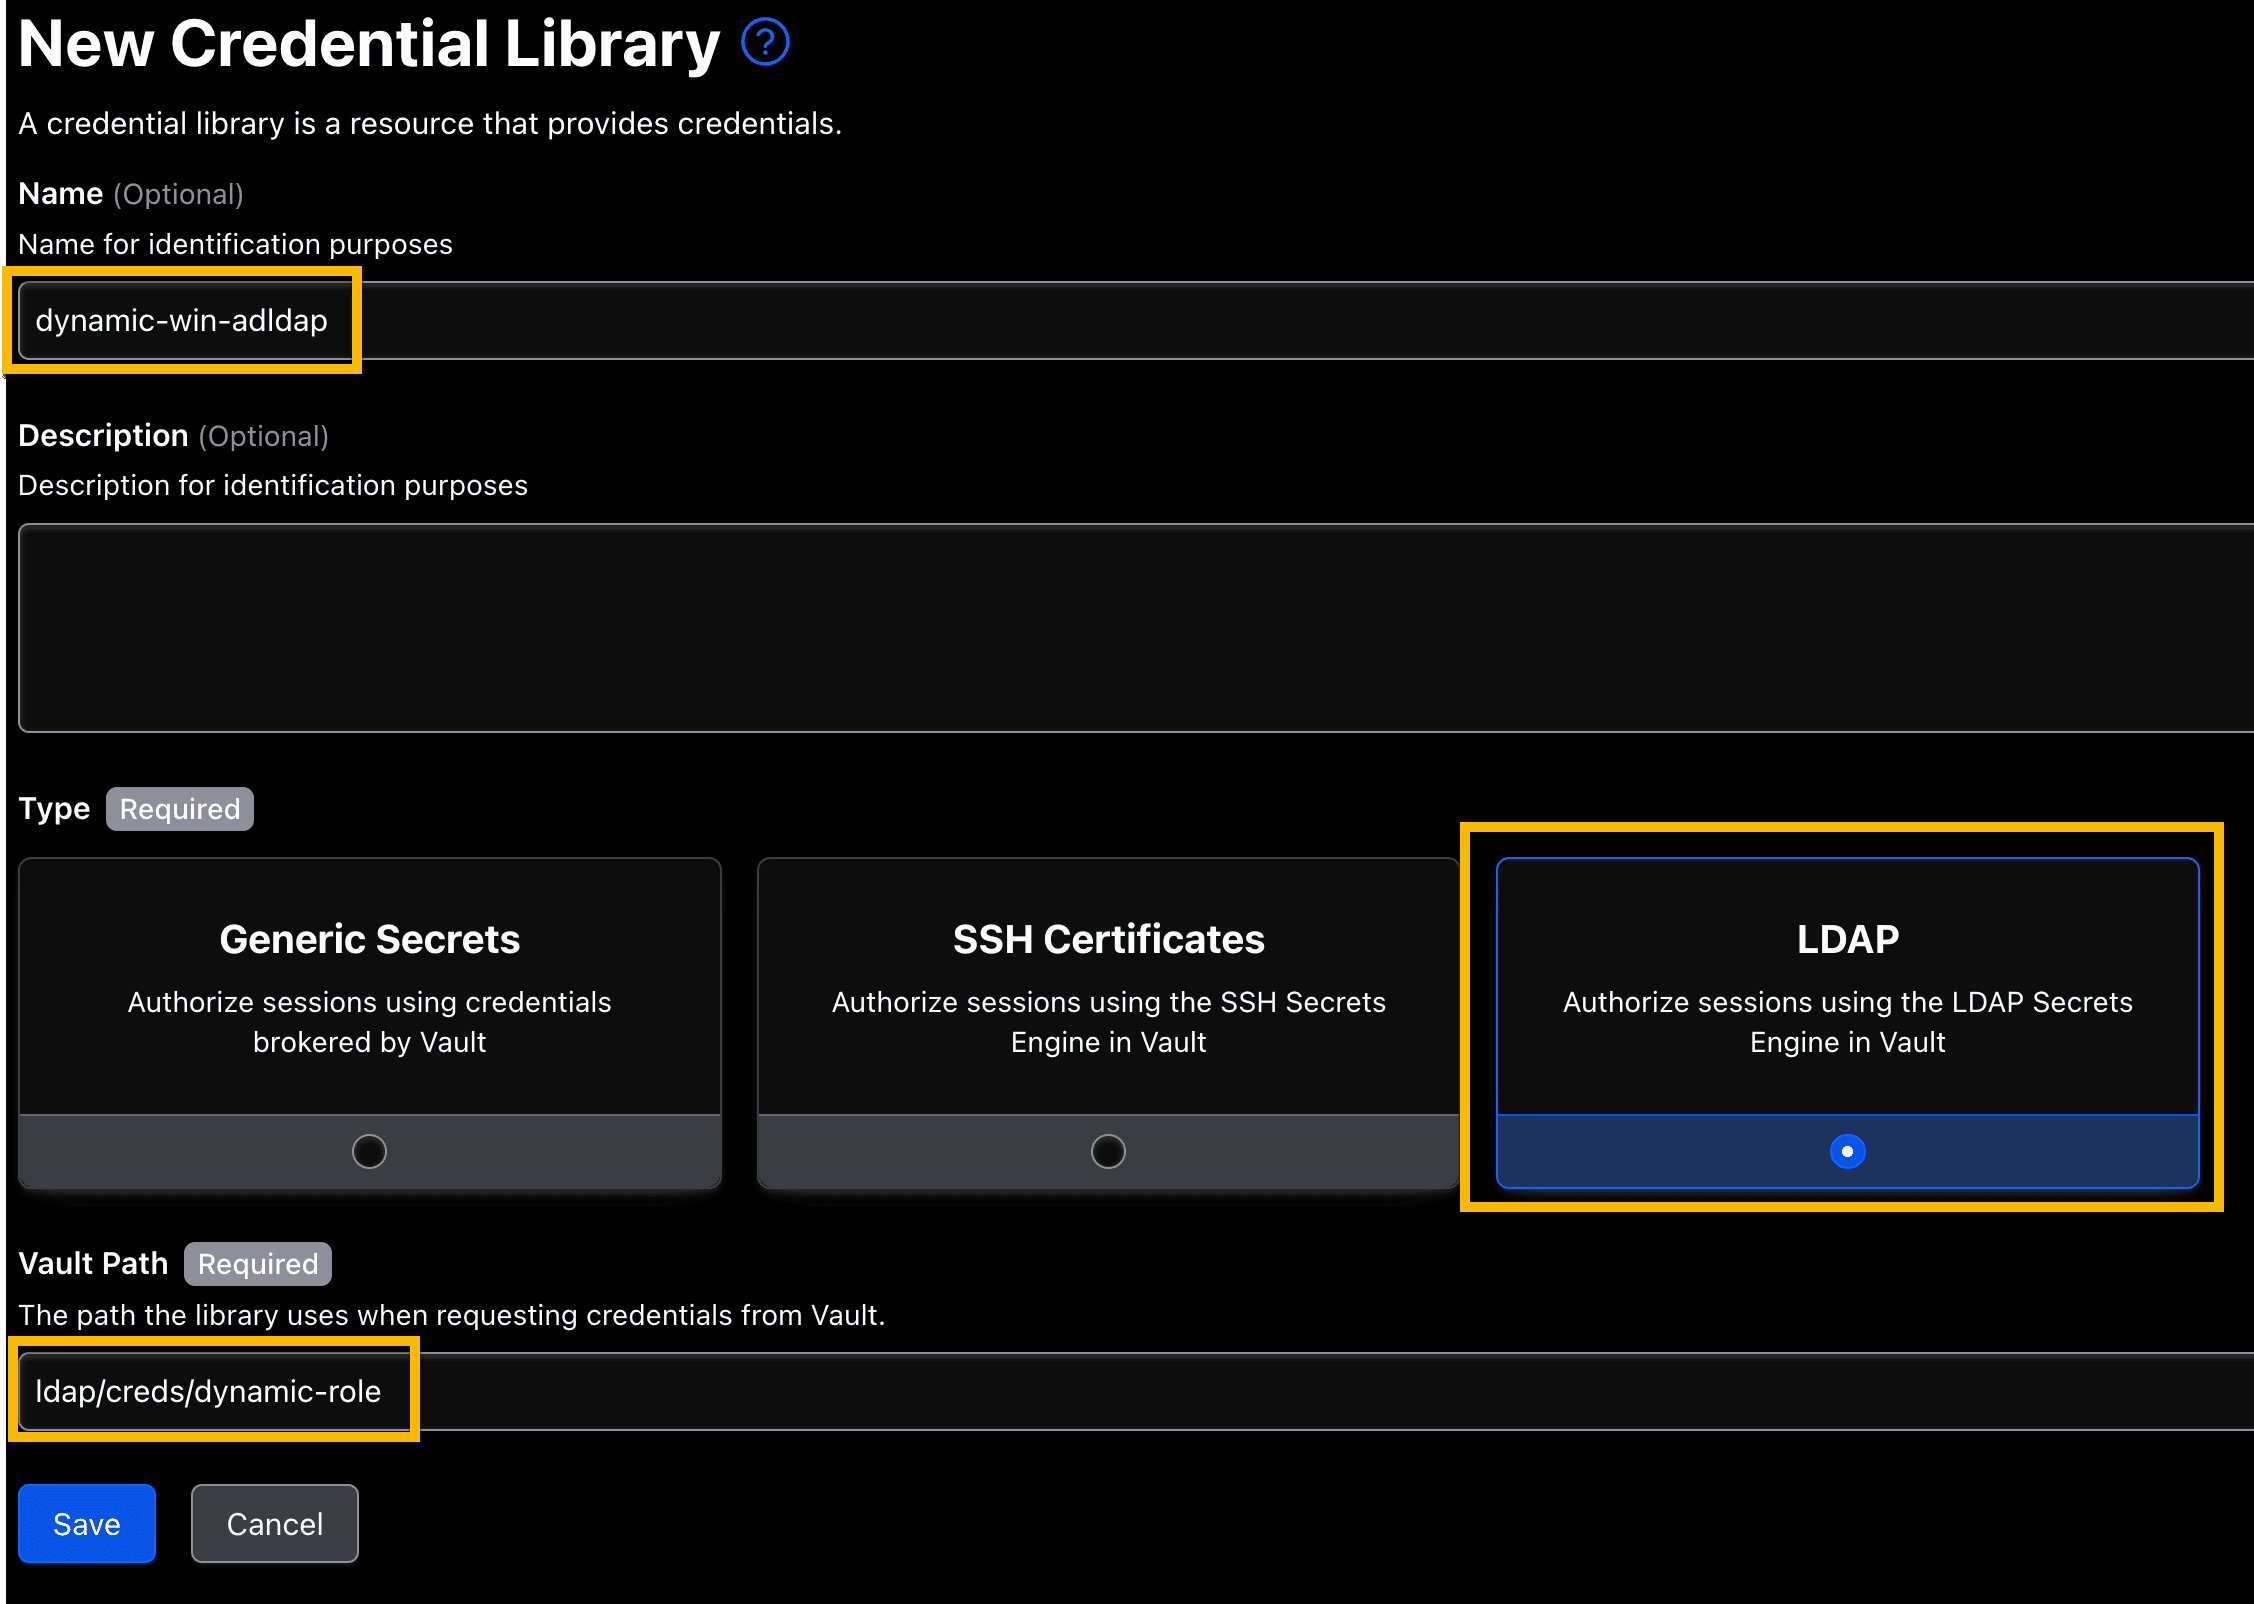
4. Once the target has been created, click on the Inject Application Credential tab.
5. Click Add Injected Application Credentials.
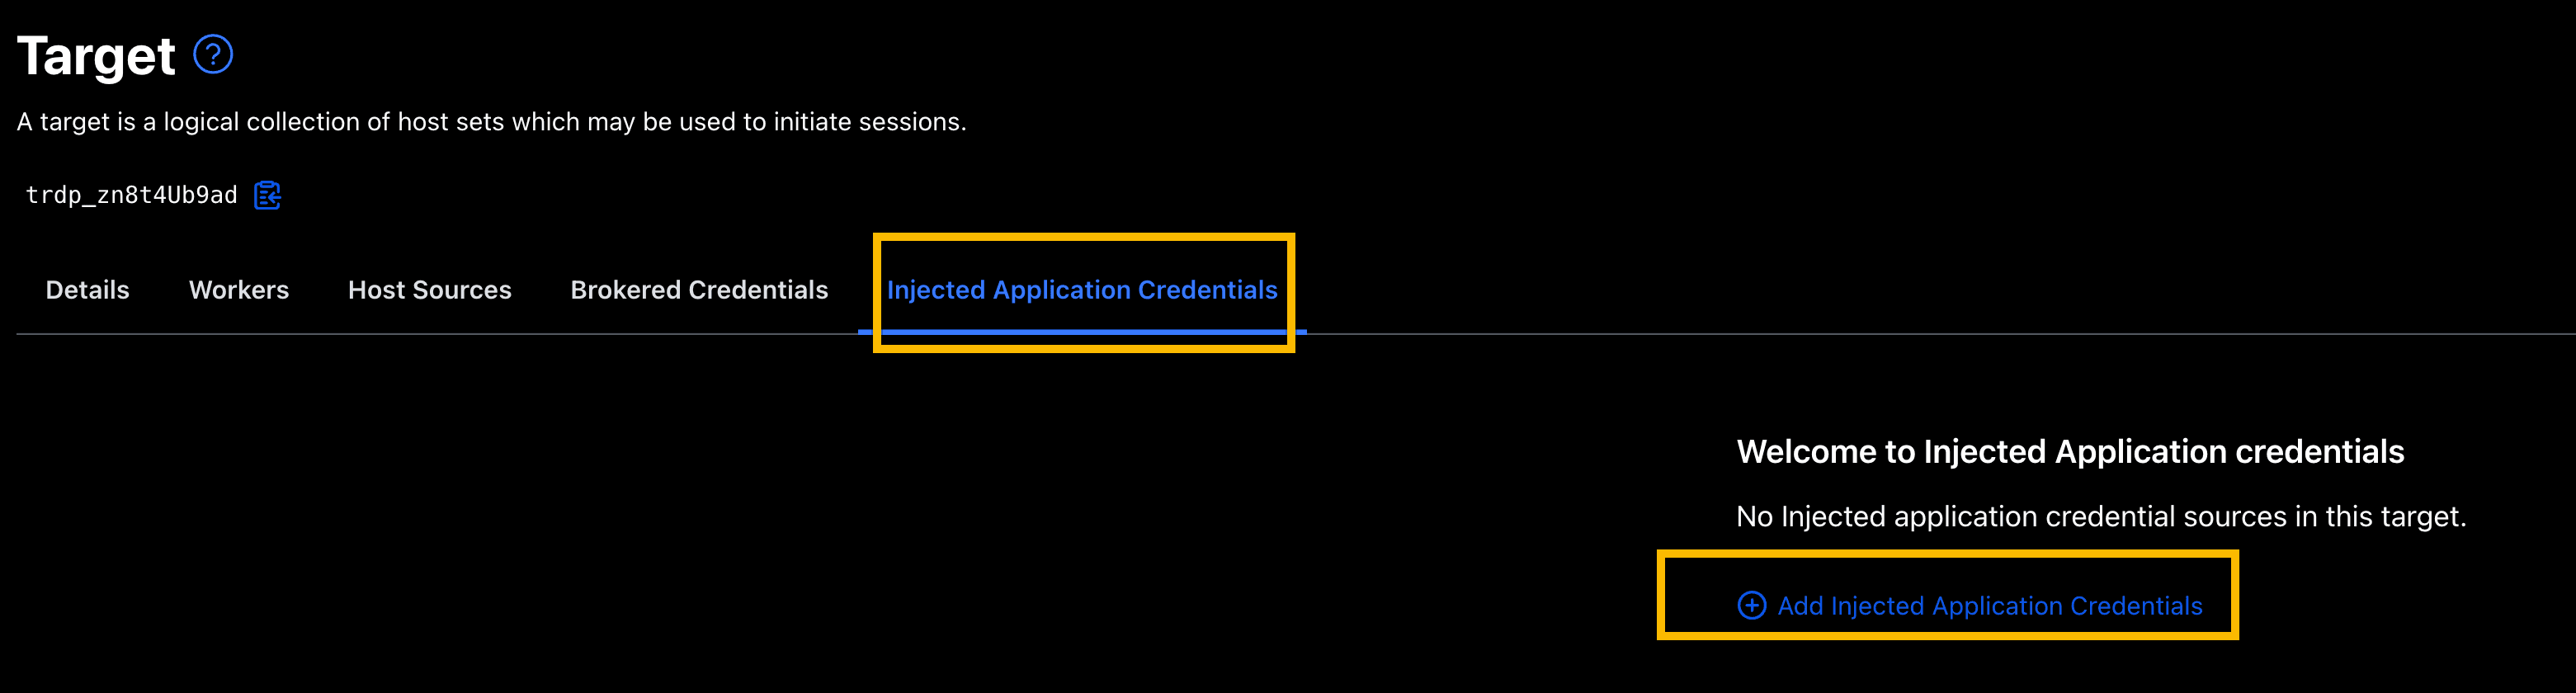
6. Select the dynamic-win-adldap credential library that you created earlier and click Add Injected Application Credentials.
»Test end user connection
Let’s test to end-to-end connection experience for the end user.
1. Log onto the Boundary desktop client. Make sure the user account has permissions to access the target you created in previous section.
2. Locate the win-ad-server target you created. Click Open.
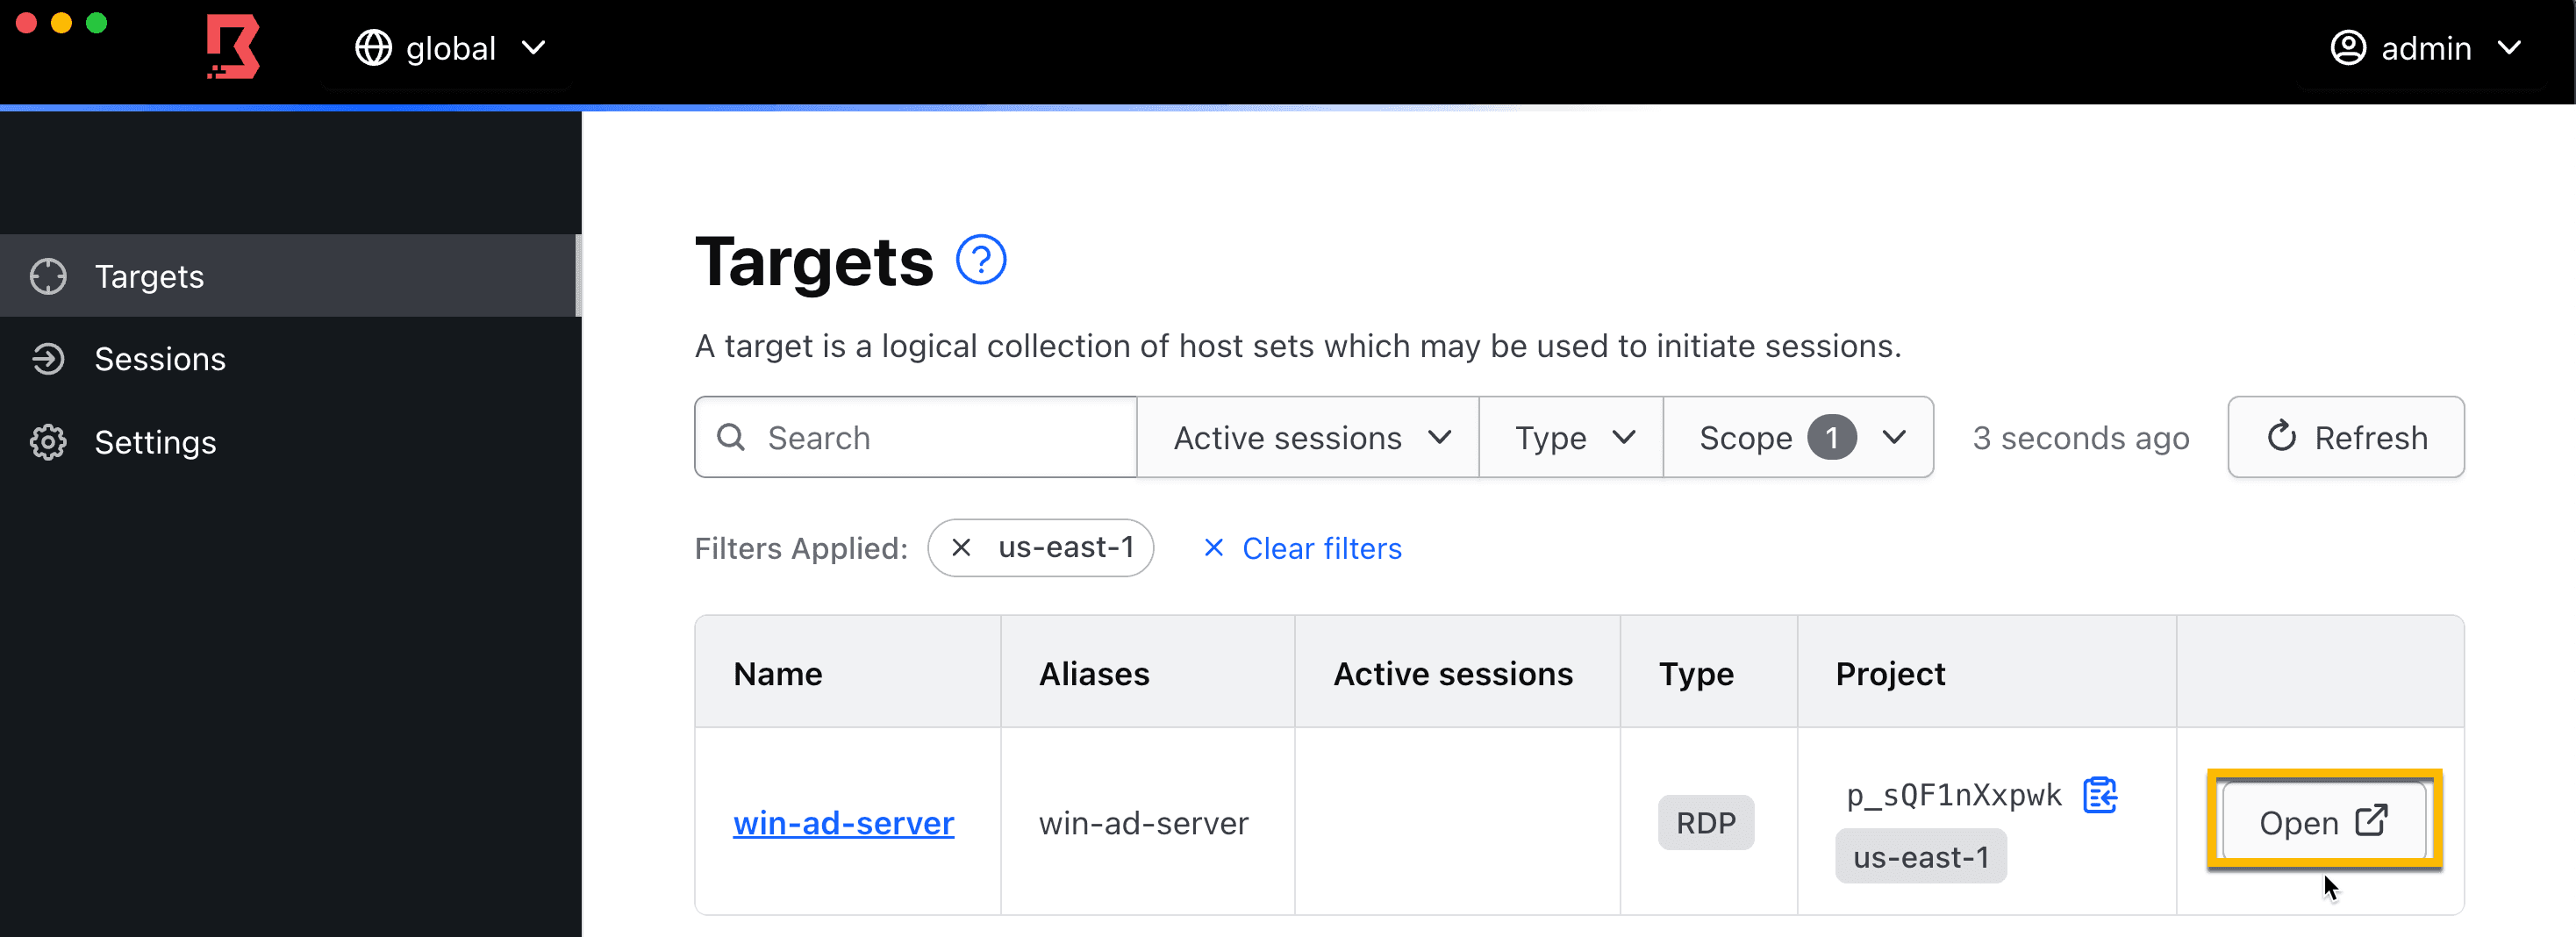
3. A Windows RDP client will automatically launch and log you into an RDP session. Notice no credentials are requested or exposed to the end user.
Congratulations, you've configured and successfully connected to a Windows target using dynamically generated and short-lived credentials.
»Clean up
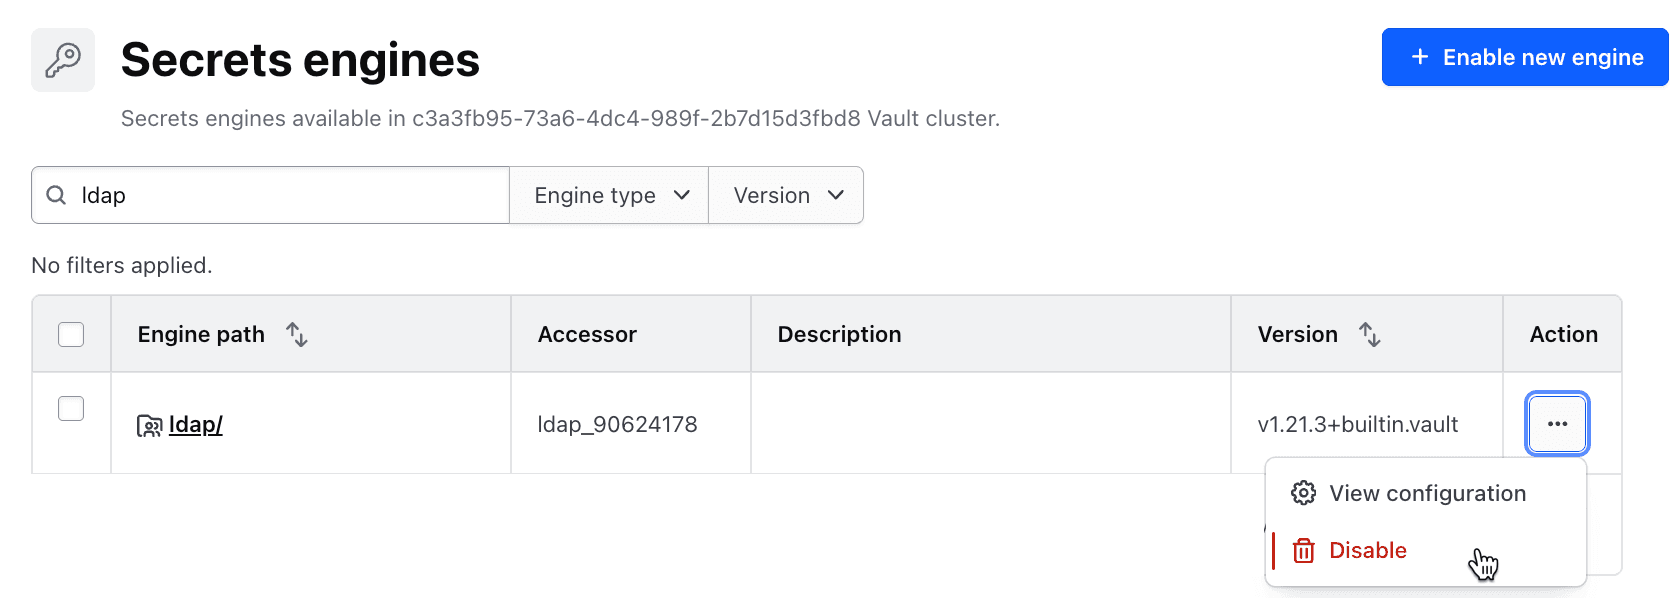
1. Go to your Vault UI on your browser and disable your ldap secrets engine. This will delete the secrets engine.
2. On your terminal, run command below to remove and clean up your AWS environment:
terraform destroy