Using Vault to Build an Ethereum Wallet
This is a guest post by Jeff Ploughman, a Security Architect at T. Rowe Price and founder of the DC-Baltimore HashiCorp User Group — this work was done in his role as an Ethereum aficionado and open source contributor.
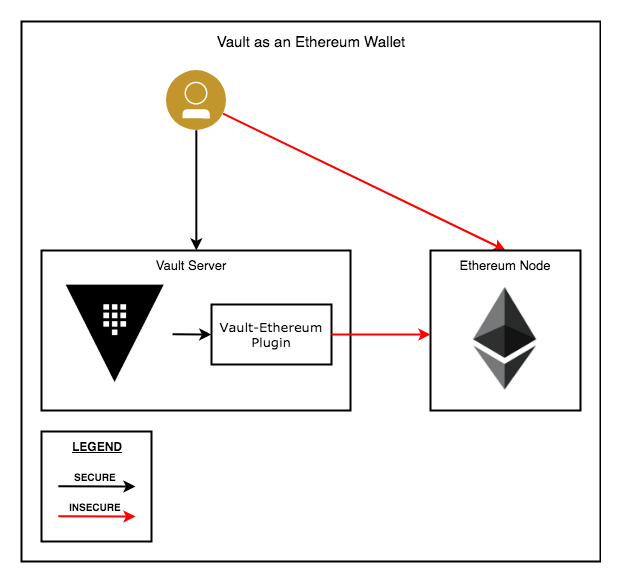
HashiCorp Vault focuses on keeping application data secure across distributed infrastructure by tightly coupling your trusted identity with brokering access and managing sensitive organizational information and secrets. An Ethereum Wallet is a gateway to decentralized applications on the Ethereum blockchain. It allows you to hold and secure ether and other crypto-assets built on Ethereum, as well as deploy and use smart contracts. This blog will look at how the two can work seamlessly together.
Ethereum, like many blockchain-based ecosystems, is fundamentally a decentralized technology. The protocol was designed to place little to no trust in 3rd parties like cloud providers, certificate authorities, or DNS. The blockchain that underlies Ethereum is replicated on every node in the network so that the loss of any particular node (or subset of nodes) is not impactful. The fundamental innovation of blockchain is how distributed consensus is achieved without trust. And while there are endless debates about the efficiency costs of this trustless model or the overall utility of blockchain, I am more interested in the practical ramifications of this decentralized architecture.
»Managing Private Keys
The foundation of all blockchain ecosystems—the "crypto" in the currency—is the system known as public key cryptography. And while the public portion of a key pair may be disseminated in a decentralized manner, the private key is a fundamentally centralized concept. This fact has caused a bit of an impedance mismatch: it often feels like the centralized nature of private keys is an afterthought in the design of many blockchain systems—including Ethereum. Wallets often feel like awkward sidecars to the protocol; and, the security and usability of private key management tools for Ethereum (and blockchains in general) are often lacking. This is especially true within an enterprise: try to imagine a large company using a laptop for the keys to all its accounts. Private key management is the first problem that any blockchain consumer needs to solve.
»Vault As Platform for Blockchain Wallets
Vault can help. Vault's raison d'être is to solve the secrets management problem. And since Vault can scale from a single laptop to a highly available, globally replicated data center, it can be used as a personal wallet or as an enabler of enterprise blockchain use. Vault's design allows it to broker many forms of authentication with many forms of credentialing. As a consequence of using Vault as a platform for an Ethereum Wallet, I was able to trivially add MFA support - making Vault the first standalone Ethereum Wallet with MFA. Another benefit of using Vault as a platform for an Ethereum Wallet is that we get all the benefits of a hierarchical deterministic wallet without the risk - with this Vault plugin, I can very quickly and easily create many Ethereum accounts based on independently derived private keys.
»Ethereum plugin for Vault
The Vault Ethereum plugin is an implementation of a secret backend. This plugin provides many of the capabilities of an Ethereum wallet. It supports public and private chains. It can support smart contract continuous development practices by providing mechanisms to deploy smart contracts. It enables you to sign and verify signatures on arbitrary data. And, of course, you can send ETH.
Some of the functionality (creating accounts, signing and verifying) can happen without needing access to an Ethereum Node. Other functionality (deploying contracts and sending transactions) will require access to the Ethereum RPC interface. When you enable TLS, authentication to Vault is secure and no credentials or key material are leaked when signing transactions. This means that Vault can live on a different machine than your laptop— something you typically can't do with RPC-based wallets.

»A MFA-enabled Ethereum Desktop Wallet
To demonstrate the power of using Vault as a platform for blockchain wallets, let's use the Vault Ethereum plugin to build an MFA-enabled Ethereum desktop wallet. To keep this exercise focused on this use case, I will make a few assumptions:
- You have already installed Vault and you are using TLS for transport security. This means you are not using Vault in dev mode.
- You have an Ethereum RPC endpoint that you can communicate with. For this exercise, I will be using a Geth node at http://localhost:8545 running on a private chain. You can use any RPC endpoint (including the secure, trusted and centralized endpoint at Infura).
If these assumptions prove problematic, you can use these instructions to create a Vault and Ethereum playground.
»Side Note on Administrator Permissions
To install the plugin, configure mounts, enable authentication methods and manage policy, you need fairly powerful access in Vault. However, you do not need to use the Vault root token. If you create an administrative user with the following permissions you can do everything in this exercise:
path "sys/plugins/catalog*" {
  capabilities = ["sudo", "create", "read", "update", "delete", "list"]
}
path "sys/auth*" {
  capabilities = ["sudo", "create", "read", "update", "delete", "list"]
}
path "sys/mounts*" {
  capabilities = ["sudo", "create", "read", "update", "delete", "list"]
}
path "sys/policy*" {
  capabilities = ["create", "read", "update", "delete", "list"]
}
path "auth/userpass/users*" {
  capabilities = ["create", "delete", "list"]
}
»Install the Vault Ethereum Plugin
First, lets download and verify the authenticity of the plugin. Note: I use Keybase PGP to sign my releases.
$ cat ./grab_plugin.sh

#!/bin/bash

function grab_plugin {
  echo "OS: $1"
  echo "Version: $2"

  wget --progress=bar:force -O ./$1.zip https://github.com/immutability-io/vault-ethereum/releases/download/v$2/vault-ethereum_$2_$1_amd64.zip
  wget --progress=bar:force -O ./SHA256SUMS https://github.com/immutability-io/vault-ethereum/releases/download/v$2/SHA256SUMS
  wget --progress=bar:force -O ./SHA256SUMS.sig https://github.com/immutability-io/vault-ethereum/releases/download/v$2/SHA256SUMS.sig
  keybase pgp verify -d ./SHA256SUMS.sig -i ./SHA256SUMS
  if [[ $? -eq 2 ]] ; then
    echo "Plugin Validation Failed: Signature doesn't verify!"
    exit 2
  fi
  rm ./SHA256SUMS.sig
  rm ./SHA256SUMS
}

grab_plugin $1 $2

$ ./grab_plugin.sh darwin 0.0.4
Signature verified. Signed by immutability 15 hours ago (2018-02-20 17:23:15 -0500 EST).
PGP Fingerprint: cf34990c53ef89590b5a3ce9c231201442e3a134.


$ unzip darwin.zip
Archive:  darwin.zip
  inflating: SHA256SUM
  inflating: vault-ethereum
We will be writing the plugin to the Vault plugins directory and registering it with the plugin catalog. The location of the plugin directory is configured in the vault.hcl file. Here is mine:
$ cat ~/etc/vault.d/vault.hcl
"default_lease_ttl" = "24h"

"max_lease_ttl" = "24h"

"backend" "file" {
  "path" = "/Users/immutability/etc/vault.d/data"
}

"api_addr" = "https://localhost:8200"

"listener" "tcp" {
  "address" = "localhost:8200"

  "tls_cert_file" = "/Users/immutability/etc/vault.d/vault.crt"
  "tls_client_ca_file" = "/Users/immutability/etc/vault.d/root.crt"
  "tls_key_file" = "/Users/immutability/etc/vault.d/vault.key"
}

"plugin_directory" = "/Users/immutability/etc/vault.d/vault_plugins"
Note the configuration for api_addr. This setting is critical for the plugin to communicate with the Vault server during mount time.
First we move the plugin:
$ mv vault-ethereum /Users/immutability/etc/vault.d/vault_plugins
Then we register the plugin in the catalog. We will use the SHA256SUM that was in the plugin archive:
$ echo $HOME
/Users/immutability

$ vault write sys/plugins/catalog/ethereum-plugin \
      sha_256="$(cat SHA256SUM)" \
      command="vault-ethereum --ca-cert=$HOME/etc/vault.d/root.crt --client-cert=$HOME/etc/vault.d/vault.crt --client-key=$HOME/etc/vault.d/vault.key"
Lastly, we have to mount the plugin as a secrets backend. (Note: We must have authenticated to Vault with permission to write to /sys/mounts*.)
$ vault secrets enable -path=ethereum -plugin-name=ethereum-plugin plugin
Now our plugin is installed and enabled. We configured the plugin as an administrative user. To properly demonstrate the power of Vault to manage access to the Ethereum backend, we will first create a non-administrative user who is not allowed to do any plugin management.
»Create an MFA-protected Authentication Backend
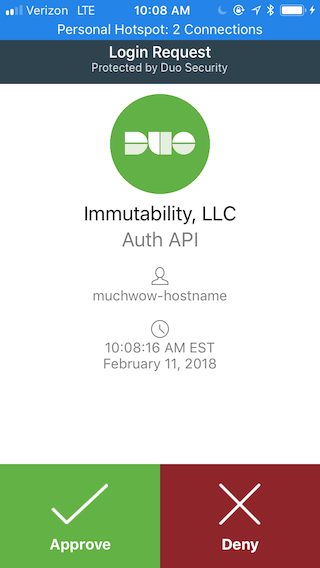
While we are still acting as an administrator, we will enable the Userpass Authentication Backend, configure it for MFA using Duo's free service, create a user named muchwow and, finally, attach this user to a policy that allows them access to the Ethereum backend. We also establish a fairly short TTL for this user— they will have to renew their session token before 10 minutes are up or they will have to re-authenticate.
The policy, ethereum_root.hcl, looks like this:
$ cat ethereum_root.hcl
path "ethereum*" {
  capabilities = ["create", "read", "update", "delete", "list"]
}
path "auth/userpass/users/muchwow/password" {
  capabilities = ["update"]
}
Care should always be taken when using passphrases. One of the benefits of Vault is that it provides many forms of authentication which means that you can avoid the awkwardness of handling certain kinds of passphrases.
$ vault auth enable userpass
Success! Enabled userpass auth method at: userpass/

$ vault policy write ethereum ethereum_root.hcl
Success! Uploaded policy: ethereum

$ read -s PASSPHRASE; vault write auth/userpass/users/muchwow \
    policies=ethereum \
    ttl=10m \
    max_ttl=60m \
    password=$PASSPHRASE; unset PASSPHRASE
Lastly, we configure MFA. I won't go over registration or device enrollment flows here. I am using Duo's service for MFA which is currently the only one supported in the OSS version of Vault. Configuring MFA requires you to get an API key from Duo.
$ vault write auth/userpass/mfa_config type=duo
Success! Data written to: auth/userpass/mfa_config

$ vault write auth/userpass/duo/access \
    host=$DUO_API_HOSTNAME \
    ikey=$DUO_INTEGRATION_KEY \
    skey=$DUO_SECRET_KEY
Success! Data written to: auth/userpass/duo/access

$ vault write auth/userpass/duo/config \
    user_agent="" \
    username_format="%s-hostname"
Success! Data written to: auth/userpass/duo/config
Now, we stop being the Vault administrator, exhaling loudly as the weight of that responsibility leaves us, and we authenticate as a normal user. When we do this for the first time, we are asked to enroll a device:
$ read -s PASSPHRASE; vault login -method=userpass \
    username=muchwow \
    password=$PASSPHRASE; unset PASSPHRASE

Error authenticating: Error making API request.

URL: PUT https://localhost:8200/v1/auth/userpass/login/muchwow
Code: 400. Errors:

* Enroll an authentication device to proceed (https://api-a84jf925.duosecurity.com/portal?code=A57A2D8bC4f7A654F180b929&akey=A57A2D8bC4f7A654F180b9)
We paste the URL into a browser, enroll our device and we try again:

$ read -s PASSPHRASE; vault login -method=userpass \
    username=muchwow \
    password=$PASSPHRASE; unset PASSPHRASE

Success! You are now authenticated. The token information displayed below
is already stored in the token helper. You do NOT need to run "vault login"
again. Future Vault requests will automatically use this token.

Key                    Value
---                    -----
token                  779c105f-da09-2330-f9cb-8b63aa4dd58f
token_accessor         3828e899-ca4f-10c5-0be6-ce21a99a6a6c
token_duration         24h
token_renewable        true
token_policies         [default ethereum]
token_meta_username    muchwow
Of course, even though we have MFA enabled on our account, we change our password for sanity's sake.
$ read -s PASSPHRASE; vault write auth/userpass/users/muchwow/password \
    username=muchwow \
    password=$PASSPHRASE; unset PASSPHRASE
»Using our MFA-enabled Ethereum Wallet
Whether we are running a private chain, testnet or on the mainnet, we may want to use existing accounts. These accounts are often stored in a file format known as a JSON keystore. The plugin supports importing JSON keystores. (For the Mist browser or Ethereum wallet, keystores are stored in ~/.ethereum/keystore.)
$ ls -la ~/.ethereum/keystore
total 24
drwxr-xr-x  5 immutability  admin  170 Dec  2 11:57 .
drwxr-xr-x  3 immutability  admin  102 Dec  2 11:55 ..
-rw-r--r--  1 immutability  admin  492 Dec  2 11:56 UTC--2017-12-01T23-13-37.315592353Z--a152e7a09267bcff6c33388caab403b76b889939
-rw-r--r--  1 immutability  admin  492 Dec  2 11:56 UTC--2017-12-01T23-13-56.838050955Z--0374e76da2f0be85a9fdc6763864c1087e6ed28b
-rw-r--r--  1 immutability  admin  492 Dec  2 11:57 UTC--2017-12-01T23-14-16.032409548Z--f19a9a9b2ad60c66429451075046869a9b7014f7
As was mentioned, handling passphrases is always problematic. Care should be taken when importing a keystore not to leak the passphrase to the shell's history file or to the environment. When we import the keystore, we need to specify the chain_id with which the account is associated. By default, the value is 4 which is the Rinkeby testnet. In this case, we use a chain_id=1977 which is my private chain:
$ read -s PASSPHRASE; vault write ethereum/import/wellfunded \
  chain_id=1977 \
  path=/Users/immutability/.ethereum/keystore/UTC--2017-12-01T23-13-37.315592353Z--a152e7a09267bcff6c33388caab403b76b889939 \
  passphrase=$PASSPHRASE; unset PASSPHRASE

Key    	Value
---    	-----
address	0xa152E7a09267bcFf6C33388cAab403b76B889939
We can read the attributes for this account stored at ethereum/accounts/wellfunded as follows:
$ vault read ethereum/accounts/wellfunded

Key             	Value
---             	-----
address      0xa152E7a09267bcFf6C33388cAab403b76B889939
blacklist    <nil>
chain_id     1977
rpc_url      http://localhost:8545
whitelist    <nil>
For convenience, we can also read the balance for this account. Everything is denominated in Wei:
$ vault read ethereum/accounts/wellfunded/balance
Key                 Value
---                 -----
address             0xa152E7a09267bcFf6C33388cAab403b76B889939
pending_balance     100000000000000000000000000
pending_nonce       0
pending_tx_count    0
We can also send Ethereum to accounts:
$ vault write ethereum/accounts/wellfunded/debit to=0x4169c9508728285e8A9f7945D08645Bb6b3576e5 value=10000000000000000000
Key    	Value
---    	-----
tx_hash	0xe99f3de1dfbae82121a009b9d3a2a60174f2904721ec114a8fc5454a96e62ba8
The complete API to the Ethereum plugin is documented here. Each API is exemplified using curl as a sample REST client.
»Offline Storage
Lastly, we want to demonstrate how easy it is to backup our Ethereum Wallet. If we want to move a personal wallet onto another machine or put it into offline storage, it is a very simple exercise. Before we take our wallet offline, we need to spend a moment talking about the Vault seal.
We haven't discussed Vault's most fundamental security mechanism: the sealing process using Shamir secret sharding. When Vault is initialized, a set of Shamir key shards are generated. These key shards are used to build a master encryption key which is used to encrypt all data in Vault. If you so desire, you can leverage Keybase PGP to create what amounts to a multisig mechanism to protect Vault: a quorum of key shard holders is necessary to unseal Vault— where each shard encrypted with a different PGP key. It should go without saying that these unseal keys should be stored securely.
Assuming that your unseal keys are safe and sound, putting a wallet into cold storage can be accomplished by simply killing the Vault process and moving the Vault data and configuration to a flash drive or other mount.
$ kill -2 $(ps aux | grep '/usr/local/bin/vault server' | awk '{print $2}')
$ mv -f $HOME/etc $COLD_STORAGE/etc
Restoring from cold storage is the opposite process with the additional step of unsealing the Vault.
»A Platform for Building Blockchain Wallets
The Ethereum plugin has more capabilities than we showed here. It supports whitelisting and blacklisting accounts, smart contract deployment and the signing and verification of arbitrary data. In this exercise, we were able to use Vault to build a MFA-enabled Ethereum Wallet. We did this with the simplest Vault authentication method, the userpass backend, but it is easy to see how we could leverage other authentication mechanisms: e.g., a CI/CD pipeline for smart contracts might use GitHub authentication (with MFA) to allow slaves to deploy Solidity code.
This exercise demonstrated using Vault as a personal wallet; however, the same basic techniques can be used for an enterprise. However, if you want to solve the Ethereum wallet use case for an enterprise, Vault Enterprise provides an even more compelling platform. In addition to Vault Enterprise's advanced replication and HA mechanisms, Vault Enterprise supports HSMs as a persistence mechanism for Vault keys. This makes Vault equivalent to what is called a hardware wallet. (Vault Enterprise with HSM support is very comparable to what Gemalto and Ledger have developed.) Lastly, while the Ethereum plugin does support whitelisting and blacklisting— capabilities that are essential for anti-money laundering compliance— Enterprise Vault additionally provides a sophisticated rules engine called Sentinel for more robust compliance support.
Vault, with its plugin architecture, is a platform for building advanced secrets management solutions. As such, it can become an enabler for enterprise adoption of blockchain.
Are you interested in telling others your HashiCorp story or perhaps how HashiCorp products helped with that amazing thing you built? Let us know. Email your story or idea to guestblogs@hashicorp.com
Sign up for the latest HashiCorp news
More blog posts like this one

Terraform provider for Google Cloud 7.0 is now GA
Version 7.0 of the HashiCorp Terraform Google Cloud provider adds new ephemeral resources, write-only attributes, and validation logic.

How to enable developer self-service at scale with Terraform and Waypoint
Learn how to simplify Terraform self-service with HCP Waypoint’s features for building golden deployment workflows.

Terraform now supports assigning agent pools at the project level
HCP Terraform and Terraform Enterprise users can now assign default agent pools at the project level, offering a more scalable and secure approach to agent pool configuration.