
Part 1 of this blog series, demonstrated how to deploy the infrastructure for a single Nomad server and four Nomad clients. In this installment of the blog series, you will deploy and configure HashiCorp Vault as a Nomad job.
»Deployment overview
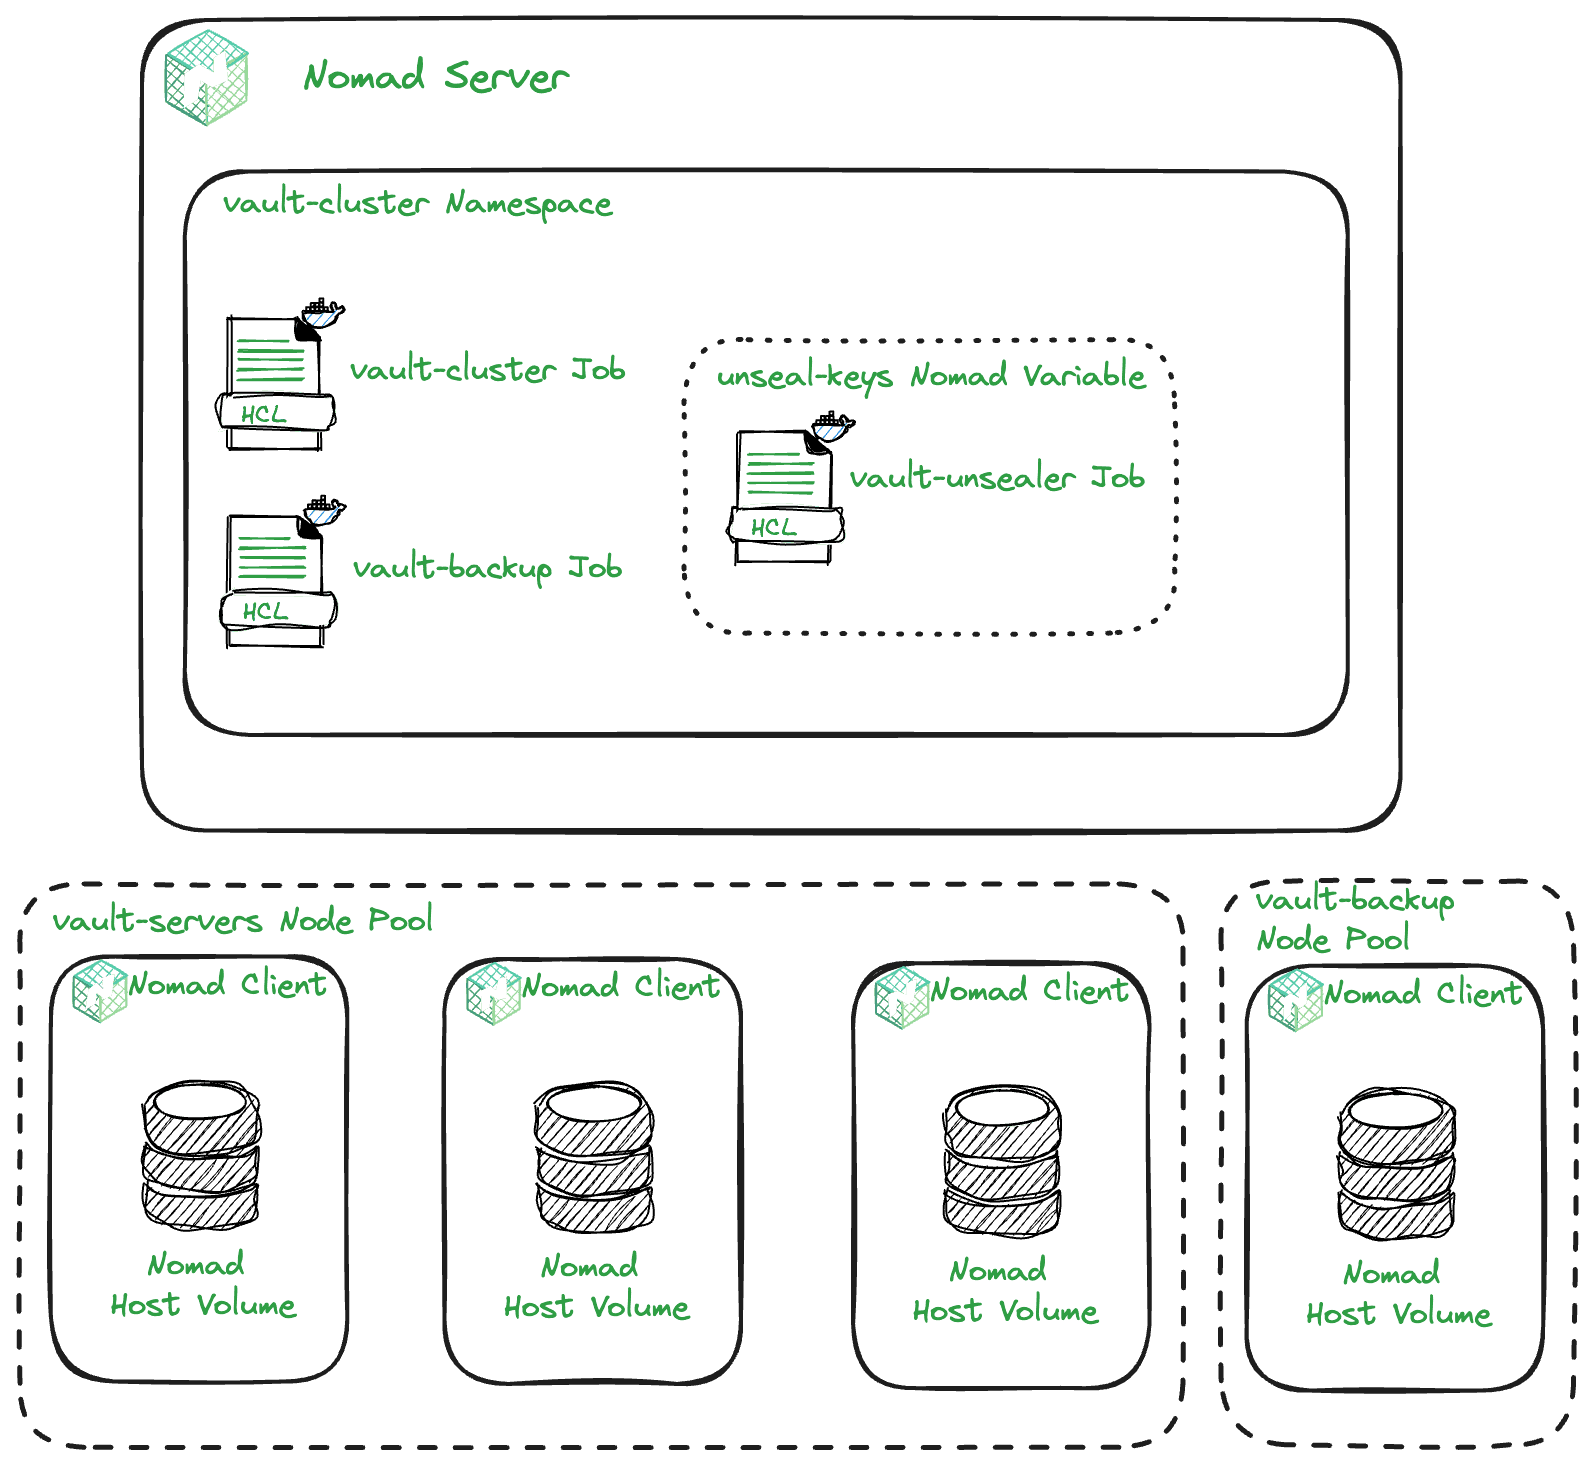
The diagram above gives an overview of how the Nomad jobs will be deployed and some of the Nomad features you will use to enable this. In total, there will be three Nomad jobs deployed to a Vault cluster namespace. However, this installment will focus on the Vault server cluster. Everything will be deployed using Terraform. In this installment, you will be working in the 2-nomad-configuration directory of the Vault on Nomad demo GitHub repository.
»Reading outputs from remote state
The infrastructure deployed using Terraform in part 1 of this blog series included some outputs that you need to deploy Vault as a Nomad job. These outputs are:
-
nomad_clients_private_ips -
nomad_clients_public_ips -
nomad_server_public_ip -
terraform_management_token
In order to read the values of these outputs, you can use the Terraform remote state data source to configure the Terraform provider for Nomad.
data "terraform_remote_state" "tfc" {
 backend = "remote"
 config = {
   organization = "org name"

   workspaces = {
     name = "1-nomad-infrastructure"
   }
 }
}
The code above points to the Terraform workspace from part 1 of the series: 1-nomad-infrastructure. This means you can access outputs from that workspace within this post’s workspace: 2-nomad-configuration. The full code example of how you use this to configure the provider can be found here.
»Nomad namespaces
Nomad has the concept of namespaces, which is a way to isolate jobs from one another. This allows you to create granular ACL policies specific to a namespace.
The first thing you need to do is create a namespace for all of your jobs related to Vault management. The code below creates a namespace named vault-cluster:
resource "nomad_namespace" "vault" {
 name        = "vault-cluster"
 description = "Vault servers namespace"
}
»Nomad job for Vault cluster
The next step is to write a Nomad job. Deploy a 3-node Vault cluster with the following parameters:
- Each Vault server must run on a separate Nomad client.
- They can only run on Nomad clients in the
vault-serversnode pool. - Vault will run as a Docker job.
- The job will use the host volumes configured on the Nomad clients to provide persistent storage for Vault.
Below is the complete Nomad jobspec:
job "vault-cluster" {
 namespace   = "vault-cluster"
 datacenters = ["dc1"]
 type        = "service"
 node_pool   = "vault-servers"

 group "vault" {
   count = 3

   constraint {
     attribute = "${node.class}"
     value     = "vault-servers"
   }

   volume "vault_data" {
     type      = "host"
     source    = "vault_vol"
     read_only = false
   }

   network {

     mode = "host"

     port "api" {
       to     = "8200"
       static = "8200"
     }

     port "cluster" {
       to     = "8201"
       static = "8201"
     }
   }

   task "vault" {
     driver = "docker"

     volume_mount {
       volume      = "vault_data"
       destination = "/vault/file"
       read_only   = false
     }

     config {
       image   = "hashicorp/vault:1.15"
       cap_add = ["ipc_lock"]

       ports = [
         "api",
         "cluster"
       ]

       volumes = [
         "local/config:/vault/config"
       ]

       command = "/bin/sh"
       args = [
         "-c",
         "vault operator init -status; if [ $? -eq 2 ]; then echo 'Vault is not initialized, starting in server mode...'; vault server -config=/vault/config; else echo 'Vault is already initialized, starting in server mode...'; vault server -config=/vault/config; fi"
       ]
     }

     template {
       data = <<EOH
ui = true

listener "tcp" {
 address         = "[::]:8200"
 cluster_address = "[::]:8201"
 tls_disable     = "true"
}

storage "raft" {
 path    = "/vault/file"

{{- range nomadService "vault" }}
 retry_join {
   leader_api_addr = "http://{{ .Address }}:{{ .Port }}"
 }
 {{- end }}
}

cluster_addr = "http://{{ env "NOMAD_IP_cluster" }}:8201"
api_addr     = "http://{{ env "NOMAD_IP_api" }}:8200"

EOH

       destination = "local/config/config.hcl"
       change_mode = "noop"
     }

     service {
       name     = "vault"
       port     = "api"
       provider = "nomad"

       check {
         name      = "vault-api-health-check"
         type      = "http"
         path      = "/v1/sys/health?standbyok=true&sealedcode=204&uninitcode=204"
         interval  = "10s"
         timeout   = "2s"
       }
     }

     resources {
       cpu    = 500
       memory = 1024

     }

     affinity {
       attribute = "${meta.node_id}"
       value     = "${NOMAD_ALLOC_ID}"
       weight    = 100
     }
   }
 }
}
There are three layers to the jobspec: the job, the groups, and the tasks. A job can have one or more groups within it. Each group is a collection of individual units of work that will all run on the same client. A task is an individual unit within a group. A group can have one or more tasks within it.
Let's break down the jobspec above:
»Job
The main specifications at the job layer are:
- Namespace: Created in the previous step, it tells Nomad to run the job within this namespace.
- Datacenters: Nomad has the concept of regions, which is an availability zone approach to managing compute. A region can have multiple datacenters. Clients and servers belong to datacenters. In the jobspec you are specifying that the job will run in the
dc1datacenter. To read more about regions and datacenters, see the Nomad architecture overview. - Type: Nomad provides four different types of workload schedulers,
service,batch,sysbatch, andsystem. In this case you are using the service type because Vault should be a long-lived job that never goes down. - Node pool: The node pool specifies which pool of compute nodes the job can run on. You have a dedicated Vault node pool because you do not want other non-Vault related jobs to be scheduled on these Nomad clients.
»Group
At the group layer you have the following specifications:
- Count: This tells Nomad how many instances of the tasks within the group it should run concurrently. In this tutorial, you are running a 3-node Vault cluster and you have specified
3as the value. - Constraint: This is a way to tell Nomad which nodes are eligible to run this job. For this tutorial, you want to constrain the job to nodes in the
vault-serversnode class. You also created avault-serversnode pool and you can also constrain the job to that. - Volume: This tells Nomad that the group requires a particular volume to run the tasks within it. There are two types of volumes in Nomad, host volumes and Container Storage Interface (CSI) volumes. In this case you are using the host volumes that you created in part 1 when you deployed the Nomad clients. This is to ensure that if Vault restarts, its data will persist.
- Network: This is where you can tell Nomad the network requirements of the group.
- Mode: Nomad supports four different network modes:
none,bridge,host, andContainer Network Interface (CNI). In this case, you are running it using the host network mode, which means it will join the host's network namespace. - Port: As part of your network configuration, you need to tell Nomad which ports you need allocated to the tasks within the group. In this case, the Vault API runs on port
8200and the cluster communications run on port8201. The job configuration above names these ports, so you can reference them later.
»Task
The task level specifications include:
- Driver: Nomad supports multiple driver types that allow you to schedule a wide variety of jobs. Because you want to run our Vault servers as containers, you are using the Docker driver. For more information about task drivers, see the drivers documentation.
- Volume mount: This mounts the volume you specified at the group layer to the task and sets the task permissions on the volume. Since Vault will need to be able to write data to this volume, its
read_onlypermission is set tofalse. - Config: The config block is where the bulk of the task configuration takes place.
- Image: As this is a Docker task, it needs to point to a Docker image. The Vault image is publicly accessible so there is no additional configuration required for Nomad to be able to pull this image from the Docker Hub registry.
- Cap add: The Vault container image by default will attempt to lock memory to prevent sensitive values from being swapped to disk and as a result must have the
ipc_lockcapability set to work. This capability is not allowed in Nomad by default and must be explicitly enabled in the client configuration file. - Ports: This adds the ports created at the group layer to the task. As mentioned before, naming the ports means they can be referenced in the task layer. In this case, the
apiandclusterports are attached to the task. - Volumes: The volume created at the group layer was mounted to the task; however, this volume is not yet exposed inside the container due to the nature of how containers operate. Because they are isolated units of work, the volume mount needs to be further mounted within the container itself. This piece of configuration takes care of that.
- Command: In order to start the Vault server within the container, a command needs to be run inside the container with an argument that is essentially a small bash script.
- Args: This one-liner script checks the seal status of Vault and advises on whether it is initialized or not. Either way, it starts Vault in server mode. This script is useful for troubleshooting startup issues with the server.
- Template: This is where a lot of the magic happens to configure each Vault server. Nomad has a built-in templating engine that renders files for jobs. In this case, it renders a Vault config file for each server. This is useful because without it, you would need to hard code some values, many of which you do not know upfront.
- Range function: The templating engine includes a range function, which is very similar to the range loop in Go. This loops over a list of things, in this case the Nomad service called Vault, then creates a
retry_joinstanza for each instance using the.Addressand.Portvalues it retrieves from the service to populate the stanza. More on the Nomad service registration in the next section. - Runtime environment variables: Nomad exposes a series of runtime environment variables that can be accessed and used as part of the template. In this case, the
cluster_addrandapi_addrconfiguration values are partially set using these variables to populate the IP address of the node. - Destination: This tells Nomad where to write the file it renders from this template.
- Change Mode: This configuration option tells Nomad how to handle file changes. In this case, the template is using runtime variables to render the file. If these values were to change, a new file would be rendered. This configuration tells Nomad what to do if that occurs. For example, Nomad could restart the job using the new file. In this case, Vault running on Nomad has been configured in a very static way (static ports, static IP addresses) so the job does not need to restart, hence why the
noopoption has been chosen. Other configuration options aresignal,restart, andscript.
- Range function: The templating engine includes a range function, which is very similar to the range loop in Go. This loops over a list of things, in this case the Nomad service called Vault, then creates a
- Service: Nomad supports two service registration providers. The first is the built-in Nomad service registry, and the other is Consul service mesh. In this case, the built-in Nomad provider is being used. It registers a service called
vault, using theapiport specified at the group layer.- Check: This is an optional health check that can be run to determine if the service should be marked as healthy.
- Type: Because this tutorial is using the Nomad built-in service registry, there are two types of health checks that are supported,
http, andtcp. In this case, the health check is an API call to a Vault endpoint sohttphas been specified. - Path: This specifies the endpoint to call for the health check. Out of the box, Vault uses these standard responses. Vault could be uninitialized and sealed, which would normally return a
501for an uninitialized node, and a503for a sealed node. This would mark the service as unhealthy, so to get around that issue, there are a series of parameters that can be added to the path that ensure that Vault responds with a204code for sealed and uninitialized nodes, and a200code for standby nodes. - Interval: This configuration specifies the interval between each health check.
- Timeout: For each health check, if it does not respond within a certain timeframe, it is best for it to timeout. This configuration specifies what that timeout threshold should be.
- Type: Because this tutorial is using the Nomad built-in service registry, there are two types of health checks that are supported,
- Check: This is an optional health check that can be run to determine if the service should be marked as healthy.
- Resources: This configuration specifies the CPU and memory requirements for each instance of the task. This can be adjusted according to individual requirements and based on the compute available.
- Affinity - This is how task placement preference is specified. In this case, there are three nodes in the node pool and there should only be one task running on each node. This configuration uses runtime variables to express this and ensure the desired outcome is met.
»Vault configuration file
In the last section, I went through the Nomad templating configuration to render the Vault configuration file.
ui = true

listener "tcp" {
 address         = "[::]:8200"
 cluster_address = "[::]:8201"
 tls_disable     = "true"
}

storage "raft" {
 path    = "/vault/file"
 retry_join {
   leader_api_addr = "http://10.0.101.190:8200"
 }
 retry_join {
   leader_api_addr = "http://10.0.101.233:8200"
 }
 retry_join {
   leader_api_addr = "http://10.0.101.162:8200"
 }
}

cluster_addr = "http://10.0.101.162:8201"
api_addr     = "http://10.0.101.162:8200"
The above snippet is the rendered Vault configuration file from the Nomad template. I'll break down the different configurations:
- UI: This setting configures whether the Vault UI is enabled.
- Listener: Vault supports two types of listeners,
tcpandunix. The purpose of the listener is to tell Vault what address and ports to listen to for cluster operation and api call requests. TLS specifics for the listener can also be configured here; however, as this is a demo, I have not enabled TLS. - Storage: Vault needs to store its secrets somewhere. For that, it uses storage backends. Vault supports 23 storage backends, each with their own pros and cons. Most backends are decoupled from Vault except the Raft integrated storage and in-memory backends, which are both coupled with Vault. In this case, Raft is being used because it lowers the complexity of management and allows high availability (HA) by replicating its data to all Vault servers in the cluster.
- Path: Since the Raft storage backend is being used, it needs to know where to store its data. This configuration option gives it the path to use for this purpose.
- Retry join: Raft supports HA and does this by creating a cluster using the Raft algorithm. The series of
retry_joinstanzas tell Vault which addresses it should contact to attempt to join the cluster. - Cluster addr: This configuration tells Vault what address and port to advertise to other nodes in the cluster when forwarding requests.
- API addr: This configuration tells Vault what address and port to advertise to other nodes in the cluster when redirecting clients.
For a full set of Vault configuration options, see the server configuration documentation.
»Deploying the Vault Nomad job
With the Nomad jobspec complete, Vault can now be deployed to Nomad. The Terraform code below will read the jobspec file and run it on Nomad:
resource "nomad_job" "vault" {
 jobspec = file("vault.nomad")
 depends_on = [
   nomad_namespace.vault
 ]
}
There is an explicit dependency on the namespace resource declared here to ensure Terraform does not try to deploy this job until the namespace is in place.
»Initializing Vault
So far, the steps taken will provide three Vault servers running on different VMs, but the cluster is not yet formed because Vault has not been initialized and unsealed. The first server to be initialized and unsealed will become the cluster leader and the following two servers will join that cluster. The Terraform provider for Vault does not have the ability to perform these actions by design so instead, TerraCurl can be used. Now to initialize Vault.
resource "terracurl_request" "init" {
 method         = "POST"
 name           = "init"
 response_codes = [200]
 url            = "http://${data.terraform_remote_state.tfc.outputs.nomad_clients_public_ips[0]}:8200/v1/sys/init"

 request_body   = <<EOF
{
 "secret_shares": 3,
 "secret_threshold": 2
}
EOF
 max_retry      = 7
 retry_interval = 10

 depends_on = [
   nomad_job.vault
 ]
}
This will make an API call to the first node in the pool to initialize it.
- It expects a
200response to the call. - The call is made to the
/v1/sys/initendpoint. - It specifies that the master key should be split into 3 shards and will require a minimum of any 2 of these shards to unseal Vault.
Vault will respond by returning 3 unseal keys and a root token.
»Storing unseal keys in Nomad variables
Now that Vault has been initialized, the unseal keys and root token need to be stored as Nomad variables. Nomad variables are encrypted key/value pairs that can be used by Nomad jobs. They have full ACL support meaning that granular policies can be written to ensure that only authorized entities are able to access them.
resource "nomad_variable" "unseal" {
 path      = "nomad/jobs/vault-unsealer"
 namespace = "vault-cluster"

 items = {
   key1       = jsondecode(terracurl_request.init.response).keys[0]
   key2       = jsondecode(terracurl_request.init.response).keys[1]
   key3       = jsondecode(terracurl_request.init.response).keys[2]
 }
}
This Nomad variable is only accessible to the vault-unsealer job and the job must be running within the vault-cluster namespace.
»Summary
This blog post has shown how to deploy a 3-node Vault cluster as a Nomad job. It has also taken a deep dive into Nomad, different aspects of the jobspec file including templates and runtime variables, and also Vault server configurations. Part 3 of this blog series will explore deploying some automation to assist in the day-to-day operations of Vault on Nomad.