

In the past, integrating Microsoft Azure DevOps pipelines with HashiCorp Vault has been challenging in certain instances. Unlike GitHub, Azure DevOps doesn’t provide an implicit platform-level identity for its pipelines, which can complicate its integration with external services such as Vault. The best option was usually to leverage Azure platform features such as service connections and service principal names (SPNs) to create a platform identity that allowed secure introduction to Vault.
In February 2024, Microsoft announced the general availability of workload identity federation (WIF) for Azure DevOps. This improves upon the previous integration options by providing a simplified, passwordless integration that uses the widely adopted OpenID Connect (OIDC) standard to authenticate and establish trust between Azure DevOps and Azure. It removes the secret zero problem that affected some previous integrations, eliminates the need to manage the day-to-day lifecycle of such credentials, and avoids the possibility of credential leakage because no credential is required to set up the integration in the first place. As a result, we can now leverage WIF to provide a platform identity to Azure DevOps pipelines that need to access secret data centrally managed by HashiCorp Vault — this includes static and dynamic secrets as well as many other kinds of credentials.
This post uses HCP Vault Dedicated to demonstrate this integration. HCP Vault Dedicated is HashiCorp’s cloud-hosted, single-tenant Vault offering. The concepts laid out here are also applicable to Vault Community and Vault Enterprise, assuming they are hosted in a location accessible from within Azure.
»Configuring Azure DevOps for workload identity federation
There are two ways to configure WIF within an Azure DevOps service connection.
The first — and recommended — method is to let Azure DevOps automatically create all the necessary objects within Azure DevOps and Entra ID for you.
The second method relies on integrating the Azure DevOps service connection with an existing workload identity and managing all the integration touchpoints yourself. While this takes a little more effort, it provides a bit more control over the end-to-end configuration, especially if you need to leverage existing service principals or managed service identities (and their associated SPNs) that are already scoped to the roles required by your pipelines.
While neither method is particularly difficult or complex, the end-to-end configuration in either workflow can be created using a straightforward Terraform configuration — a real bonus if you need to implement this at scale.
The rest of this post focuses on the first method of integration and the Terraform configurations that can be used to set it up.
»Creating the service connection with WIF
Although it is perfectly reasonable to configure the service connection using the manual methods described earlier, you need four bits of information in order to successfully configure the service connection using Terraform:
- A
project_id, which represents the Azure DevOps project - An
azurerm_spn_tenantid, which represents the Azure tenant - An
azurerm_subscription_id, which represents the Azure subscription - An
azurerm_subscription_name
You can then use Microsoft’s own Terraform provider for Azure DevOps to create the service connection. The example below references an Azure DevOps project created in the same configuration as the service connection, but it could just as easily reference a data lookup for an existing Azure DevOps project.
resource "azuredevops_serviceendpoint_azurerm" "automatic" {
project_id = azuredevops_project.this.id
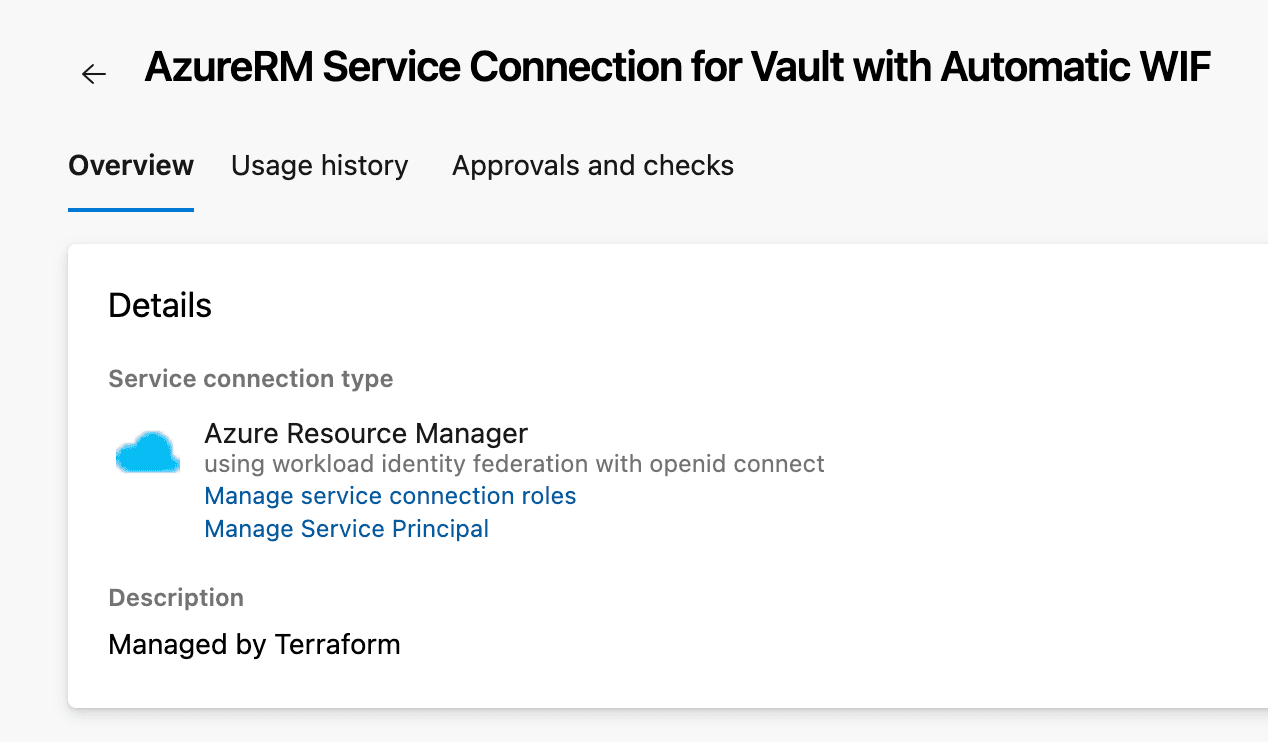
service_endpoint_name = "AzureRM Service Connection for Vault with Automatic WIF"
service_endpoint_authentication_scheme = "WorkloadIdentityFederation"
azurerm_spn_tenantid = "00000000-0000-0000-0000-000000000000"
azurerm_subscription_id = "00000000-0000-0000-0000-000000000000"
azurerm_subscription_name = "Subscription Name"
}
You want to limit Vault access to only the pipelines that require it, so the next step is to extract the service principal object ID associated with the service principal that is implicitly created when this configuration is applied. You can do this with the Terraform provider for Entra ID (formerly Azure Active Directory) and its service principal data lookup:
data "azuread_service_principal" "auto_wif" {
  client_id = azuredevops_serviceendpoint_azurerm.automatic.service_principal_id
}
You can then extract the Object ID as a Terraform output:
output "auto_wif_object_id" {
  value       = data.azuread_service_principal.auto_wif.object_id
  description = "the service principal object id for the automatically generated service principal"
}
If you prefer to locate this in the Azure portal, the value required is the object ID for the enterprise application that gets created when the service connection is configured.
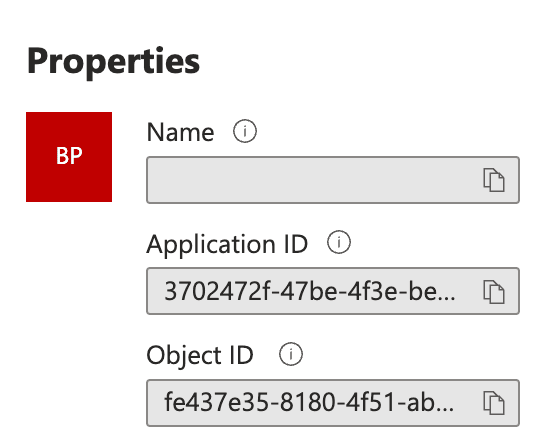
You can then use this service principal object ID in your HashiCorp Vault configuration to bind a role on the Azure auth method to a specific service principal or principals.
»Configuring HashiCorp Vault
You can use standard Vault CLI commands to enable and configure the Azure auth method, and to configure an appropriate role on that auth method to let an Azure DevOps pipeline authenticate. These broadly follow the pattern laid out in the documentation for the Azure auth method, with a few exceptions.
First, you need to enable the Azure auth method. Given that this will be servicing a distinct set of Vault clients, good practice is to enable the auth method at a path that reflects its use case. There is non-standard audience claim in use here, so this auth method is not suitable for standard Azure authentication workflows.
vault auth enable -path="ado" azure
Next, configure the method. Note that the resource parameter is subtly different from the default value of https://management.azure.com/. This value also appears in the audience claim of the tokens issued by Azure.
vault write auth/ado/config \
    tenant_id=00000000-0000-0000-0000-000000000000 \
    resource=https://management.core.windows.net/ \
    client_id=00000000-0000-0000-0000-000000000000\
    client_secret=sUp3r~S3Cr3t~cl1enT_S3Cr3t
Once the auth method is configured appropriately, finish up by configuring a role on that auth method for the Azure DevOps pipelines to reference during login. The role will impart suitable policies on the issued tokens for future use by the pipeline.
It’s a good idea to use lightweight batch tokens to authenticate the pipeline process. The features of the more commonly used service tokens are not required in these one-shot processes, and in large-scale environments where many pipelines are executing concurrently, many times a day, using batch tokens can drastically reduce the load on the Vault cluster. Just make sure that the token time-to-live (TTL) is long enough for your pipeline to complete all the tasks it needs to in Vault.
vault write auth/ado/role/pipeline-role \
    token_policies="default,azure-policy" \
    token_ttl=600 \
    token_type=batch \
    bound_service_principal_ids="00000000-0000-0000-0000-000000000000”
The value(s) passed to the bound_service_principal_ids parameter will be the service principal object ID retrieved from the output in either the Azure portal or the Terraform configuration provided earlier.
By binding the role to specific service principals, you’re implicitly limiting which identities associated with Azure DevOps pipelines are permitted to authenticate with Vault. Furthermore, use of the explicit binding simplifies the authentication process by removing the requirement to provide a subscription ID and a resource group name alongside the authentication request. Subscription ID and resource group are meaningless in the context of a pipeline; it is metadata that simply doesn’t exist.
As mentioned above, the next step is to learn how to set this up with Terraform. To automate the configuration of Vault, use the Terraform provider for Vault. Here is an example Terraform configuration to implement the CLI configuration described earlier:
resource "vault_auth_backend" "ado" {
  type = "azure"
  path = "ado"

  tune {
    listing_visibility = "unauth"
  }
}

resource "vault_azure_auth_backend_config" "ado" {
  backend       = vault_auth_backend.ado.path
  tenant_id     = “00000000-0000-0000-0000-000000000000”
  client_id     = “00000000-0000-0000-0000-000000000000”
  client_secret = “sUp3r~S3Cr3t~cl1enT_S3Cr3t”
  resource      = "https://management.core.windows.net/"

  lifecycle {
    // if we rotate the client secret outside of terraform in line with good practice, we don't want to trigger a change
    ignore_changes = [client_secret]
  }
}

resource "vault_azure_auth_backend_role" "ado" {
  backend       = vault_auth_backend.ado.path
  role          = "pipeline-role"
  token_ttl     = 600
  token_type    = “batch”

  token_policies = [
    "default", "pipeline-policy"
  ]

  bound_service_principal_ids = [“00000000-0000-0000-0000-000000000000”]
}
Again, note the presence of the distinct resource name, as well as the bound_service_principal_ids field.
With this configuration in place, you’re ready to put it to work.
»Configure Azure DevOps pipeline tasks
To authenticate with Vault and retrieve secret data, follow these four steps in the Azure DevOps pipeline:
- Establish your platform identity
- Retrieve a JWT from the platform representing that identity
- Present that JWT to Vault in an authentication request to retrieve a Vault token
- Use the Vault token from the authentication response to request secret data
Steps 1-3 can be accomplished within a single pipeline task, as shown below. Remember that once the Vault token is acquired, it can be reused within the scope of the pipeline as many times as the use case requires. The complete task is here:
  - task: AzureCLI@2
    displayName: "Establish Identity and Authenticate with Vault"
    env:
      VAULT_ADDR: https://my-hcp-vault-cluster-00000000.00000000.z1.hashicorp.cloud:8200
      VAULT_NAMESPACE: admin
    inputs:
      azureSubscription: 'AzureRM Service Connection for Vault with Automatic WIF'
      scriptType: 'bash'
      scriptLocation: 'inlineScript'
      inlineScript: |
        JWT=$(az account get-access-token --query accessToken --output tsv)
        VAULT_TOKEN=$(vault write -format=json auth/ado/login role=pipeline-role jwt="${JWT}" | jq -r .auth.client_token)

        # set task variables for future use in other tasks
        echo "##vso[task.setvariable variable=VAULT_TOKEN]$VAULT_TOKEN"
Let’s take a closer look at what is happening.
Before you can retrieve a JWT representing the platform identity for the pipeline, you first need to authenticate with that identity. The Azure CLI task definition provides a useful helper function to facilitate implicit authentication to Azure, which is enabled by populating the azureSubscription parameter on the task:
azureSubscription: 'AzureRM Service Connection for Vault with Automatic WIF'
This parameter associates the task with the Azure Resource Manager service connection you configured earlier. Note that the value provided to azureSubscription maps directly to the display name of the service connection.
Once the task authenticates, it allows you to request a JWT for your platform identity, which can be passed to a Vault authentication request that allows Vault to verify the identity of the calling client — in this case, the pipeline:
JWT=$(az account get-access-token --query accessToken --output tsv)
After the JWT has been issued, use it to authenticate with Vault using the Azure auth method — configured on the ado/ path — and the appropriate role:
VAULT_TOKEN=$(vault write -format=json auth/ado/login role=pipeline-role jwt="${JWT}" | jq -r .auth.client_token)
This task assumes that the Vault CLI tooling is either available on the build agent or is otherwise installed as part of the pipeline. Note that the Vault address and Vault namespace (relevant for the HCP Vault Dedicated and Vault Enterprise platforms) are configured as environment variables on the task itself.
Assuming the request to authenticate is successful, the response will be a JSON-formatted payload (due to the format parameter being set explicitly) from Vault that can be parsed with a tool such as jq, allowing the client’s Vault token to be retrieved. This can be set in the VAULT_TOKEN environment variable for further use within the pipeline:
echo "##vso[task.setvariable variable=VAULT_TOKEN]$VAULT_TOKEN"
After successfully populating the VAULT_TOKEN environment variable, you can use it in other tasks to retrieve secret data from secrets engines in Vault. In the example task provided below, the VAULT_TOKEN environment variable is used to retrieve KV data, but in reality you could use it for any secrets engine the token’s policy permitted access to.
Note that you don’t pass the JWT forward at this point. From a Vault perspective, it’s not needed anymore because you have the Vault token.
  - task: Bash@3
    displayName: Retrieve a Pipeline Secret
    env:
      VAULT_ADDR: https://my-hcp-vault-cluster-00000000.00000000.z1.hashicorp.cloud:8200
      VAULT_NAMESPACE: admin
    inputs:
      targetType: 'inline'
      script: |
         vault kv get -mount=kvv2 -format=json config/pipeline
Because the Vault token has already been injected into the environment, the task produces the content of the secret.
{
  "request_id": "34082681-2ee7-7fde-f695-e725c7c1a74a",
  "lease_id": "",
  "lease_duration": 0,
  "renewable": false,
  "data": {
    "data": {
      "secret1": "Pipeline Secret 1",
      "secret2": "Pipeline Secret 2"
    },
    "metadata": {
      "created_time": "2024-08-27T21:33:21.899708639Z",
      "custom_metadata": null,
      "deletion_time": "",
      "destroyed": false,
      "version": 5
    }
  },
  "warnings": null,
  "mount_type": "kv"
}
Again, as this data is being retrieved in a JSON format, it is easy to parse it for the required values — although you could just as easily alter the output format to better suit your use case.
When you first run the pipeline, you will be asked to grant permissions to the pipeline to make use of your service connection.
»Considerations
Despite the relative simplicity of the setup, it's important to highlight that the configuration by itself doesn't resolve all of the identity challenges associated with the integration of Azure DevOps and Vault.
The service connection is a project-level construct within Azure DevOps, and as such, does not let you finely scope what the identities associated with it represent. For instance, in other CI/CD platforms with implicit identities built in, a JWT issued by those platforms could represent a pipeline run, a repository, a branch on that repository, or some other suitable construct. There is no such option here, and you’re ultimately still relying on Azure’s managed identities.
Therefore, enforcing the principle of least privilege on pipelines’ access to secret data — ensuring a development pipeline doesn't access secrets belonging to a production pipeline, for example, or ensuring a feature branch doesn't access secrets belonging to a production branch — relies on the creation of multiple service connections in the Azure DevOps project for each desired scope, and the appropriate configuration of Vault to cater for that.
A simple version of this model might be represented as follows:
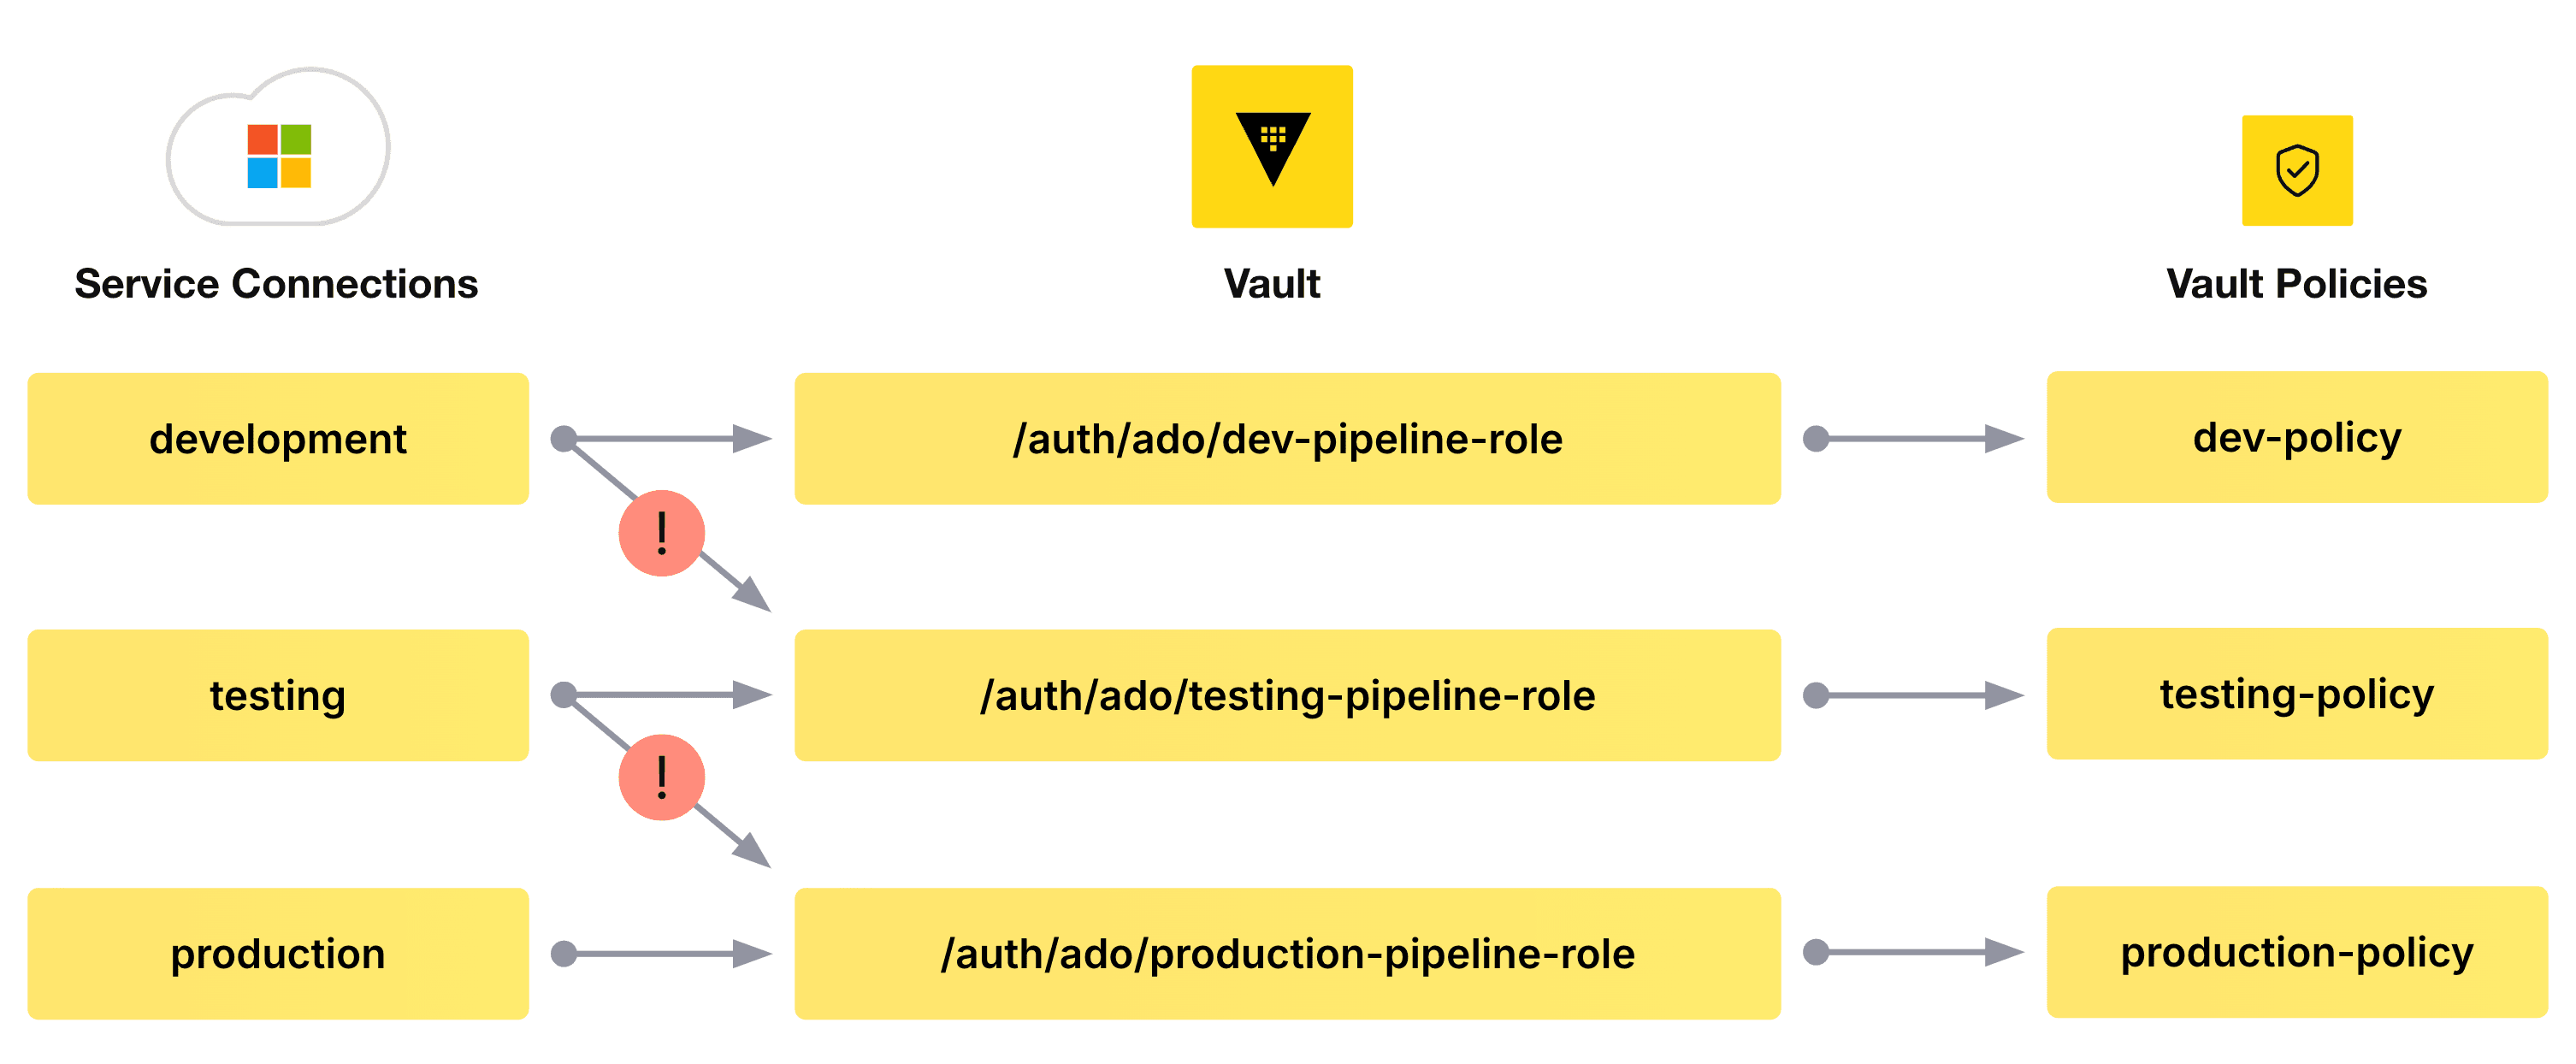
The service connections and the identities they represent should be bound to their respective roles in Vault using the aforementioned bound_service_principal_ids parameter on the role itself. This means that a pipeline can authenticate to Vault only against explicitly permitted Vault roles (conforming to Vault’s deny-by-default security stance). The policies associated with the tokens returned by Vault should then be limited in scope to the functions that role is explicitly permitted to undertake. This ensures that, for example, the identity associated with the development service connection cannot be used to authenticate against the testing-pipeline-role or the production-pipeline-role, and thus access secret data it shouldn't.
While enabling the service connections in Azure DevOps and configuring their respective roles and policies in Vault may present a challenge at scale, automation with Terraform can ease that burden and allow you to manage the process more efficiently.
»Summary
The setup defined in this tutorial allows an Azure DevOps pipeline to authenticate itself with HashiCorp Vault in a simple, secure, yet passwordless manner.
Moreover, even if you chose to manually configure WIF using an existing service principal or managed identity, the rest of the steps presented remain the same; a common integration pattern can be created irrespective of how you choose to work.
This integration opens up the possibility of consuming secrets from any of Vault’s secrets engines — not just static secrets as shown here, but dynamic database credentials, cloud provider credentials, PKI certificates, and much more.
Are you an Azure DevOps user looking to centralize secrets management for your Azure DevOps pipelines? Register on the HashiCorp Cloud Platform and get $50 of trial credit to try out this integration with HCP Vault Dedicated.