Traditional tools like VPNs or jump/bastion hosts allow remote users to access their infrastructure resources. But VPNs and jump hosts have limited capabilities to restrict what users can access once they’re on the network. In addition, VPNs and jump hosts have limited, if any, capabilities to manage credentials across the various types of resources in the environment. Furthermore, many organizations struggle with ensuring credentials across all of their resources are short-lived. Long-lived credentials are a security concern and increase the risk of an infiltration.
HashiCorp Boundary is a tool for managing access to modern, dynamic infrastructure based on identity. With Boundary, remote users can securely access their assigned infrastructure resources using credentials associated with an existing identity provider (Okta, Ping, Active Directory, etc.) without having to store or manage long-lived credentials for their different target resources. Administrators can centrally control and precisely assign the resources each remote user is allowed to access using role-based access controls (RBACs).
Boundary supports any TCP connection (SSH, RDP, databases, etc.) but this blog post focuses on the configuration steps to allow remote users access to their Kubernetes clusters using Boundary. It also discusses how to leverage HashiCorp Vault to auto-generate short-lived credentials just-in-time, so remote users don’t have to store permanent Kubernetes tokens on their local laptop/desktops.
First, we’ll put on our administrator’s hat and play the role of an admin deploying and configuring the environment. Then we'll switch gears and put on our remote user’s hat and walk through the experience of a Kubernetes developer remotely connecting to their assigned Kubernetes cluster.
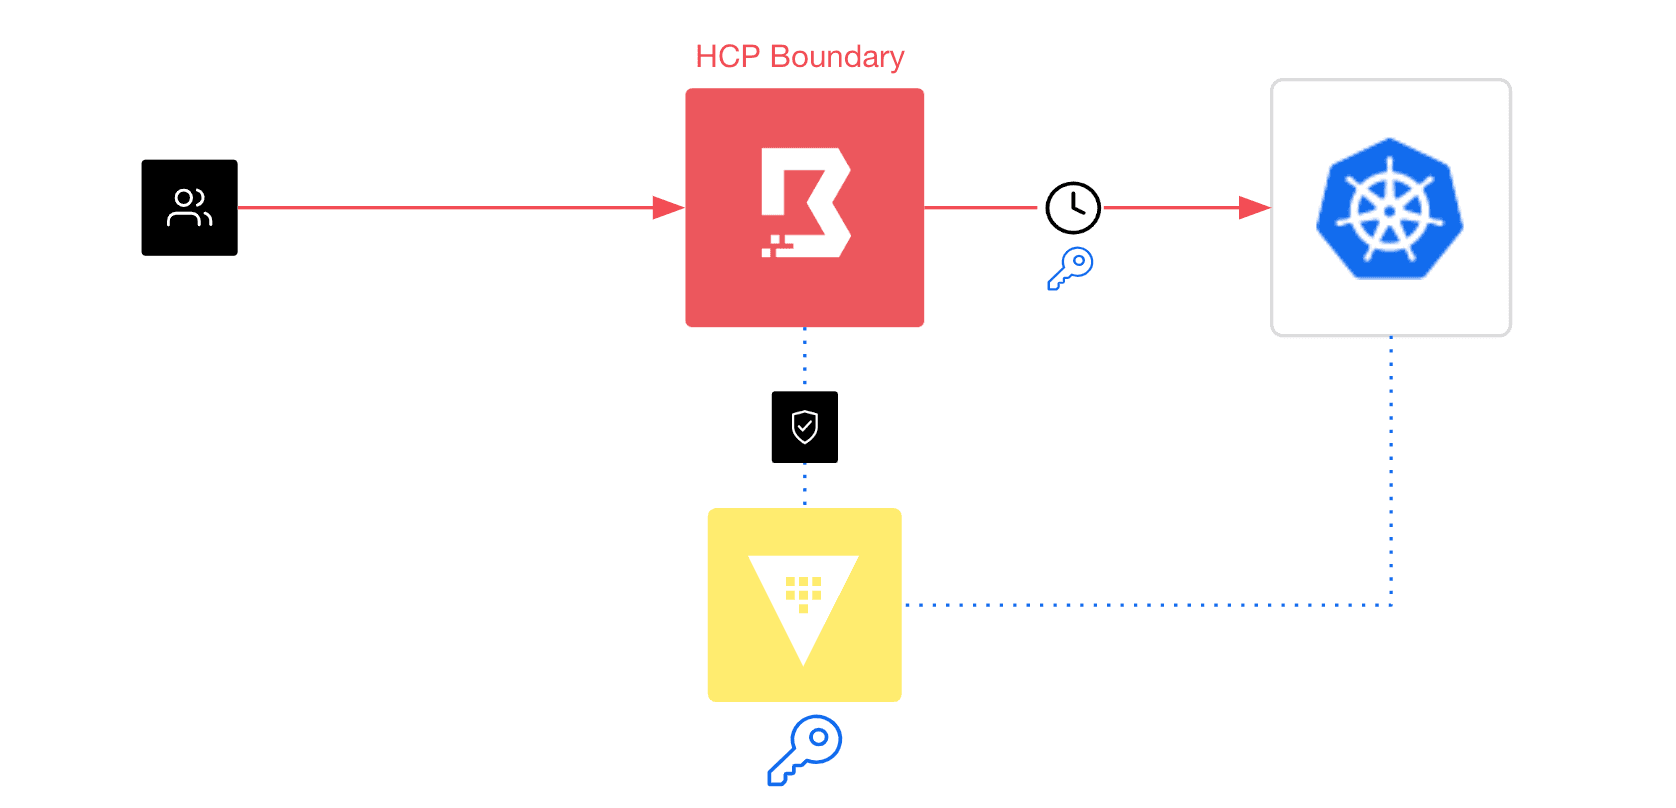
Boundary integrates with Vault to dynamically generate a short-lived Kubernetes token from the desired Kubernetes cluster. Boundary then presents the token to the user and proxies the connection through to the desired Kubernetes cluster.
»Assumptions and Prerequisites
This discussion assumes you already have an existing:
- HCP Boundary cluster: This tutorial explains how to deploy an HCP Boundary instance.
- Vault cluster: Any self-managed or HCP Vault deployment will work. This tutorial explains how to deploy a new HCP Vault cluster. This tutorial explains how to access your HCP Vault cluster.
- Kubernetes cluster: Any self-managed or cloud-managed Kubernetes cluster (EKS, AKS, etc.) should work.
»Configure Your Target Kubernetes Cluster
In order to remotely access your Kubernetes cluster, service account tokens need to be generated. They can be generated automatically by Vault and presented to remote users via Boundary. To enable Vault to auto-generate the service account tokens, follow these steps to create a Vault service account with appropriate permissions on the desired Kubernetes cluster:
On your Kubernetes cluster, create a Vault namespace:
kubectl create namespace vault
Run the command below to create a vault-cluster-role.yaml file. This file creates a Vault service account and cluster role. It associates them together with a cluster role binding on the Kubernetes cluster (in the Vault namespace):
cat > vault-cluster-role.yaml << EOF
apiVersion: v1
kind: ServiceAccount
metadata:
  name: vault
  namespace: vault
---
apiVersion: rbac.authorization.k8s.io/v1
kind: ClusterRole
metadata:
  name: k8s-full-secrets-abilities-with-labels
rules:
- apiGroups: [""]
  resources: ["namespaces"]
  verbs: ["get"]
- apiGroups: [""]
  resources: ["serviceaccounts", "serviceaccounts/token"]
  verbs: ["create", "update", "delete"]
- apiGroups: ["rbac.authorization.k8s.io"]
  resources: ["rolebindings", "clusterrolebindings"]
  verbs: ["create", "update", "delete"]
- apiGroups: ["rbac.authorization.k8s.io"]
  resources: ["roles", "clusterroles"]
  verbs: ["bind", "escalate", "create", "update", "delete"]
---
apiVersion: rbac.authorization.k8s.io/v1
kind: ClusterRoleBinding
metadata:
  name: vault-token-creator-binding
roleRef:
  apiGroup: rbac.authorization.k8s.io
  kind: ClusterRole
  name: k8s-full-secrets-abilities-with-labels
subjects:
- kind: ServiceAccount
  name: vault
  namespace: vault
EOF
Apply the vault-cluster-role.yaml file to your desired Kubernetes cluster:
kubectl apply -f vault-cluster-role.yaml
Create an environment variable for the service account token.
For Kubernetes version 1.24 or higher, run:
export VAULT_SVC_ACCT_TOKEN="$(kubectl create token vault -n vault)"
Kubernetes version 1.23 or lower, run:
export VAULT_SVC_ACCT_TOKEN="$(kubectl get secret -n vault `kubectl get
serviceaccounts vault -n vault -o jsonpath='{.secrets[0].name}'` -o
jsonpath='{.data.token}' | base64 -d)"
Copy the Kubernetes API server URL to an environmental variable:
export KUBE_API_URL=$(kubectl config view -o jsonpath="{.clusters[?(@.name == \"$(kubectl config current-context)\")].cluster.server}")
Retrieve the Kubernetes CA certificate and copy it to a ca.crt file:
kubectl config view --minify --raw --output 'jsonpath={..cluster.certificate-
authority-data}' | base64 -d > ca.crt
»Configure Vault
Next, you configure Vault’s Kubernetes secrets engine, which you will use to connect to the Kubernetes cluster and generate service account tokens. The Vault commands run from the local terminal, which means you’ll need to follow these steps to download and install Vault on your local machine.
Set your Vault instance’s address as an environment variable. This could be your Vault cluster’s public or private address as long as it is reachable from your local machine:
export VAULT_ADDR=<Your Vault address>
Set your Vault admin token as an environment variable. If you’re using HCP Vault, you can retrieve the HCP Vault admin token from the HCP Vault portal:
export VAULT_TOKEN=<Your Vault admin token>
If you are using HCP Vault, run the command below (skip this step if you are not using HCP Vault):
export VAULT_NAMESPACE=admin
Enable the Kubernetes and Key/Value v2 secrets engine on the Vault cluster:
vault secrets enable kubernetes
vault secrets enable -path=secret kv-v2
Upload the Kubernetes ca.crt file to the Vault Key/Value v2 secrets engine:
vault kv put secret/k8s-cluster ca_crt=@ca.crt
Configure the Kubernetes engine using the environment variables to point to your Kubernetes cluster:
vault write -f kubernetes/config \
  kubernetes_host=$KUBE_API_URL \
  kubernetes_ca_cert=@ca.crt \
  service_account_jwt=$VAULT_SVC_ACCT_TOKEN
Note: Make sure you have the Kubernetes ca.crt file in your current directory. (The retrieval of the ca.crt file was explained in the Configure Your Target Kubernetes Cluster section.)
Create a Vault role. This Vault role will have permissions to create a new Kubernetes service account and service account token on your Kubernetes cluster.
vault write kubernetes/roles/auto-managed-sa-and-role \
allowed_kubernetes_namespaces="*" \
token_default_ttl="10m" \
generated_role_rules='{"rules":[{"apiGroups":[""],"resources":["pods"],"verbs":["list"]}]}'
Note: This command creates a Vault role that is allowed to create a Kubernetes service account and token in any Kubernetes namespace. The Kubernetes service account is allowed to list pods for this Kubernetes cluster, and any token generated with the service account will expire in 10 minutes. You can customize what the service account is allowed to do by changing the generated_role_rules parameter that corresponds with the Kubernetes RBAC rules.
Generate a new service account token. The command below creates a new service account in the default namespace on your Kubernetes cluster. It also generates a service account token that can be presented to the remote user to connect to the Kubernetes cluster:
vault write kubernetes/creds/auto-managed-sa-and-role \
    kubernetes_namespace=default
Example output (truncated):
vault write kubernetes/creds/auto-managed-sa-and-role \
    kubernetes_namespace=default

Key                          Value
---                          -----
lease_id                     kubernetes/creds/auto-managed-sa-and-role/2zcMUUFGaCV3u6OAa5mLkmr1.ufbBB
lease_duration               10m
lease_renewable              false
service_account_name         v-token-hc-auto-man-1670545626-8fenpkjm2gqvj5gzk8usqmkq
service_account_namespace    default
service_account_token        eyJhbGciOiJSUzI1NiIsImtpZCI6InhJU1VQQ0VTVnF0YjU1VzNzVWpnZkg5d21jb25aX0licmtoeUhEcXM5QjgifQ.eyJhdWQiOlsiaHR0cHM6Ly9teS1rdWJlcm5ldGVzLWNsdXN0ZXItZG5zLWUwYWUxZTM1LmhjcC5lYXN0dXMuYXptazhzLmlvIiwiXCJteS1rdWJlcm5ldGV…
Set an environment variable with the service account token generated above:
export REMOTE_USER_TOKEN=<service account token>
On your Kubernetes cluster, confirm that the new service account was created:
kubectl get serviceaccount
NAME
default
v-token-hc-auto-man-1670545626-8fenpkjm2gqvj5gzk8usqmkq
Test out this new service account token to see if you can connect to the Kubernetes cluster. First, deploy a test pod on your Kubernetes cluster:
kubectl run nginx --image=nginx
Next, change your current kubectl context to any other Kubernetes cluster. You want to make sure your kubectl command will not use the account token configured in your current context:
kubectl config use-context <any other Kubernetes cluster>
Test the connection with kubectl get pod on Kubernetes cluster:
kubectl get pod --certificate-authority=ca.crt --server=$KUBE_API_URL --token=$REMOTE_USER_TOKEN

NAME    READY   STATUS    RESTARTS   AGE
nginx   1/1     Running   0          15m
Note: Make sure you have the Kubernetes ca.crt file in your current directory. (The retrieval of the ca.crt file was explained in the _Configure Your Target Kubernetes Cluster _section.)
Try again with kubectl get node:
kubectl get node --certificate-authority=ca.crt --server=$KUBE_API_URL
--token=$REMOTE_USER_TOKEN

Error from server (Forbidden): nodes is forbidden: User
"system:serviceaccount:default:v-token-hc-auto-man-1670545626-
8fenpkjm2gqvj5gzk8usqmkq" cannot list resource "nodes" in API group "" at the
cluster scope
Notice that it fails. This is expected, because as explained in the Configure Vault section, the service account does not have permission to list the nodes, only the pods.
If you’ve gotten to this point, you’re in great shape.
»Configure Vault for Boundary Access
So far, you’ve learned that Vault can dynamically generate temporary service accounts and tokens for your target Kubernetes cluster. The tokens can be presented to the remote user to connect to the Kubernetes cluster. Obviously, this is a fairly manual process and as an administrator, you don’t want developers pinging you every time they need access, especially since the process is generating short-lived tokens. This simply wouldn’t scale unless there’s an automated way to provision these Kubernetes tokens to remote users. Fortunately, Boundary can facilitate and automate this whole process.
In order for Boundary to work with Vault, follow these steps to provide Boundary with a Vault token allowing it to access Vault:
Run the command below to create a new Vault policy file. This policy provides Boundary access to very specific paths and privileges within Vault, including the privilege to generate service account tokens through the auto-managed-sa-and-role role that you created earlier in the Configure Vault section. It also has permissions to access the Kubernetes ca.crt file that we stored in the secret/data/k8s-cluster path:
cat > boundary-controller-policy.hcl << EOF
path "auth/token/lookup-self" {
  capabilities = ["read"]
}

path "auth/token/renew-self" {
  capabilities = ["update"]
}

path "auth/token/revoke-self" {
  capabilities = ["update"]
}

path "sys/leases/renew" {
  capabilities = ["update"]
}

path "sys/leases/revoke" {
  capabilities = ["update"]
}

path "sys/capabilities-self" {
  capabilities = ["update"]
}

#Permissions to assume auto-managed-sa-and-role role
#and update (aka generate) K8s tokens
path "kubernetes/creds/auto-managed-sa-and-role" {
  capabilities = ["update"]
}

#Permissions to access Kubernetes CA certificate stored
#in this path
path "secret/data/k8s-cluster" {
 capabilities = ["read"]
}
EOF
Apply the policy to Vault:
vault policy write boundary-controller boundary-controller-policy.hcl
Create a new token with the policy. This token is given to our Boundary cluster allowing it to access Vault:
vault token create \
  -no-default-policy=true \
  -policy="boundary-controller" \
  -orphan=true \
  -period=20m \
  -renewable=true \
  -format=json
Example:
% vault token create \
	-no-default-policy=true \
	-policy="boundary-controller" \
	-orphan=true \
	-period=20m \
	-renewable=true \
	-format=json
.
.
.
	"auth": {
		"client_token":
"hvs.CAESIOWdddyTNsLjt_sZQgCRkDnXL4chzBxinaI3Zvny0ZccGigKImh2cy4xWFVLeVdOT3l2ZEpYc29pRjJtcXF1REYudWZiQaaa54cB",
    "accessor": "VcRXYUZusletQ4VvxxjkVxmw.ufbBB",
Copy the client_token in the output. You will use the token later to configure Boundary.
»Configure Boundary Credential Store
Now you’re ready to configure your HCP Boundary cluster. It’s assumed that you have already created an org and project. If not, the Manage Scopes with HCP Boundary tutorial includes detailed steps on creating orgs and projects. For additional details on how resources are organized between orgs and projects, refer to Boundary’s domain model. Here are the steps to configure your HCP Boundary cluster:
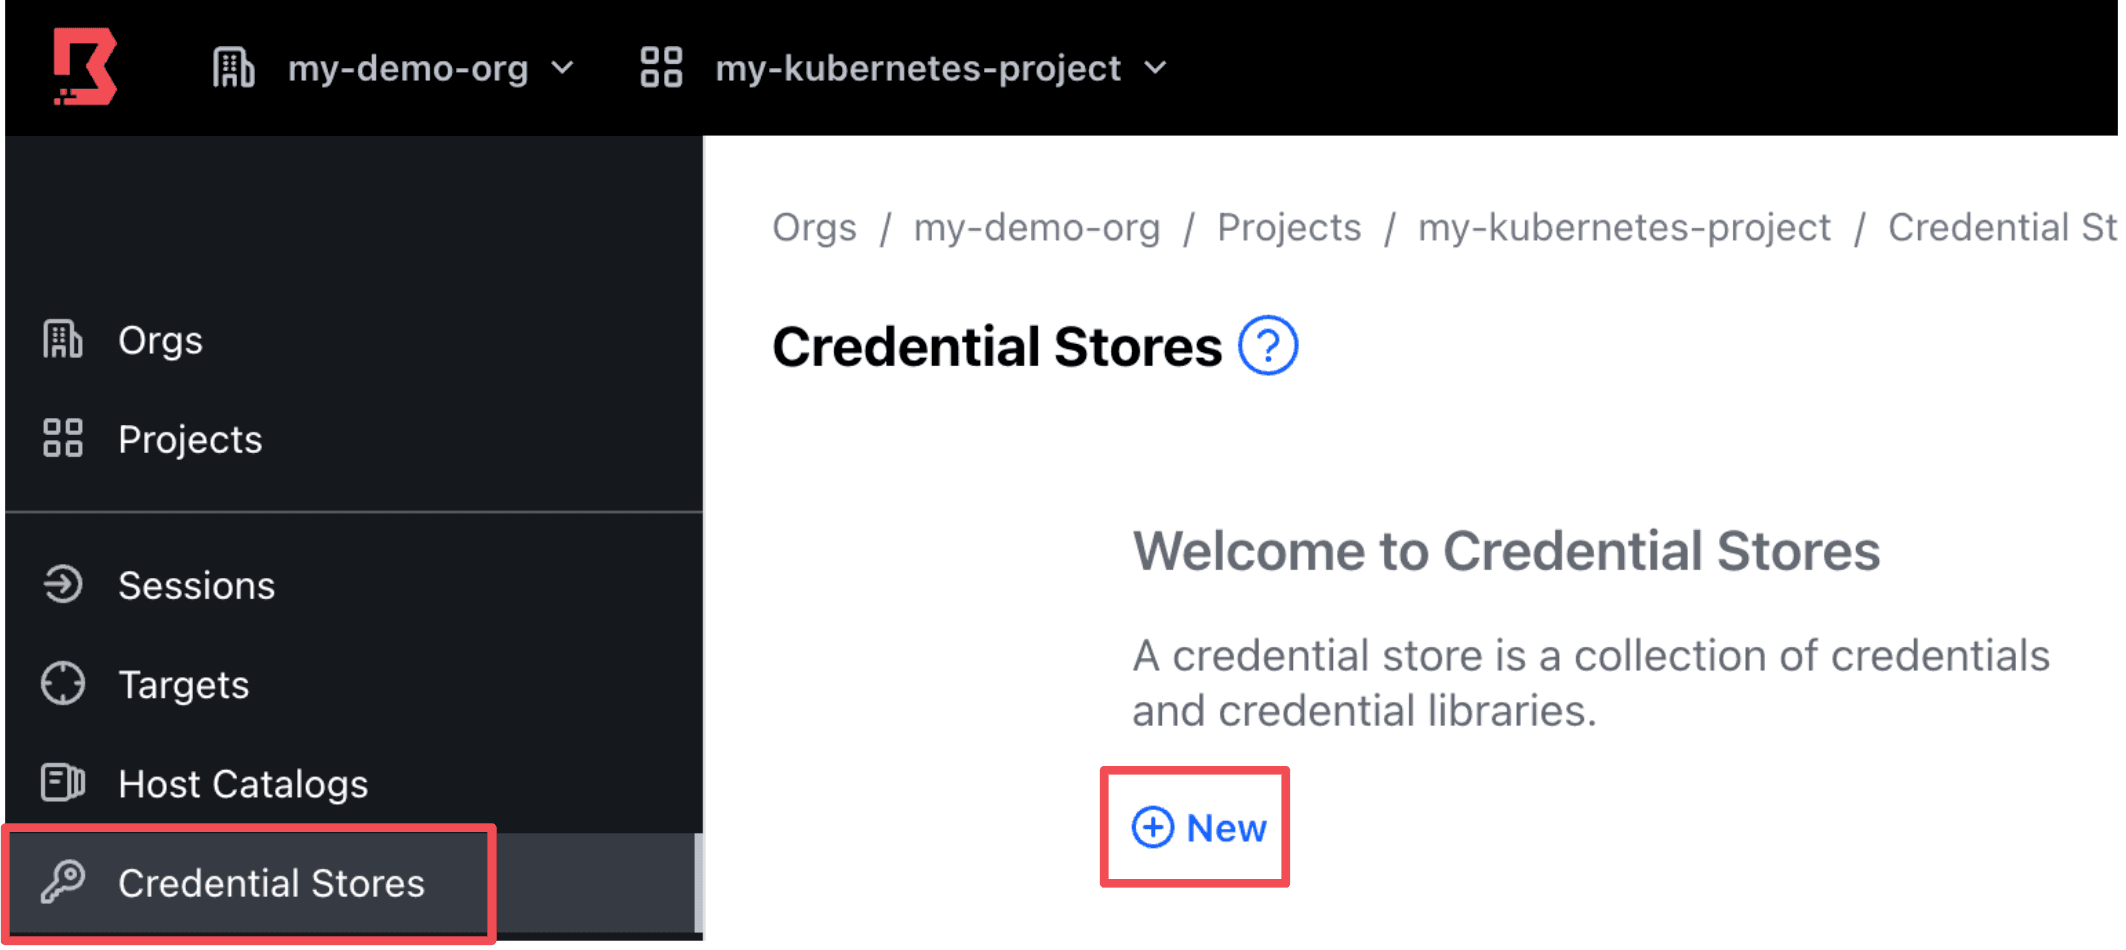
In your Boundary UI, navigate to your desired org and project. Navigate to the Credential Stores side-tab and click New to create a new Credential Store.
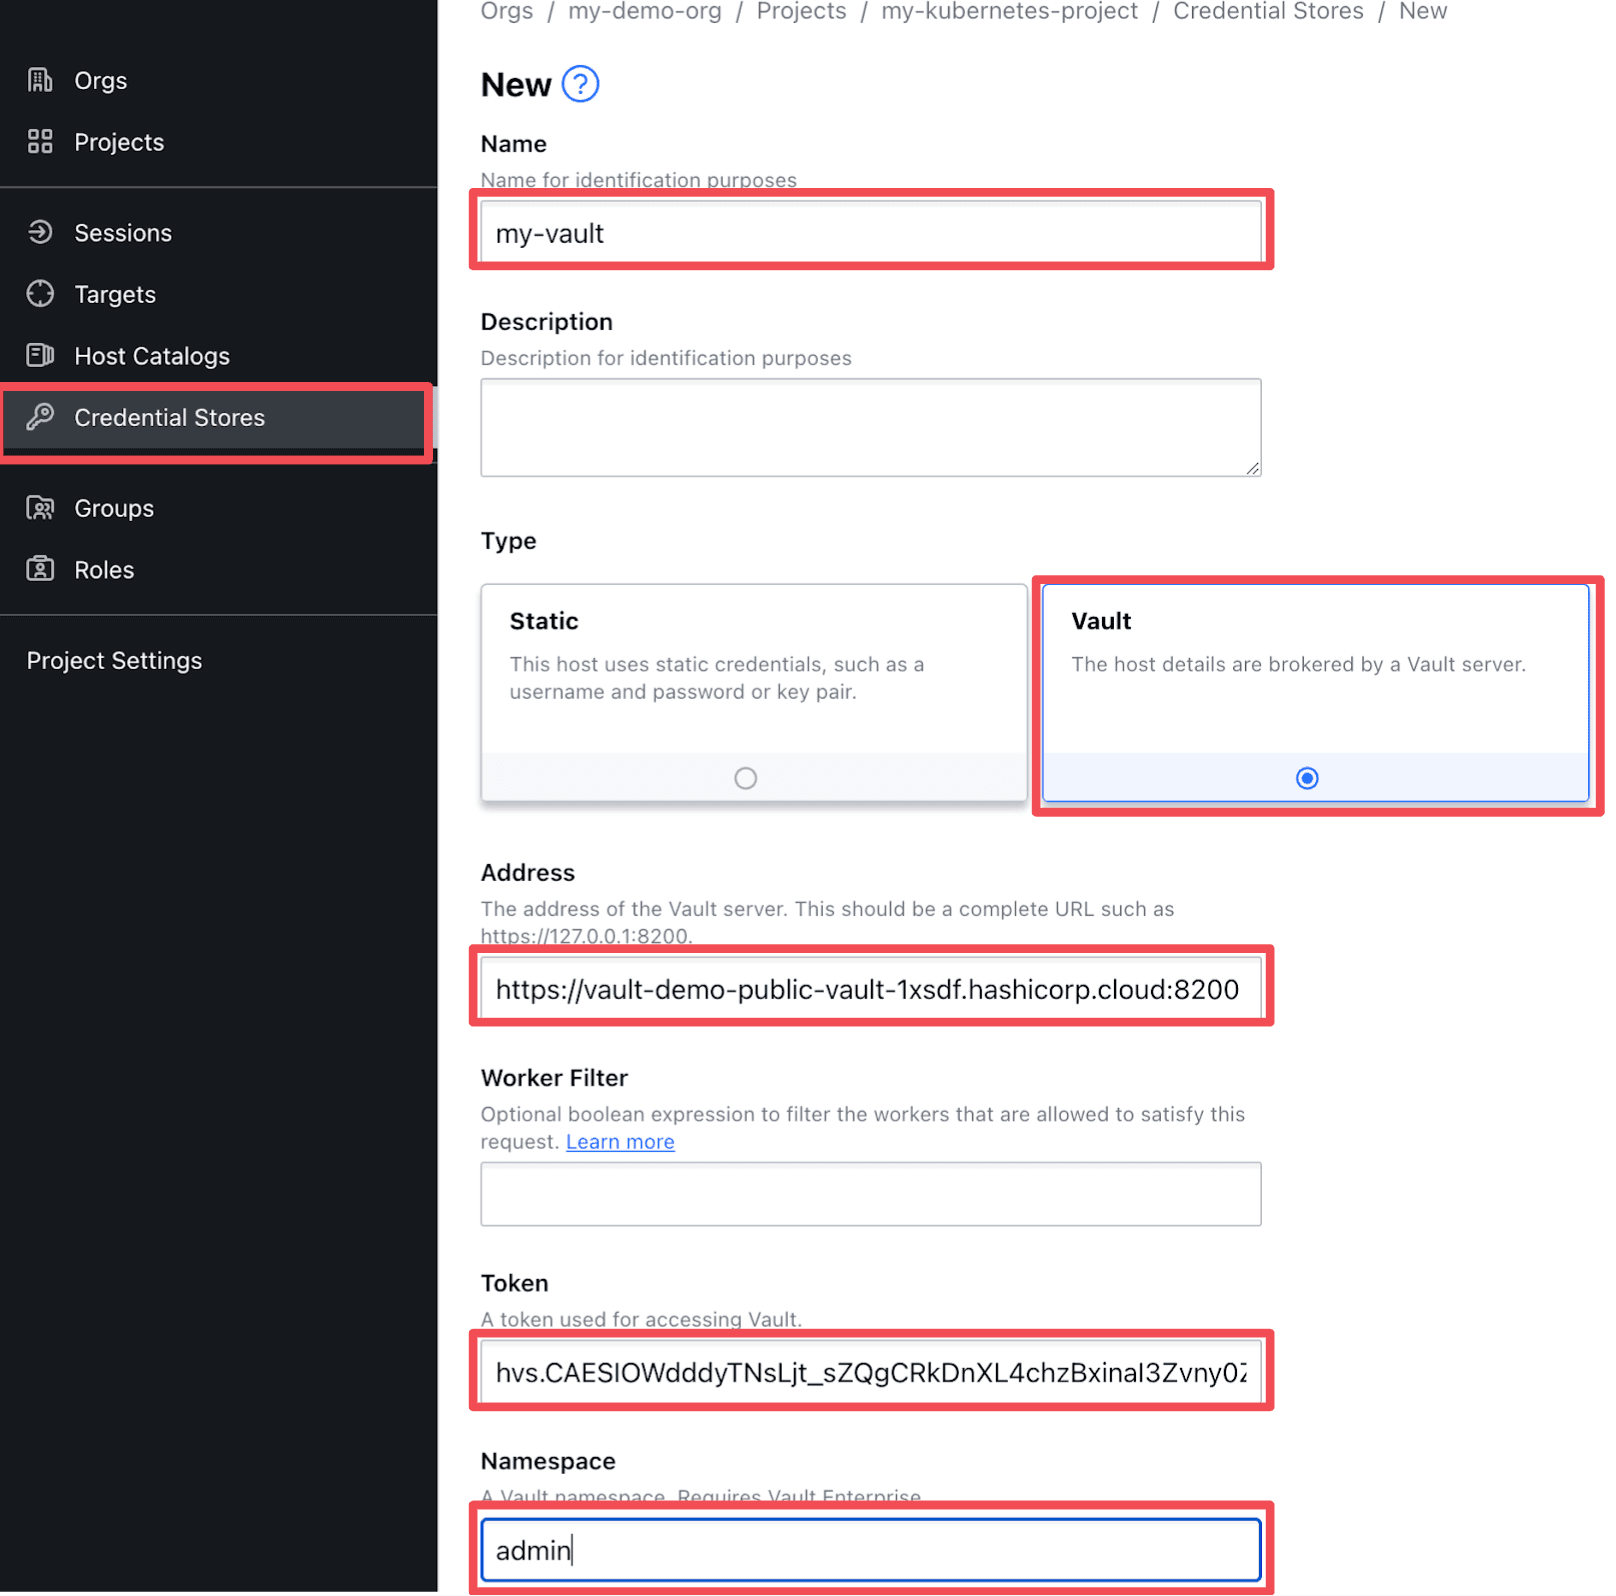
Configure your credential store so that it points to your Vault instance:
- Name: <Your desired name>
- Type: Vault
- Address: <Vault address and port number>
- Token: <Vault
client_tokencreated in Configure Vault for Boundary Access section> - Namespace: <If using HCP Vault, set to
admin>
Make sure the Vault address you provide in the Address field is reachable from your HCP Boundary cluster. Also, make sure to include the port number (default is port 8200). The screenshot below shows how this might look:
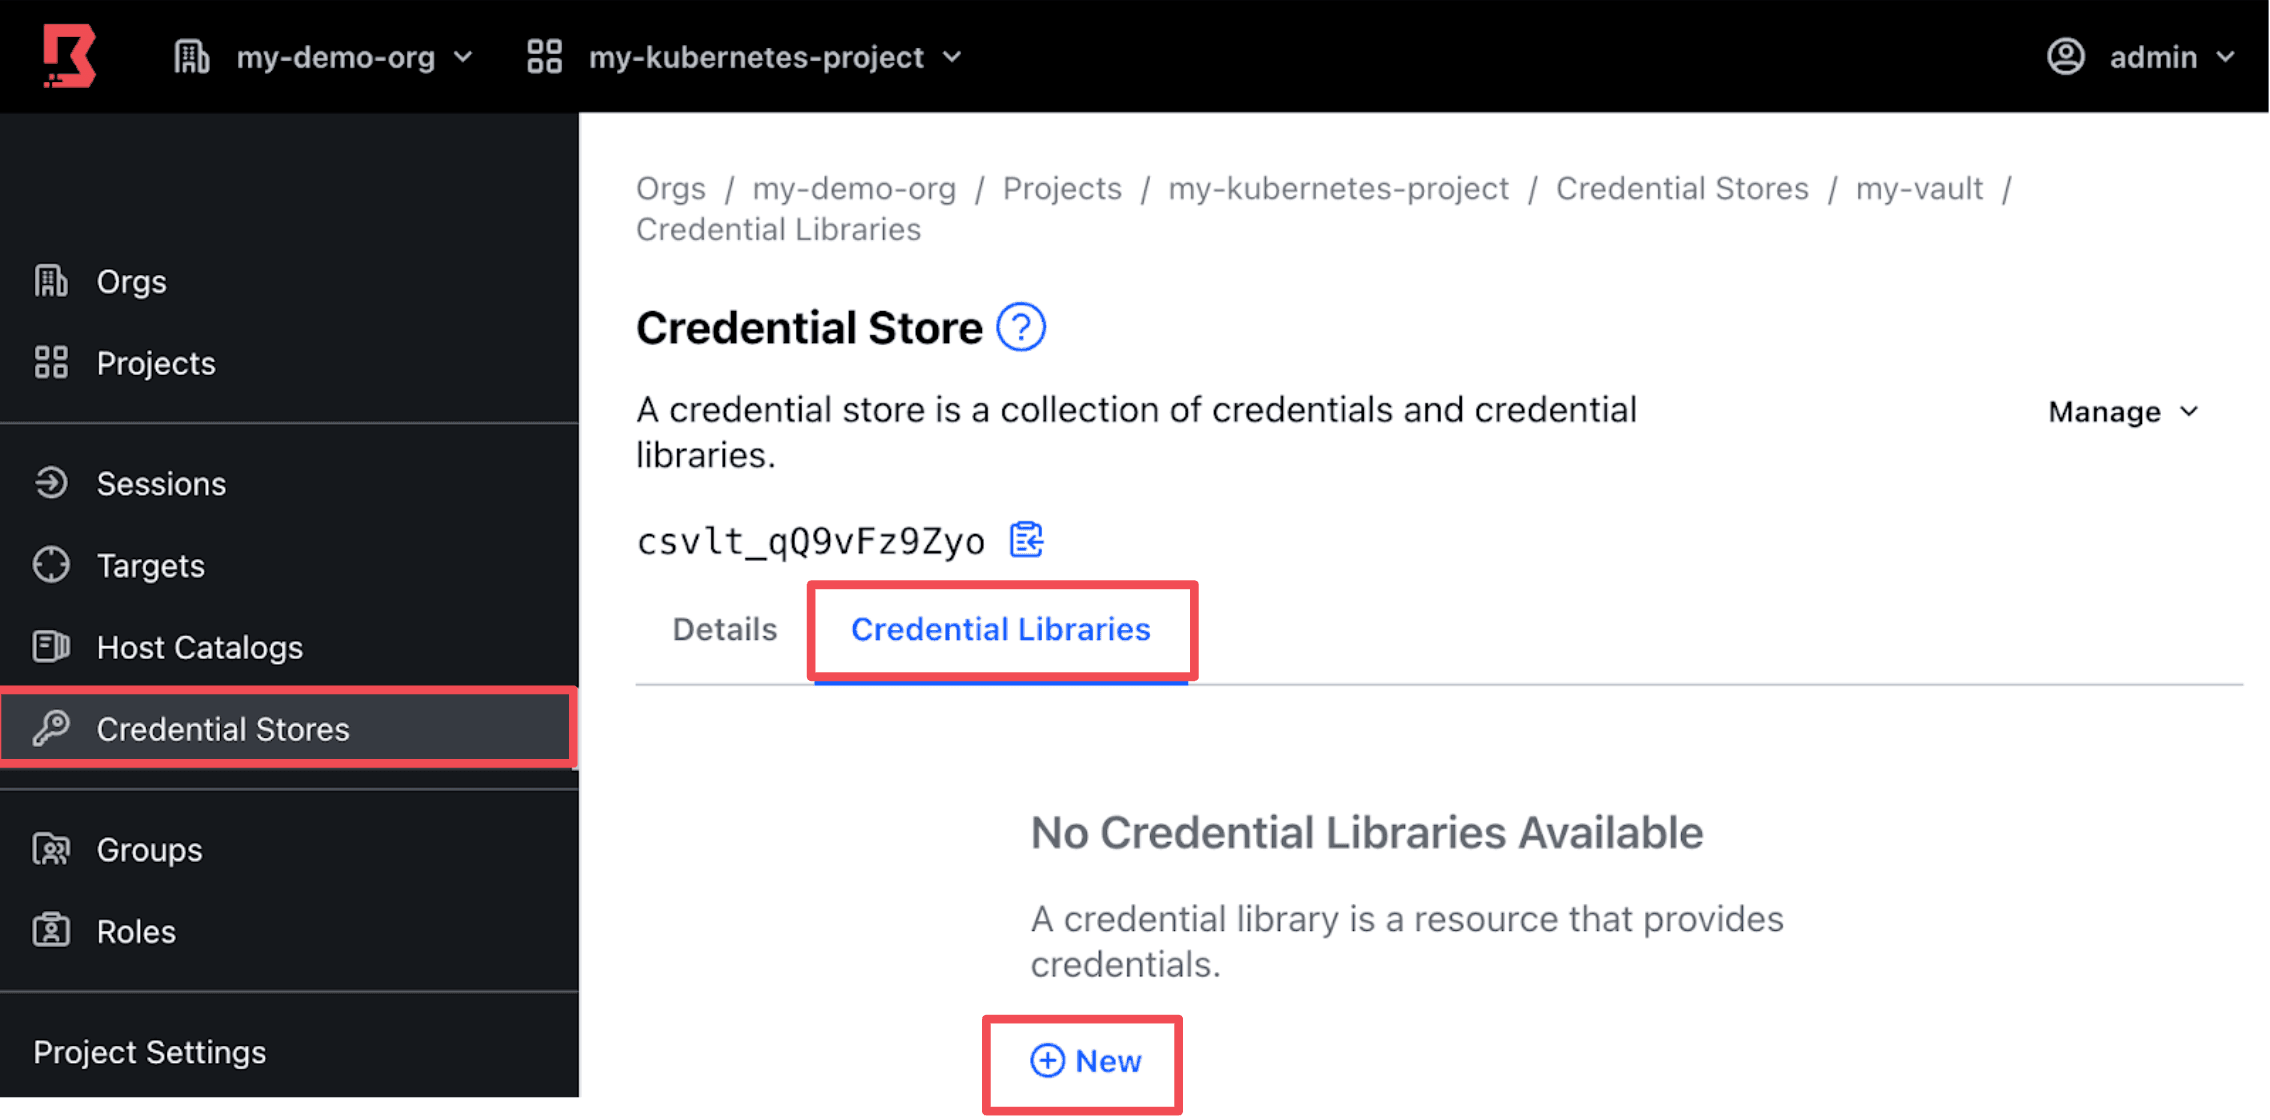
On your newly created credential store, click on the Credential Libraries tab and click New.
Configure the credential library with these parameters:
- Name: <Your desired name>
- Vault Path:
kubernetes/creds/auto-managed-sa-and-role - HTTP Method: POST
- HTTPS Method POST Request Body:
{
  "kubernetes_namespace": "default"
}
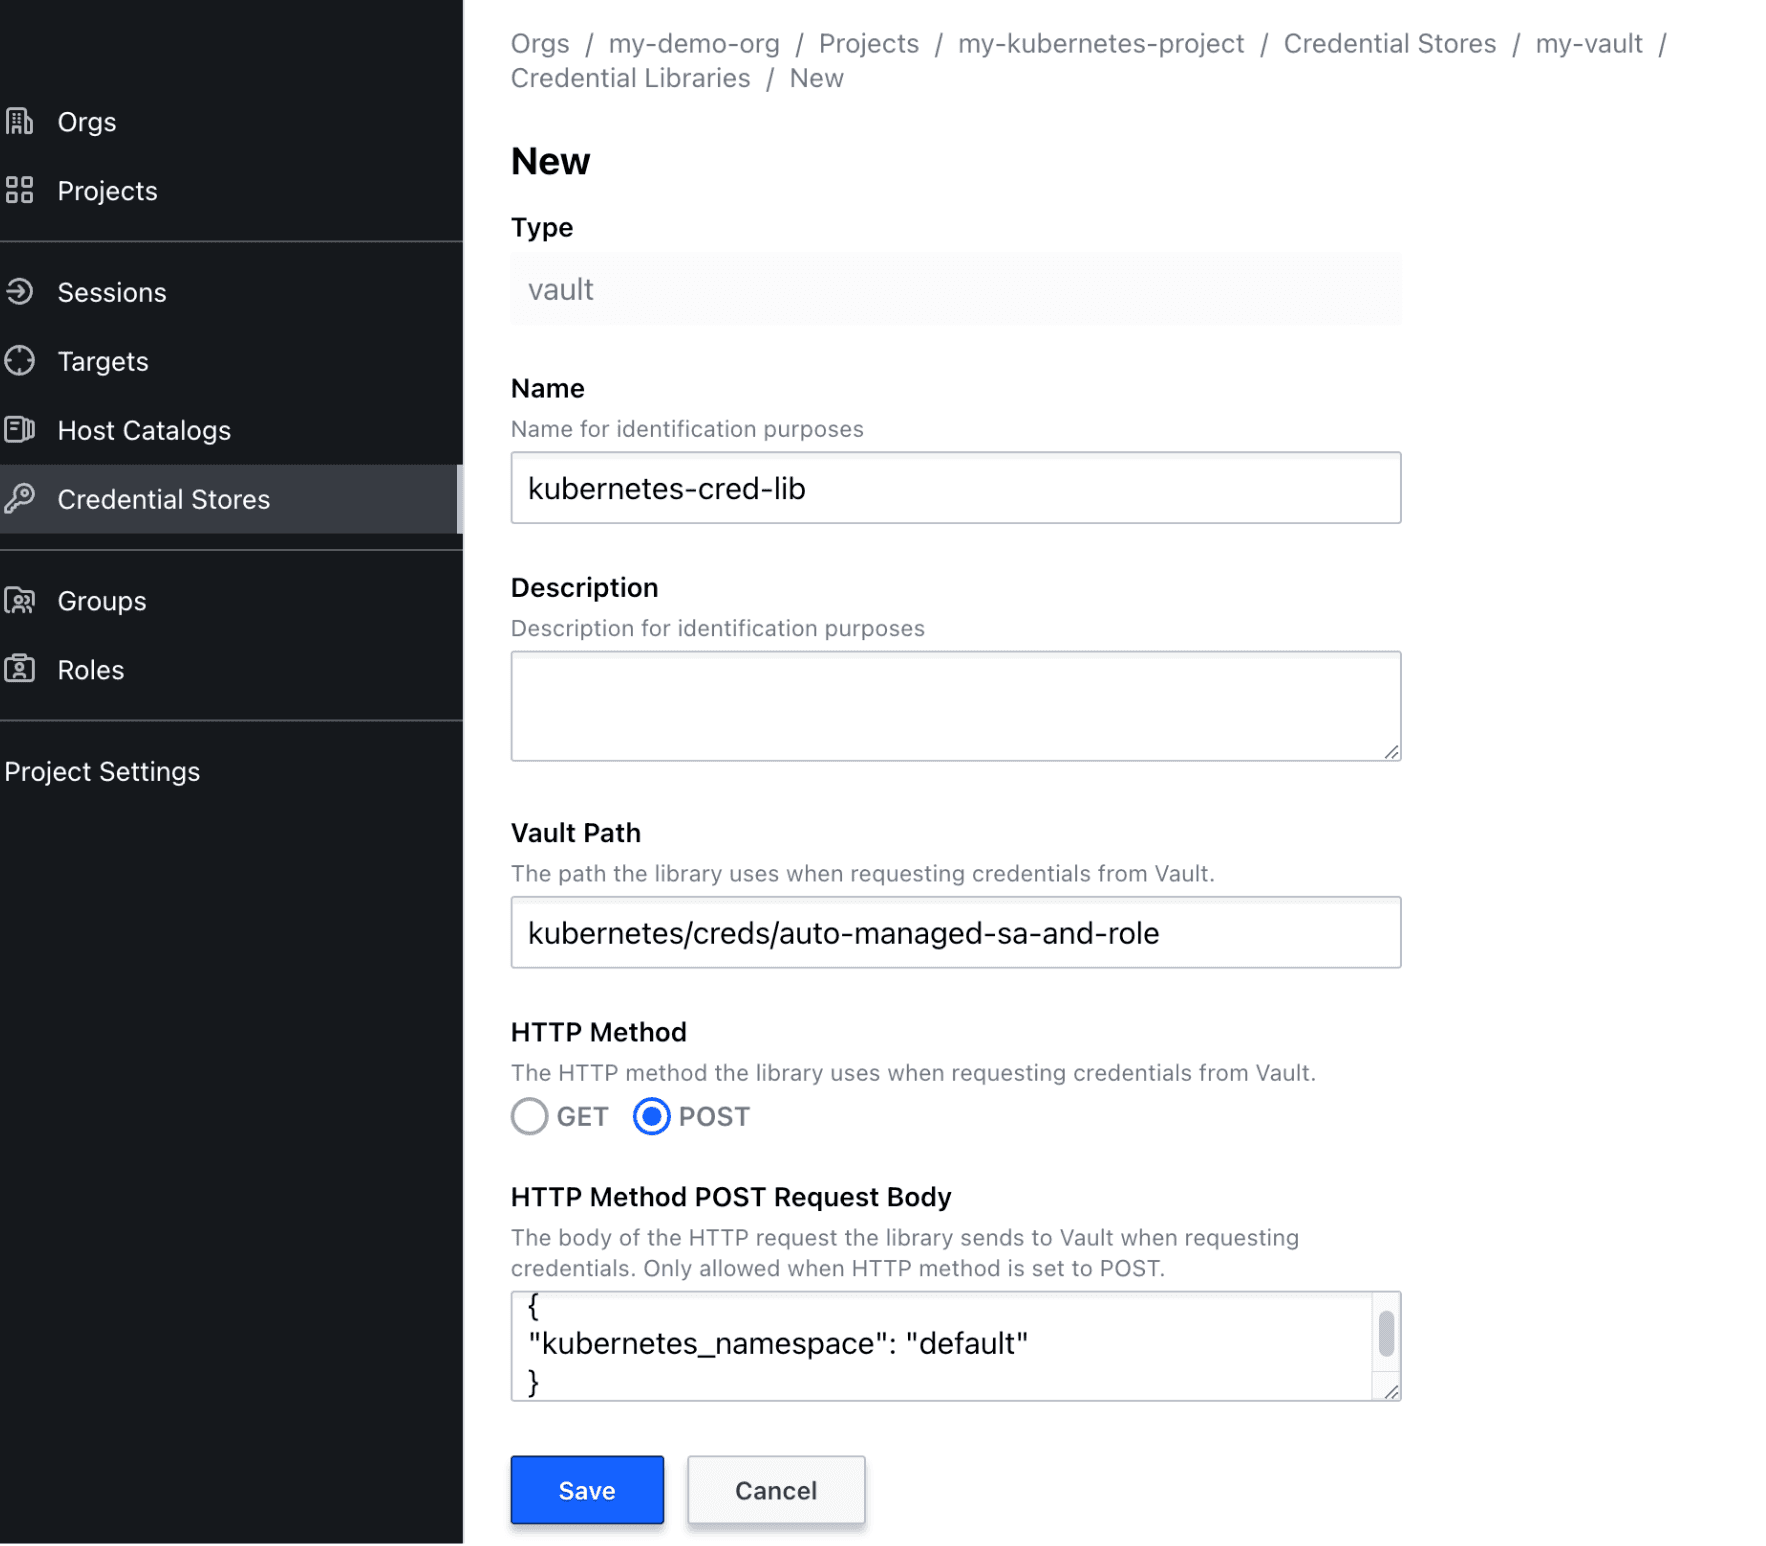
What does this do? In the Configure Vault section, you generated a service account and token using the Vault CLI command:
vault write kubernetes/creds/auto-managed-sa-and-role \
    kubernetes_namespace=default
Rather than using the Vault CLI, Boundary runs an API to Vault using the same Vault path to generate a Kubernetes service account token.
On the same credential store, create one more credential library with these parameters:
- Name: <Your desired name>
- Vault Path:
secret/data/k8s-cluster - HTTP Method: GET
This directs Boundary to the location of the Kubernetes CA certificate stored on Vault.
»Create Boundary Hosts
Boundary is now connected to Vault. Next, you want to add your Kubernetes cluster as a host in the Boundary host catalog.
Create a new host catalog and host set. (For detailed steps to create a new host catalog and host sets, refer to the Manage Targets with HCP Boundary tutorial.)
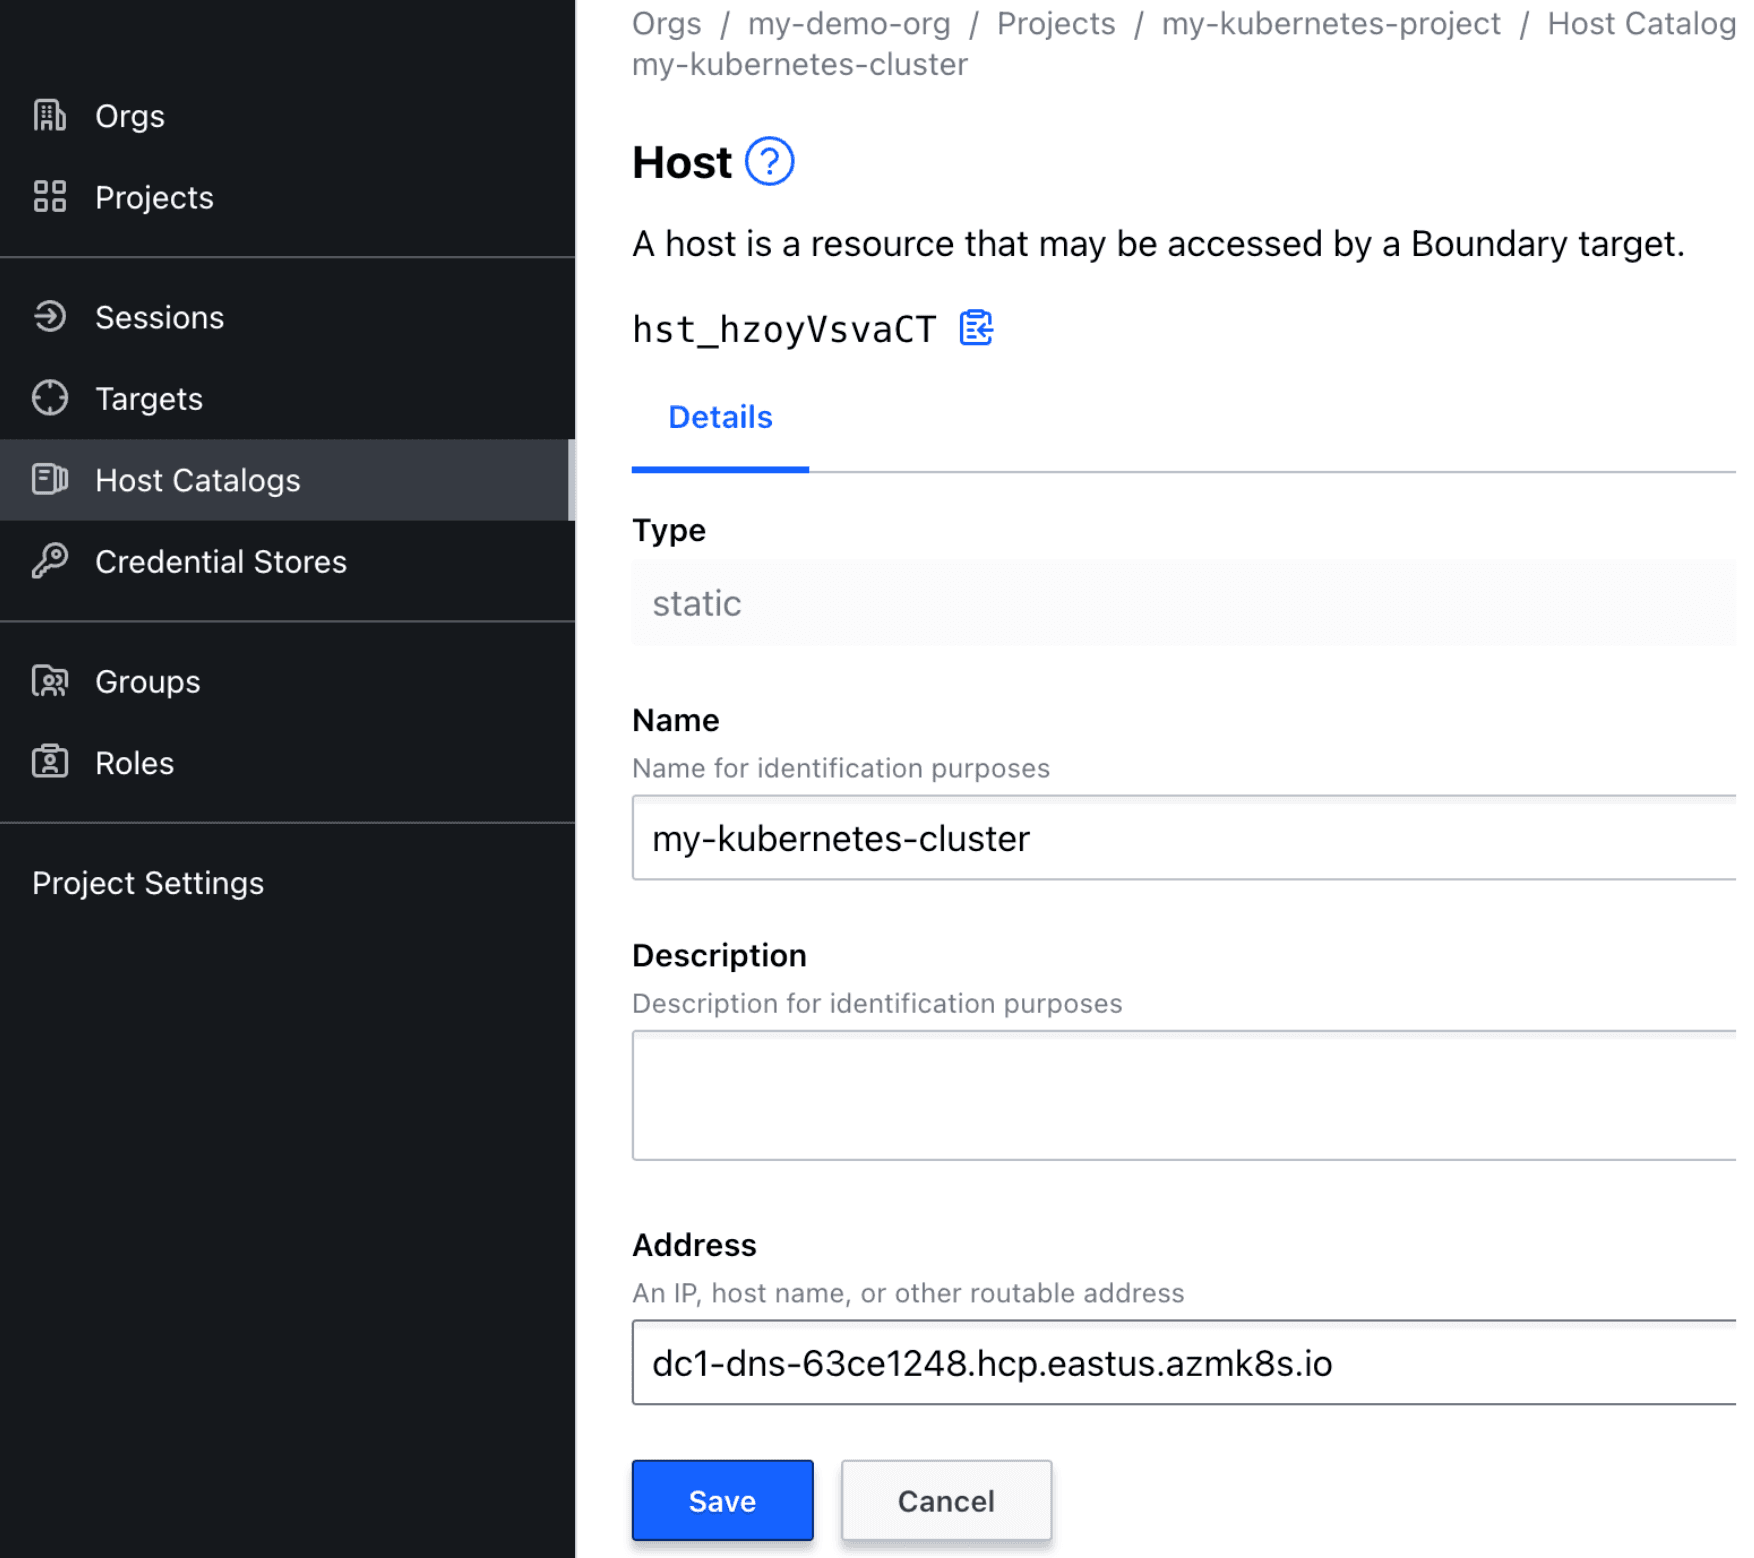
In your host set, create a new host with the following host fields populated:
- Name: <Your desired name>
- Address: <Your Kubernetes cluster API address>
Note: You can retrieve your Kubernetes cluster’s API address by running the command below. Make sure your Kubernetes context is set correctly, and that you remove the https:// and the port number from the command output:
kubectl config view -o jsonpath="{.clusters[?(@.name == \"$(kubectl config current-context)\")].cluster.server}"
Example:
»Create Boundary Target
Next, follow these steps to configure your Boundary targets. (Refer to the Domain model overview for insight into the concepts behind Boundary targets.)
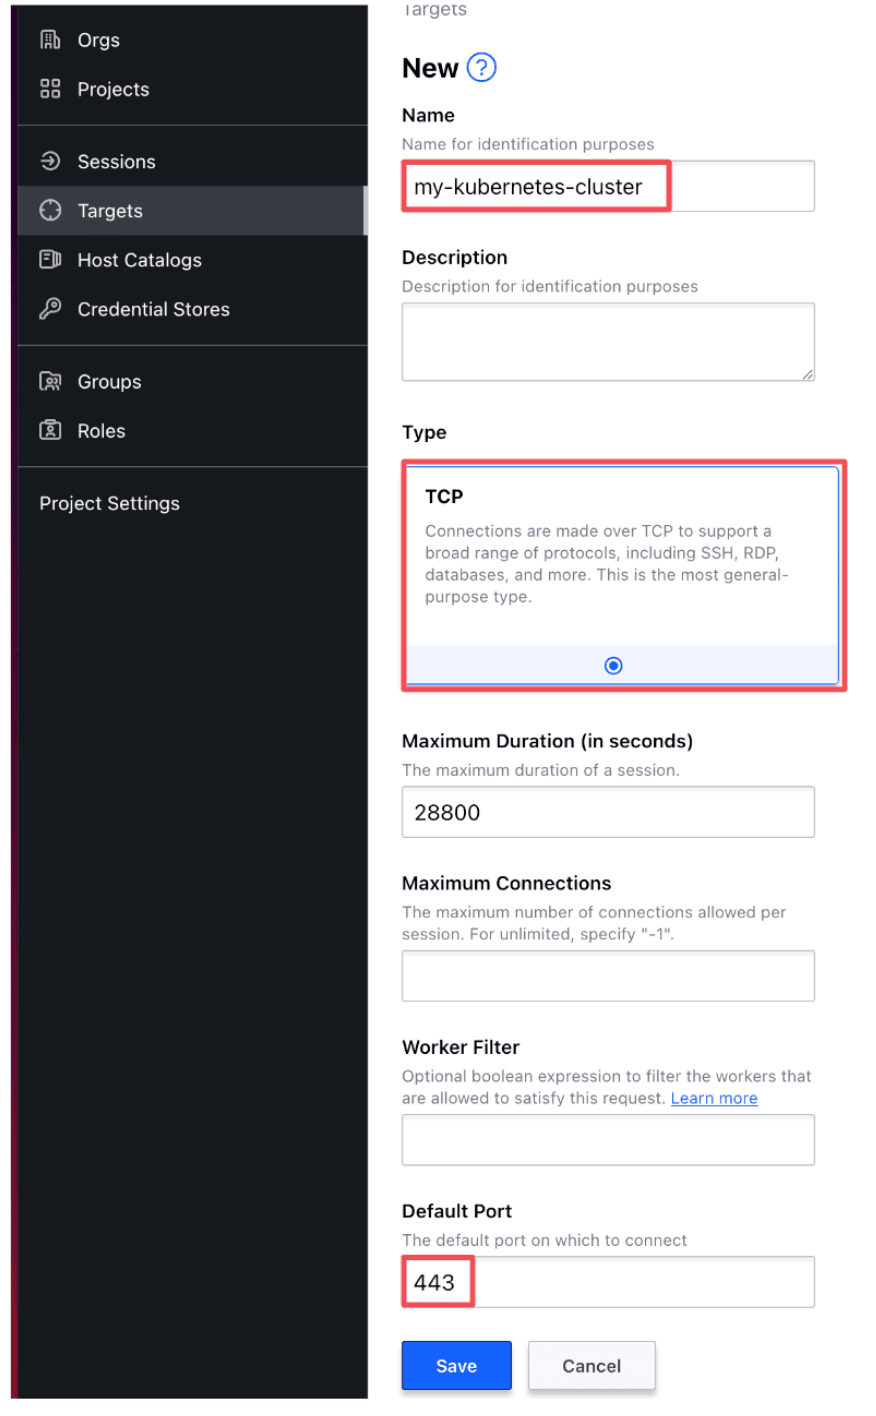
Navigate to the Targets side-tab and create a new target with these parameters:
- Name: <Your desired name>
- Type: TCP
- Default Port: 443
In your new target, click the Host Sources tab and click Add Host Sources.
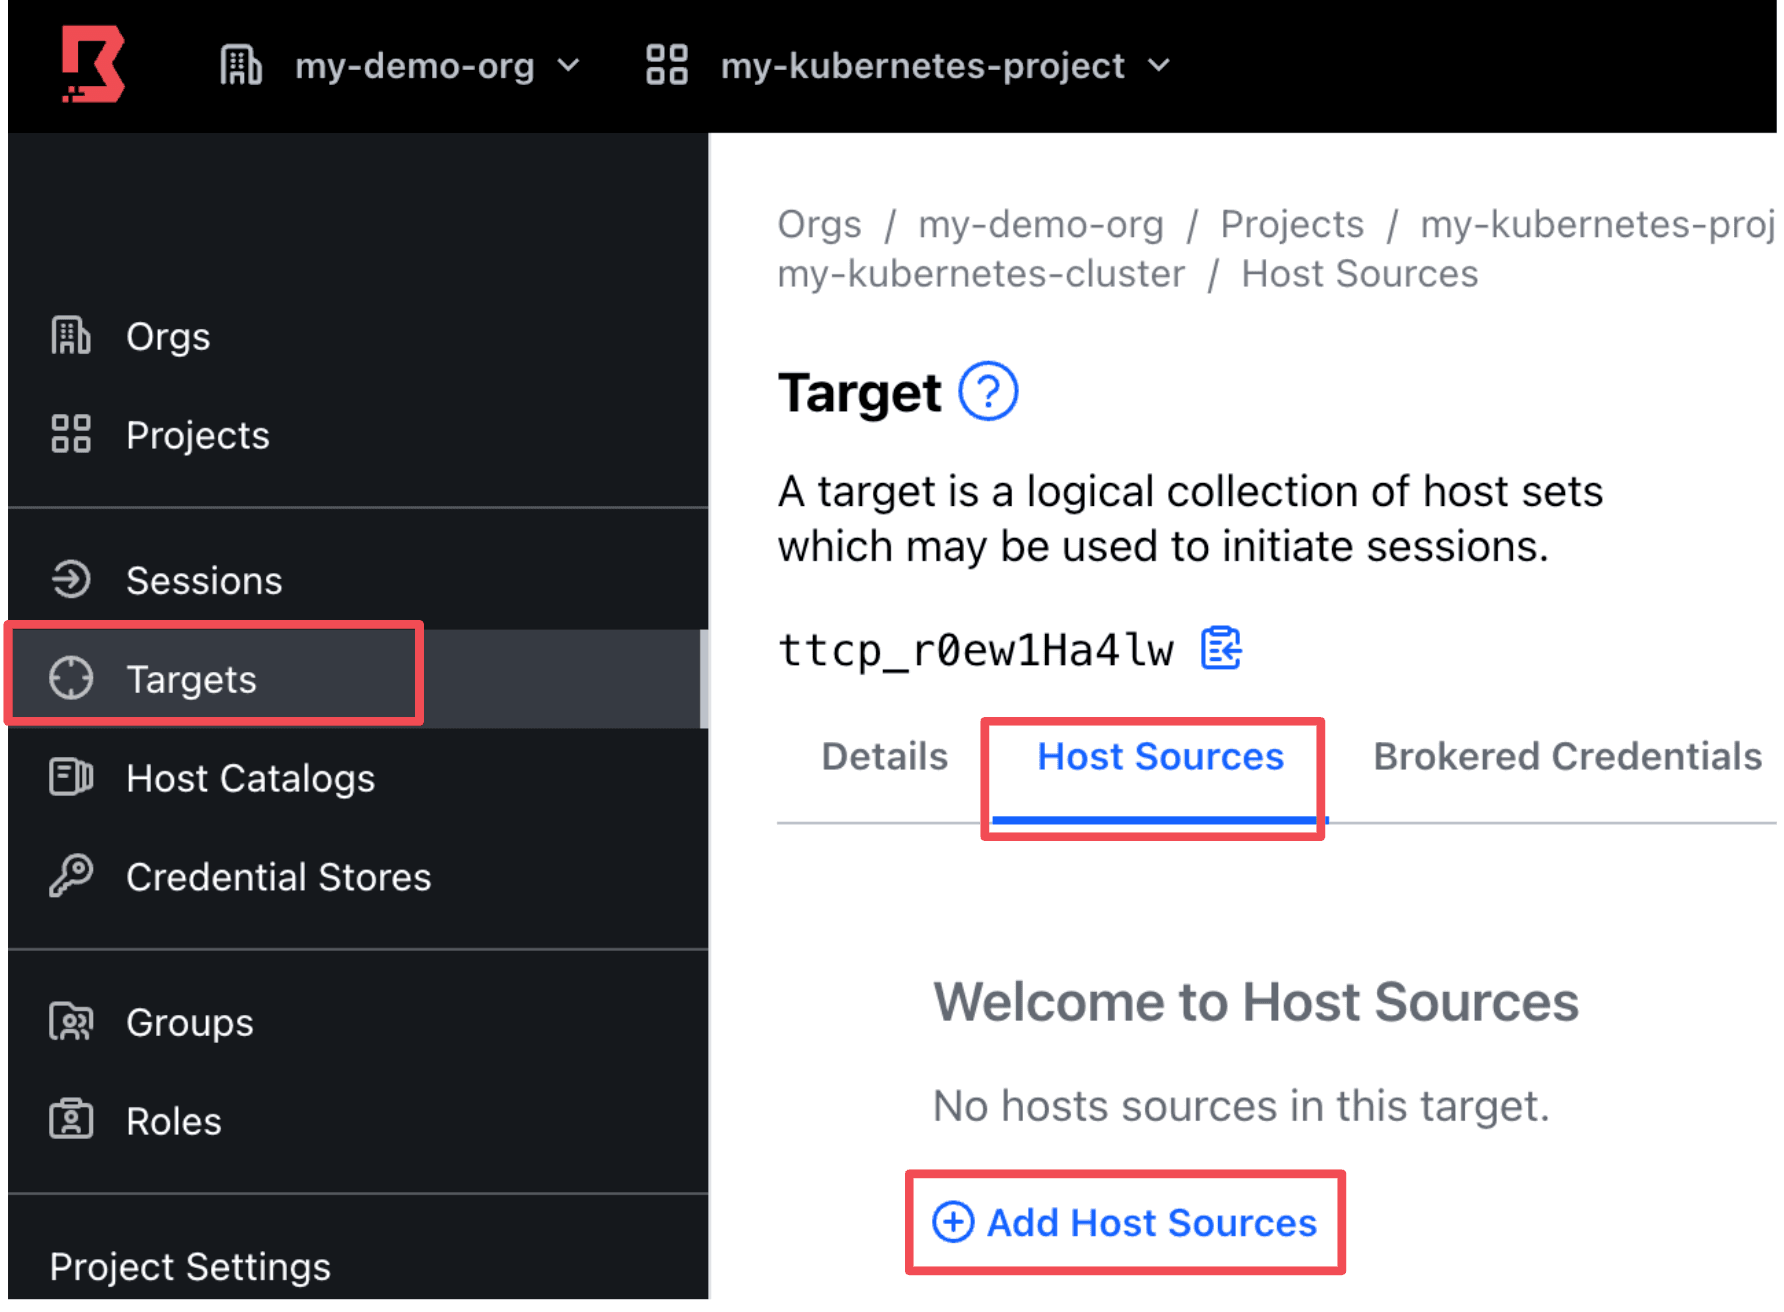
Then add the Kubernetes host set (created in the Create Boundary Hosts section) to the Host Sources.

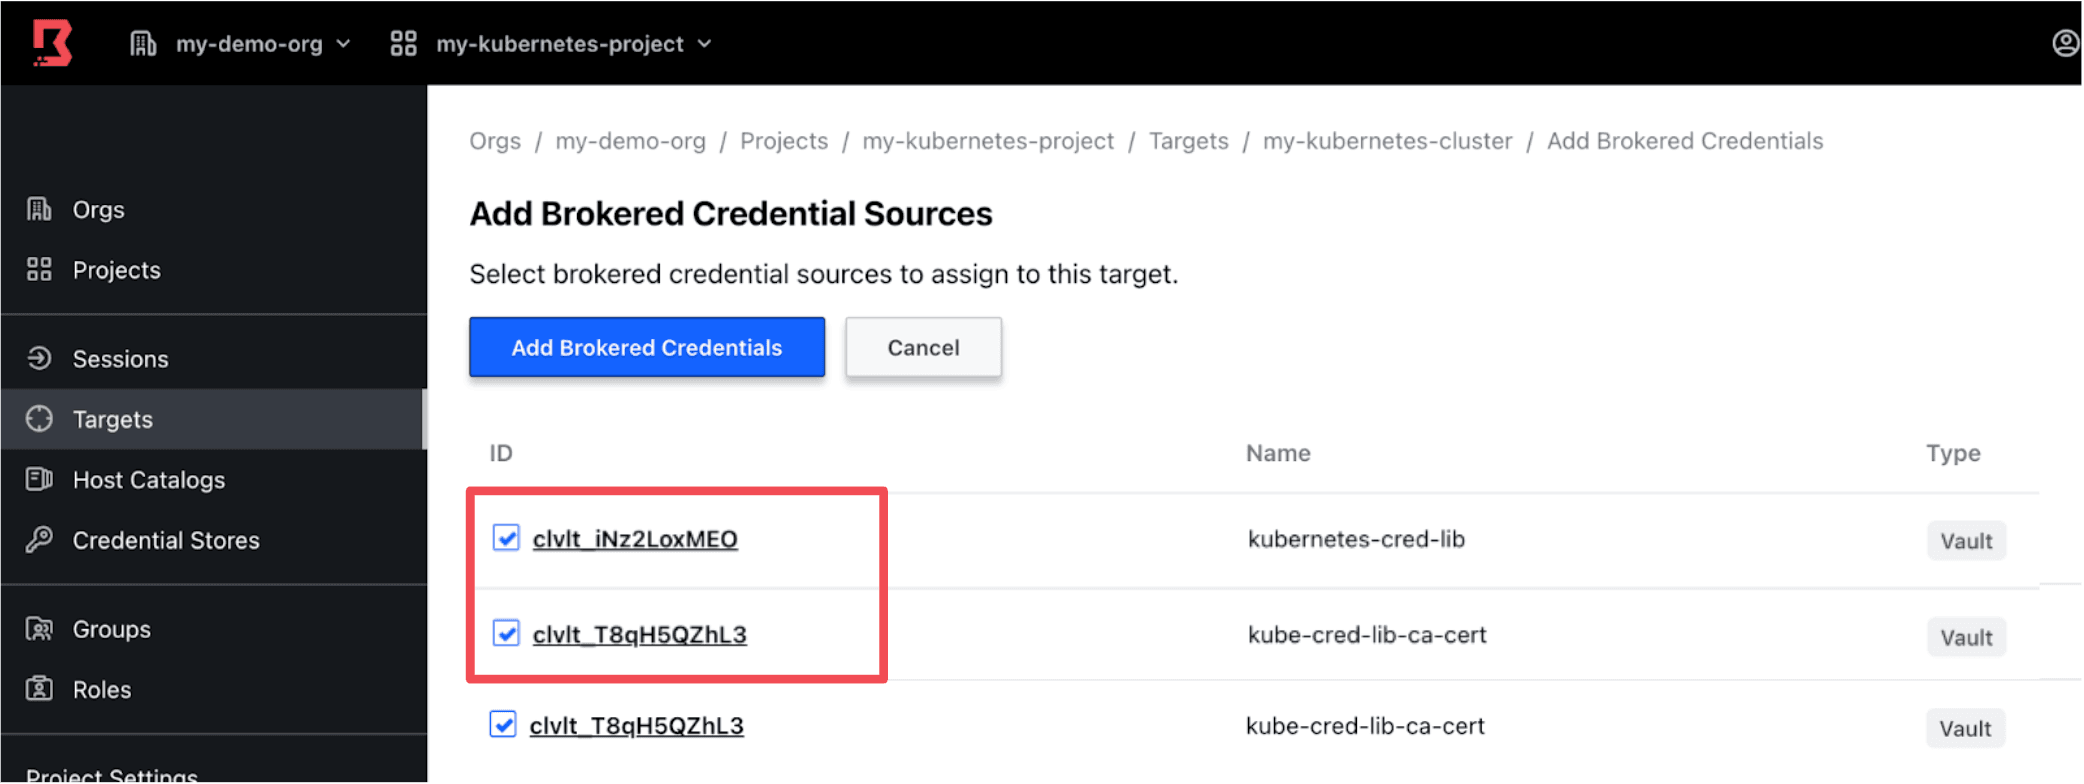
In your same target, click the Brokered Credentials tab and click Add Brokered Credentials.
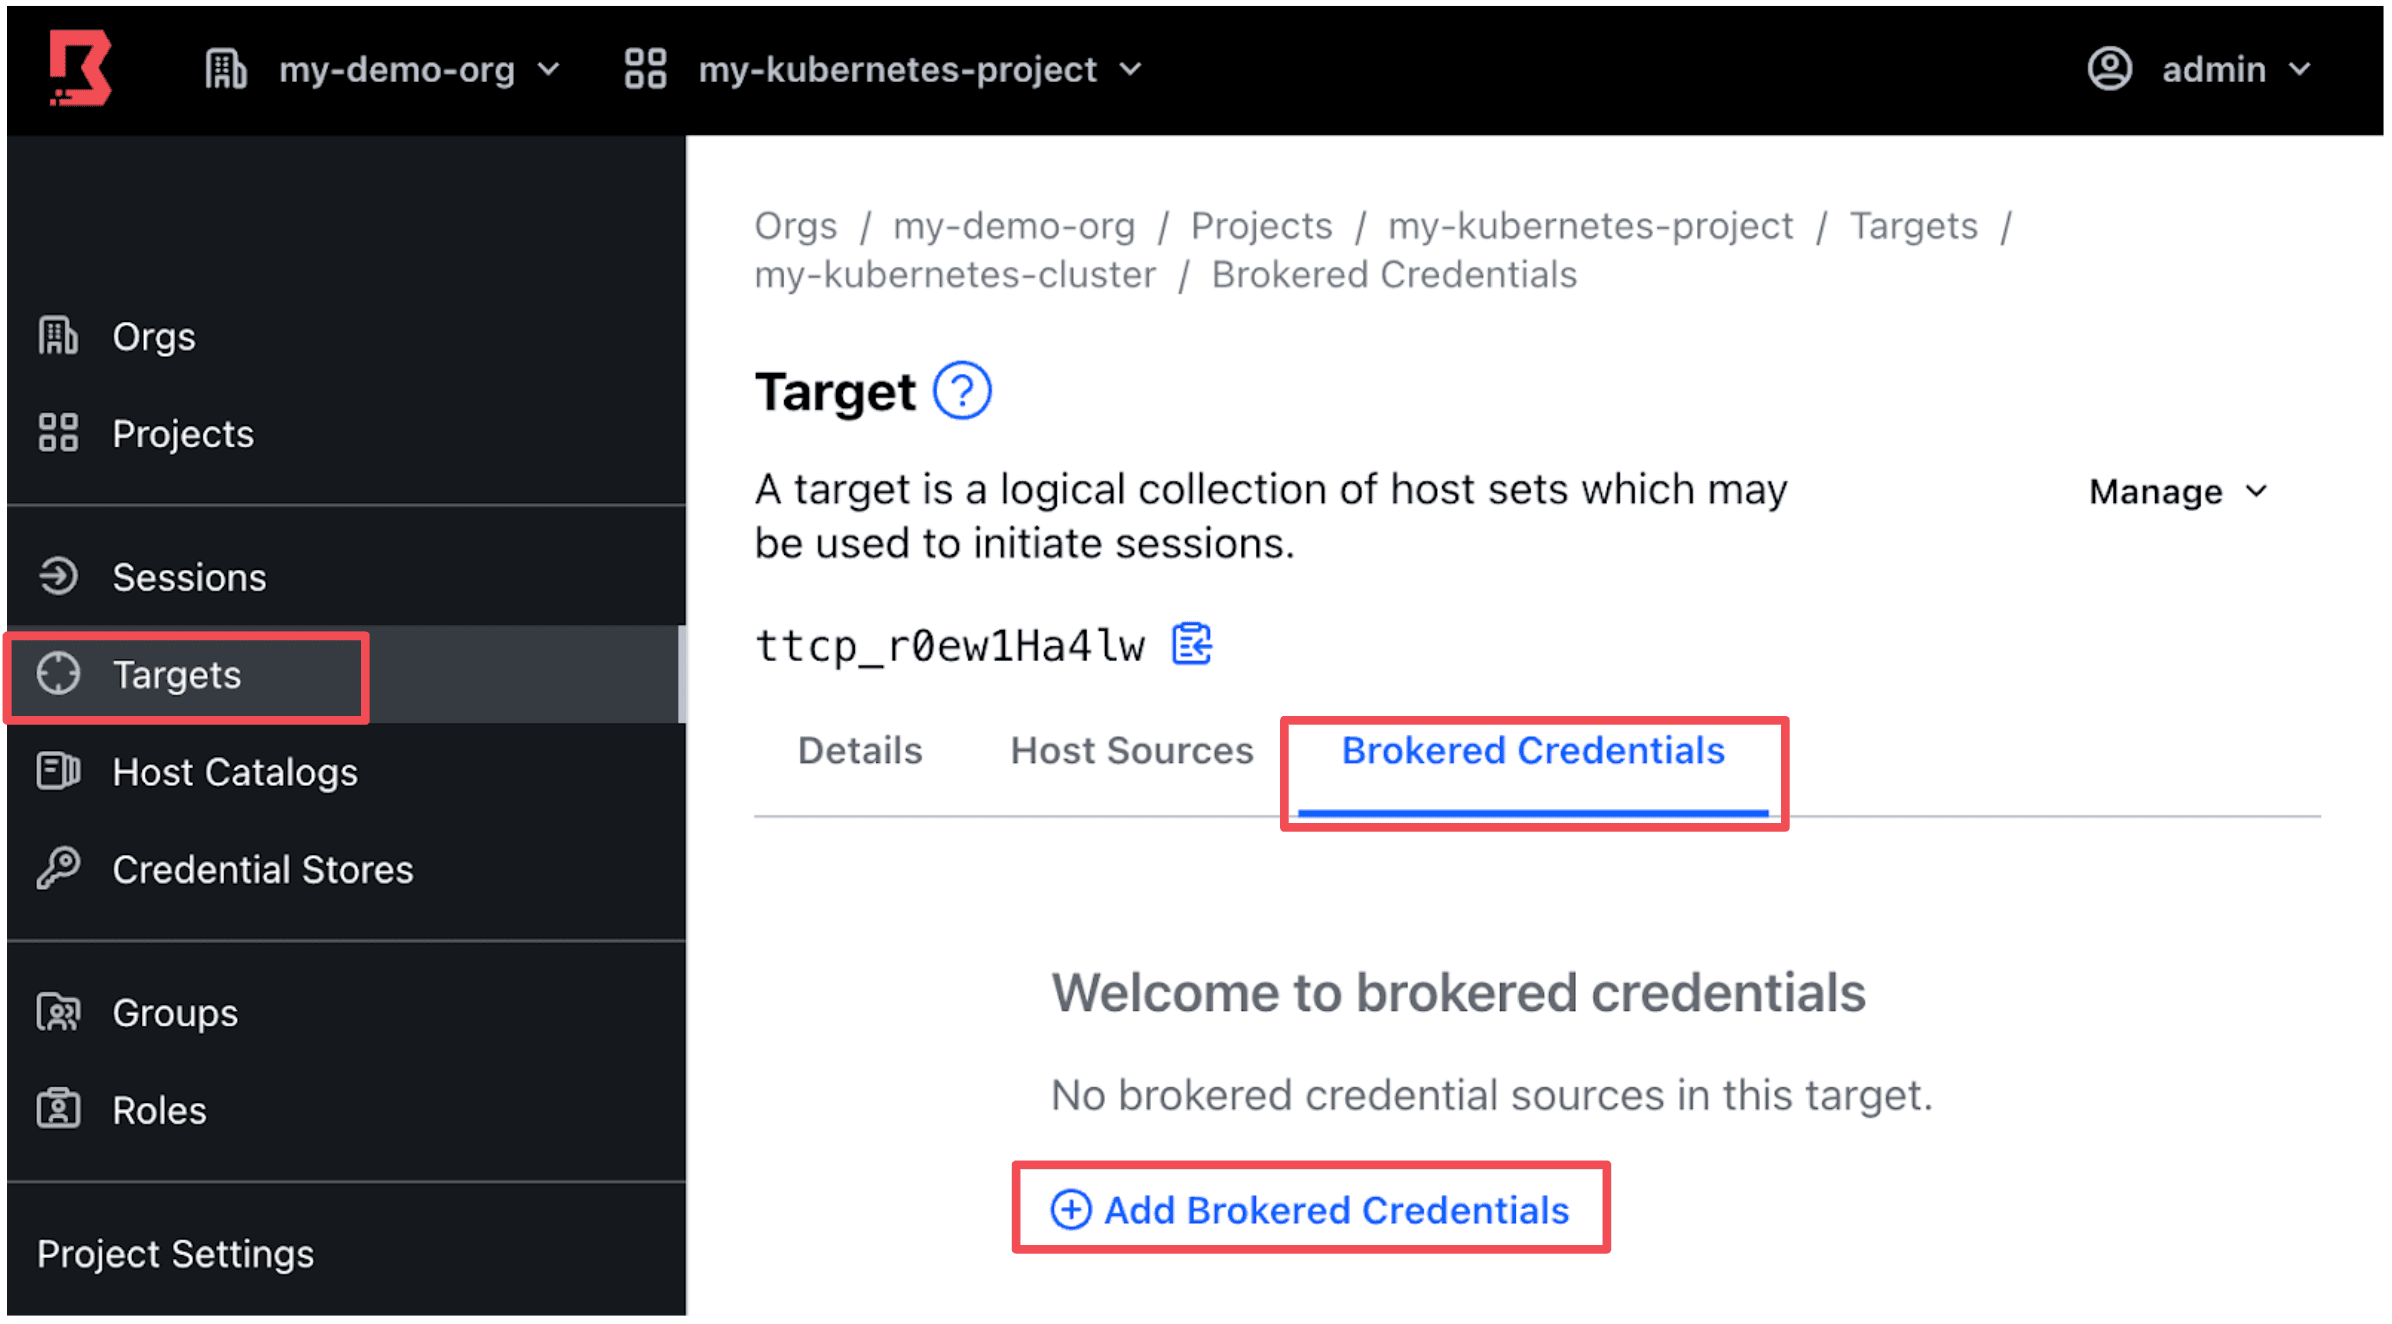
Then add the two credential libraries (created earlier in the Configure Boundary Credential Store section) to the Brokered Credentials tab.
»Create Boundary Roles
Next, create the roles that determine the targets each remote user is allowed to connect to. (This assumes you have accounts and users already created within your Boundary org. For detailed steps on creating accounts and users, refer to the Manage Users and Groups with HCP Boundary tutorial.)
Navigate to the Roles side-tab and click New to create a new Role.

Add the desired user(s) to the list of Principals for your role.
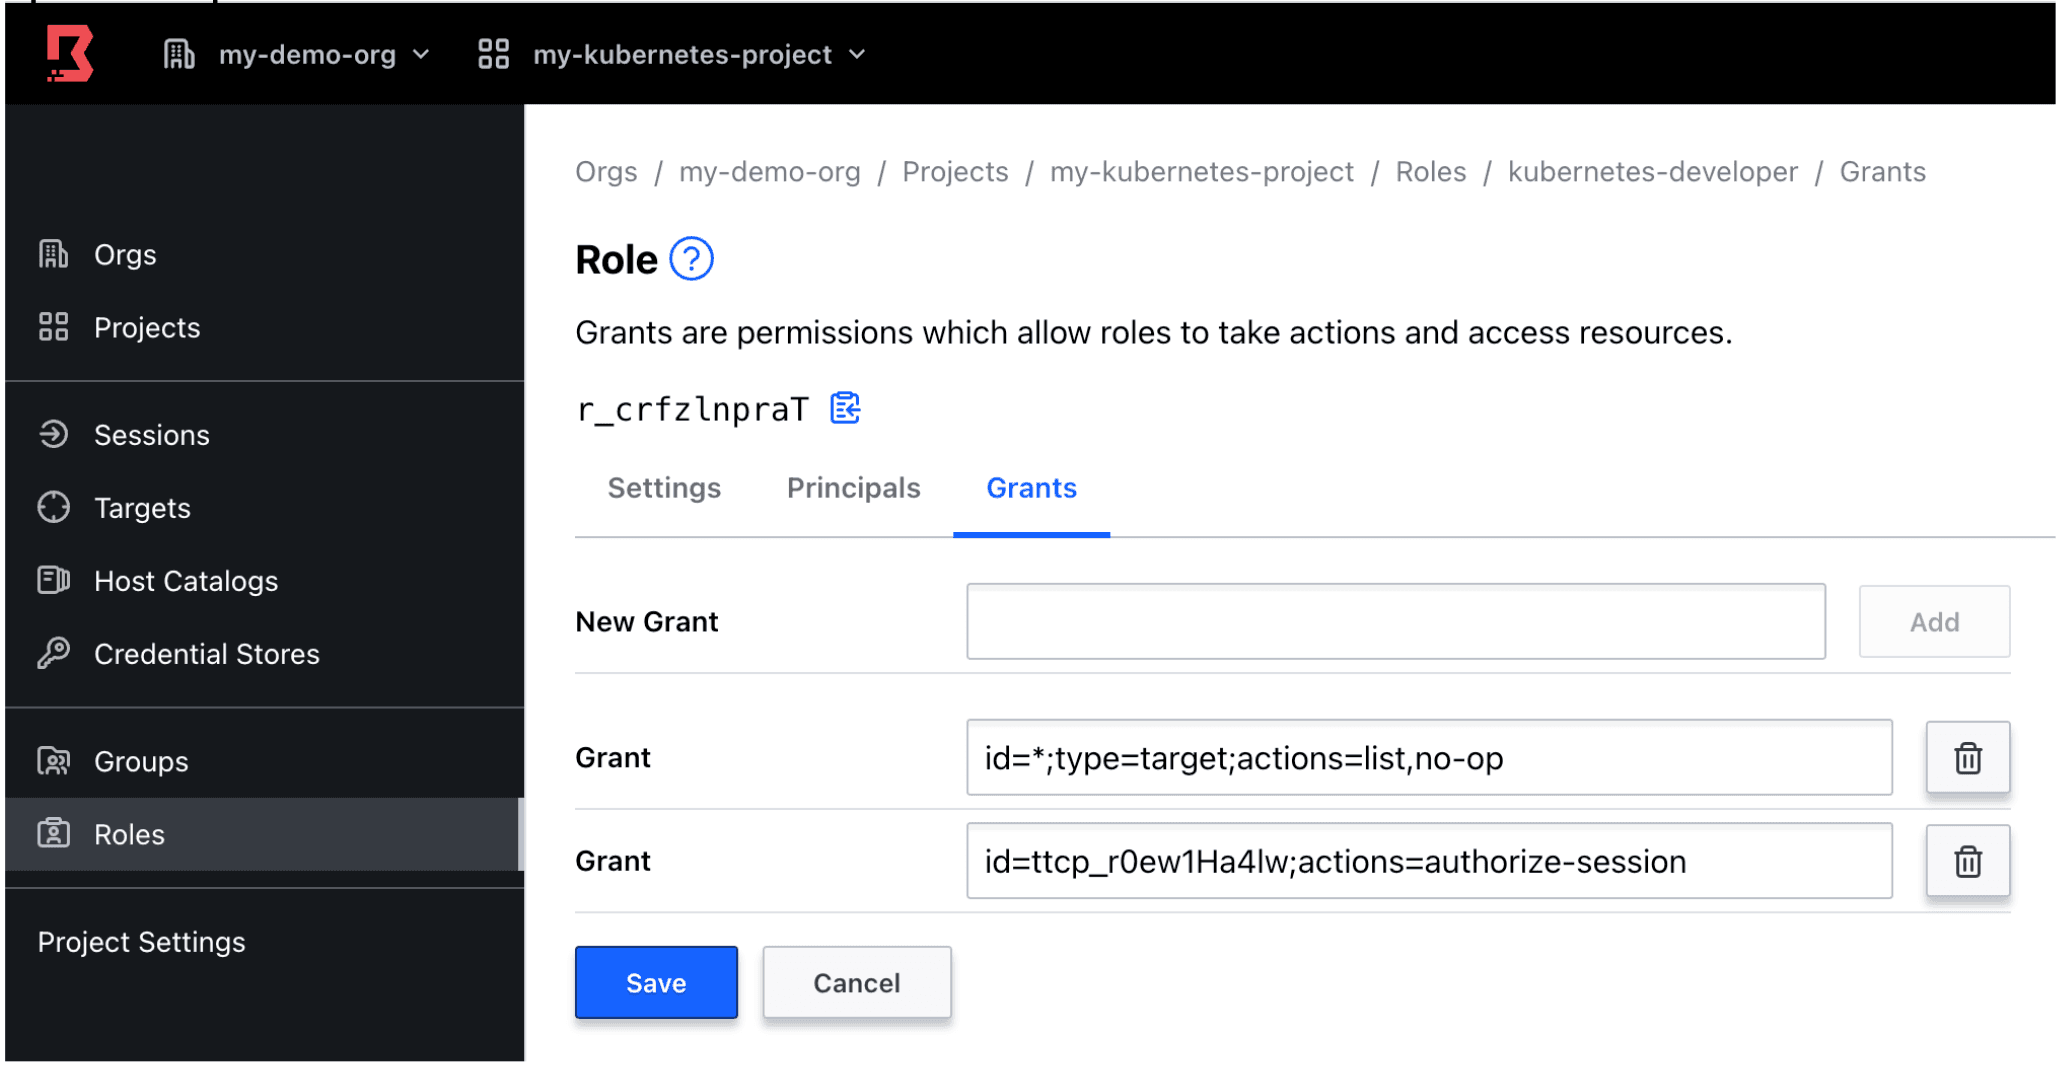
Then add Grants to your role as shown below. Make sure you include the Target ID of the target you created earlier in the Create Boundary Target section.
id=*;type=target;actions=list,no-op

id=<TARGET-ID>;actions=authorize-session
Example:
»Test the End-to-End Experience
Now it’s time to put on your remote user’s hat and test the kubectl command to access your Kubernetes cluster. This example uses the Boundary Desktop client to initiate the sessions but you can also use the Boundary CLI on your terminal as well. (For detailed steps on installing and using the Boundary Desktop, refer to the Install Boundary Desktop tutorial.)
Log on to the Boundary Desktop with your test user.
Note: The test user was added as a Principal in the Create Boundary Roles section.
Navigate to the Targets side-tab and click Connect to connect to your target.
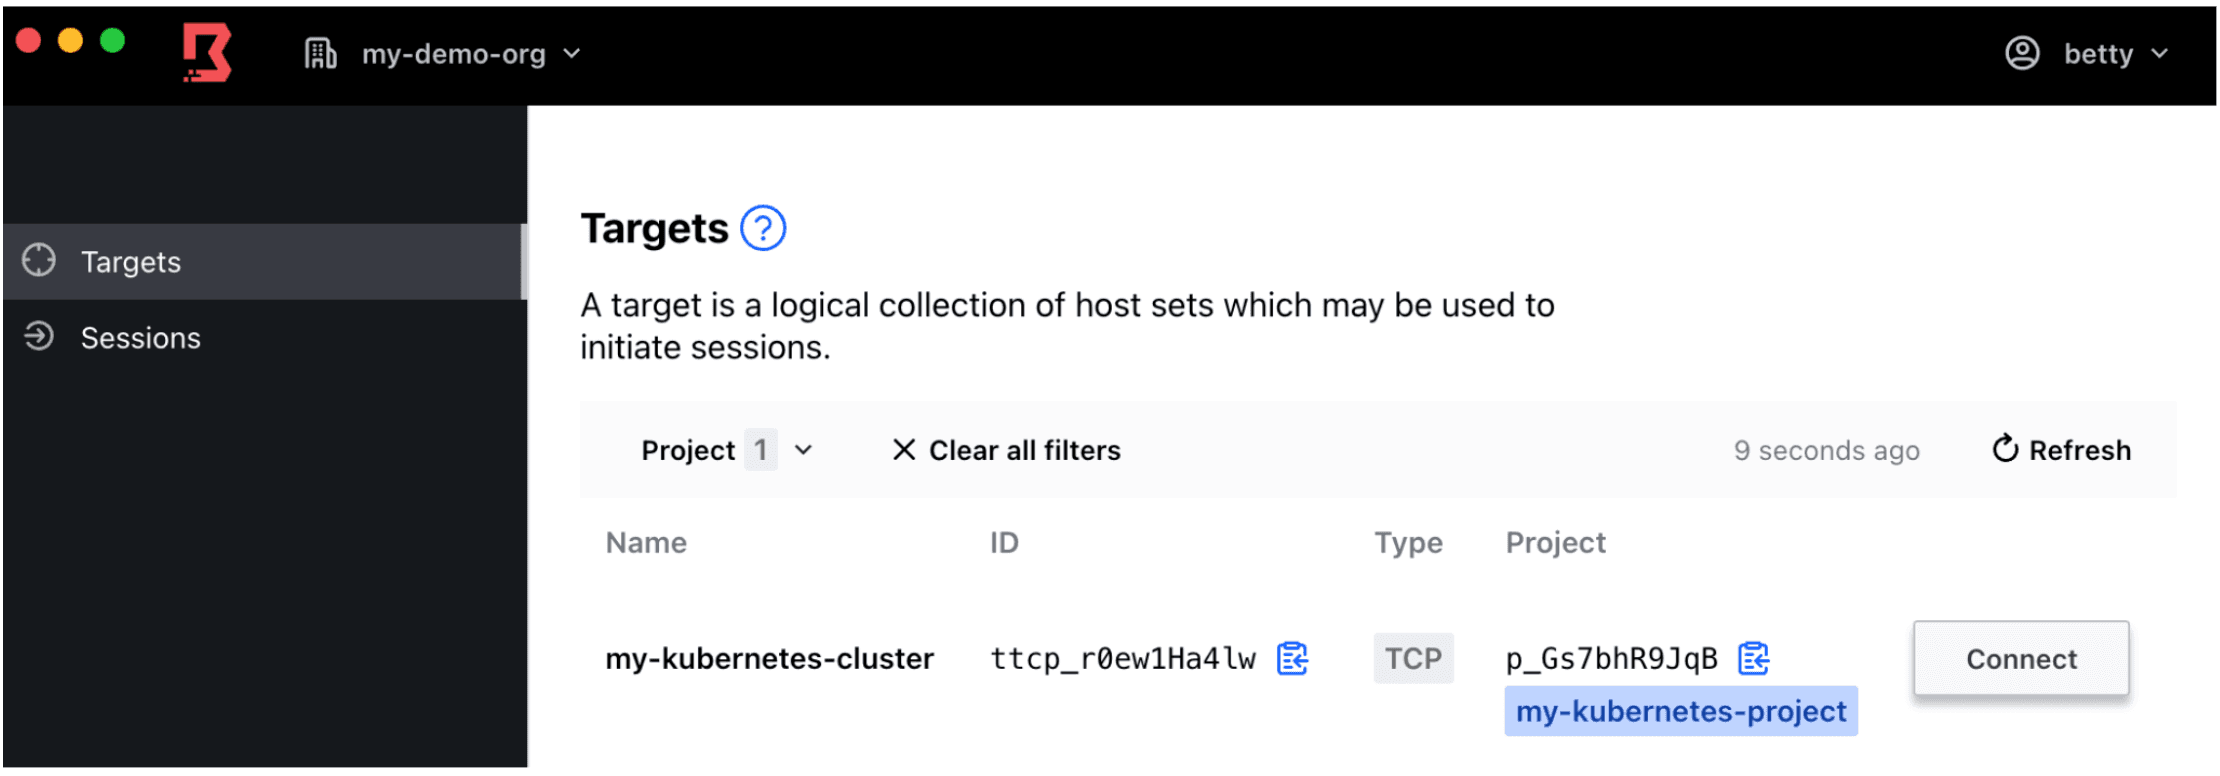
A pop-up window will appear and you will be presented with a Proxy URL port number and a service account token as shown here:
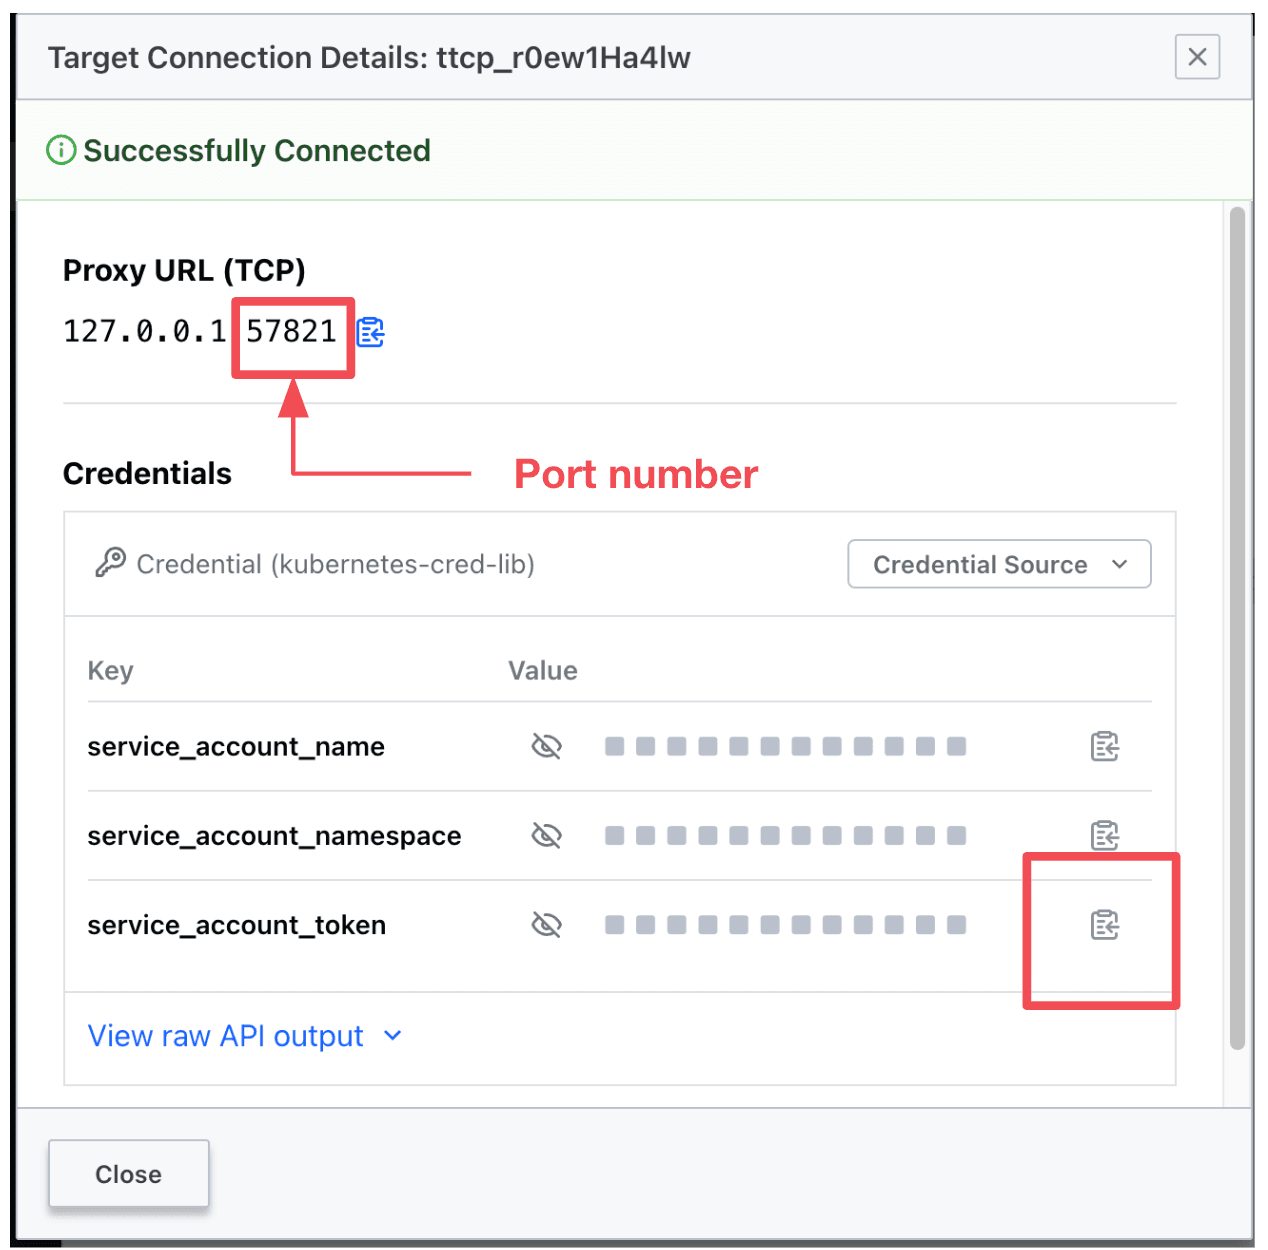
On your local terminal, copy/paste the service account token and the port number into environment variables:
export REMOTE_USER_TOKEN=<SERVICE_ACCOUNT_TOKEN>

export PORT=<PORT_NUMBER>
In the same pop-up window, scroll down to the Kubernetes CA certificate credential. Expand the raw API output and copy/paste the entire raw contents to a file called ca-raw.crt:
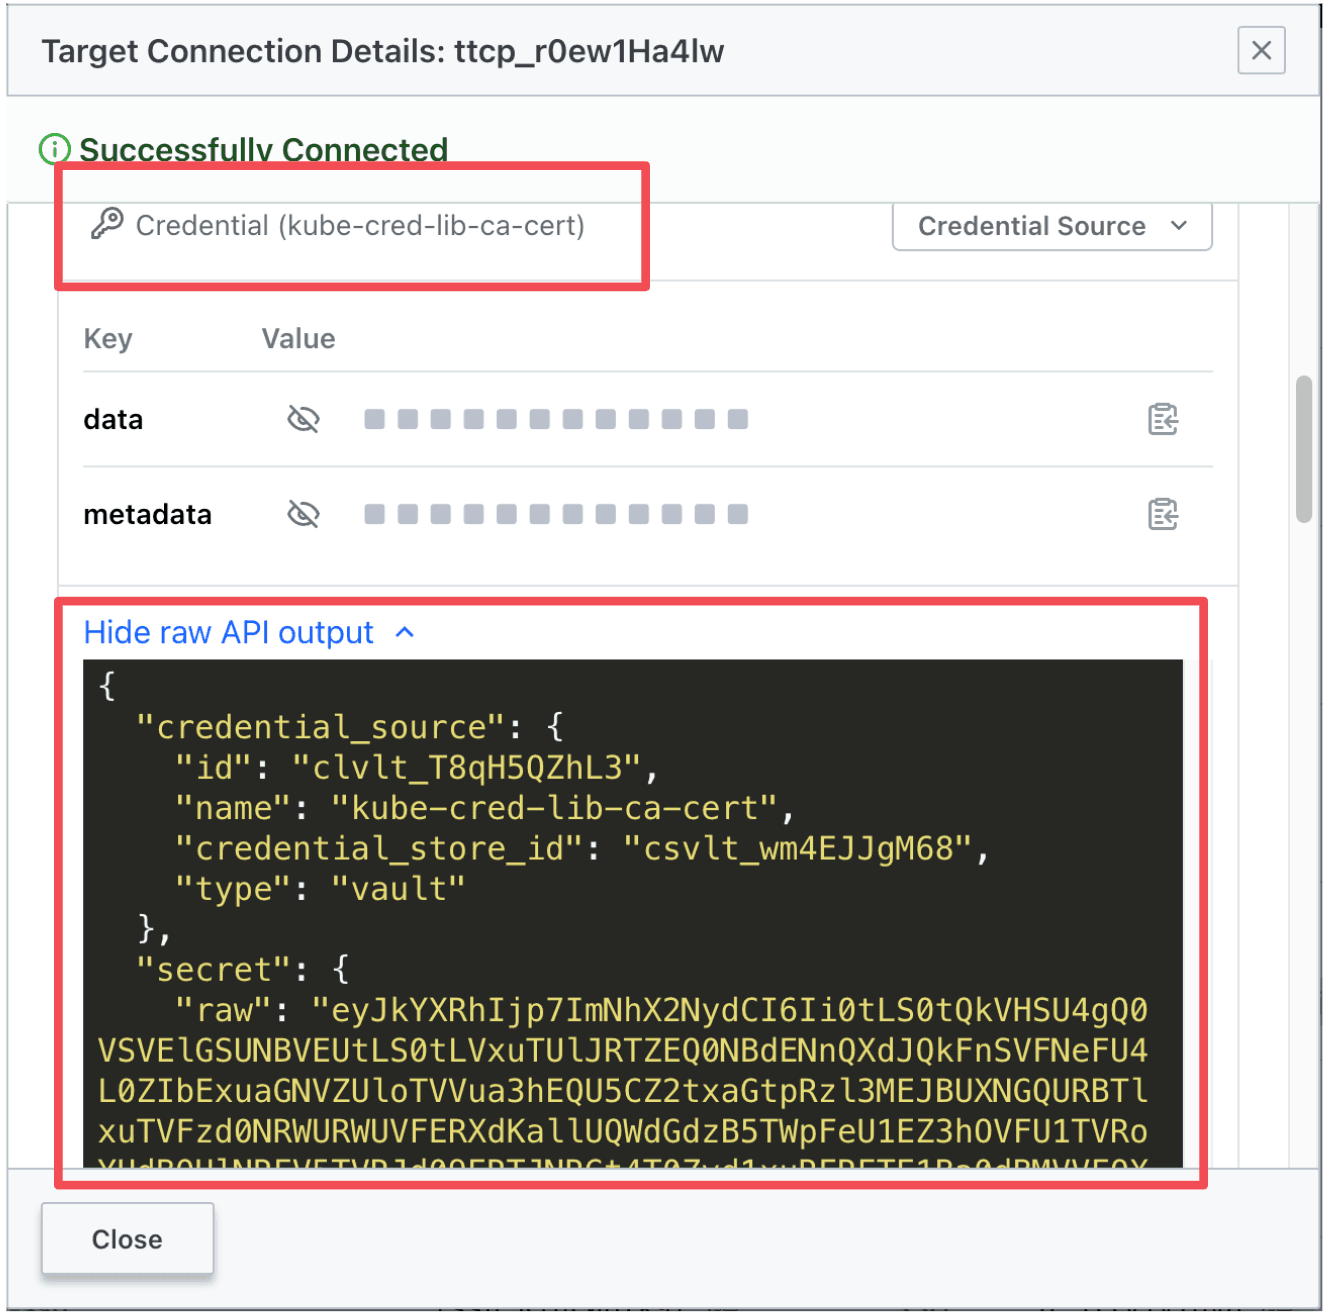
Extract the decoded Kubernetes certificate from the ca-raw.crt file into a ca.crt file:
cat ca-raw.crt | jq '.secret.decoded.data.ca_crt' | sed 's/\\n/\n/g' | sed 's/"//' > ca.crt
Note: This command assumes you have the jq and sed utilities installed on your local terminal (most Linux/Unix/Mac operating systems do). If necessary, you can download and install jq on your local system.
Test the kubectl connection:
kubectl get pod --tls-server-name kubernetes --certificate-authority=ca.crt
--server=https://127.0.0.1:$PORT --token=$REMOTE_USER_TOKEN

NAME    READY   STATUS    RESTARTS   AGE
nginx   1/1     Running   0          1h
»Setting the Kubernetes Context
Now that you’ve successfully tested the kubectl command, set the Kubernetes context for this session so that the remote user does not need to add the --server, --tls-server-name, --certificate-authority=ca.crt and --token flag to every kubectl command.
Remote users can run the script below to automatically set the context on their local machines. Edit the line items in red with the appropriate values for the PORT and REMOTE USER_TOKEN. Then execute the full command below to create a create-k8s-context.sh file.
cat > create-k8s-context.sh << EOF
export CLUSTER_NAME=My-Kubernetes-Cluster
export PORT=<Port number provided by Boundary>
export REMOTE_USER_TOKEN=<Service account token provided by Boundary>

echo "Cluster name is: ${CLUSTER_NAME}"
echo "Port number is: ${PORT}"
echo "Configuring Kubernetes contexts..."

kubectl config set-cluster $CLUSTER_NAME --server=https://127.0.0.1:$PORT --tls-server-name kubernetes --certificate-authority=ca.crt

kubectl config set-context $CLUSTER_NAME --cluster=$CLUSTER_NAME
kubectl config set-credentials boundary-user --token=$REMOTE_USER_TOKEN
kubectl config set-context $CLUSTER_NAME --user=boundary-user
kubectl config use-context $CLUSTER_NAME
EOF
Execute the** create-k8s-context.sh file.
source create-k8s-context.sh
Your new Kubernetes context has been created. Now enter the kubectl get pod command:
kubectl get pod
NAME    READY   STATUS    RESTARTS   AGE
nginx   1/1     Running   0          4d20h
»What’s Next?
This blog post discussed how to configure HashiCorp Boundary and Vault to provision short-lived credentials to allow a remote user access to a pre-assigned Kubernetes cluster. This is one of many use cases where organizations can use Boundary to centralize remote access and credential management.
Boundary has many additional capabilities that we hope you will explore. Credential injection, for example, automatically injects credentials into an SSH target on behalf of the remote user, resulting in a passwordless experience. Boundary can also dynamically discover hosts in your Amazon Web Services (AWS) and Microsoft Azure environments. This relieves administrators from having to manually add individual hosts into Boundary’s host catalog, dramatically reducing administrative burden, especially in cloud environments where IP addresses are ephemeral and constantly change.
We encourage you to explore Boundary’s capabilities by visiting our Boundary tutorials:


