When building an application, user authentication (AuthN) is often a fundamental component. Writing your own AuthN implementation can be cumbersome and error prone. You would need to:
- Implement and enforce password complexity rules within your application
- Implement password checking yourself
- Enforce failed login attempts policies to protect your application against brute force attacks
The password would also be stored in the database, which means you would need to encrypt it, and that comes with another set of costs:
- Key management
- General cryptography costs when checking the password
- Whether or not convergent encryption is used
Instead it is much safer for businesses and their customers to delegate this implementation to a specialist platform like HashiCorp Vault because it can act as an identity provider (IdP).
In this blog post, you’ll learn how to set up Vault as an OpenID Connect (OIDC) IdP for all of your applications, allowing your organization to have secrets management and identity servers through one platform, like a standard library for security.
»How OIDC works
One of the most common workflows used for user AuthN is OIDC. It has slowly become one of the most popular standards for identity, and since 2021 Vault has had the ability to act as an OIDC identity provider. Here’s a quick, high-level look at an OIDC workflow:
- The user navigates to a web application, mobile application, or platform. This application / platform is known as the relying party (RP). An RP is something that delegates user AuthN to an external IdP.
- The user enters their credentials, usually a username and password combination.
- The RP sends this information as an AuthN request to the external IdP.
- The IdP authenticates the user by checking that the credentials submitted in the AuthN request are correct.
- If the submitted credentials are correct, the user is authenticated and the IdP responds to the AuthN request with an access token.
- The authenticated user can now submit requests to the application with their access token attached
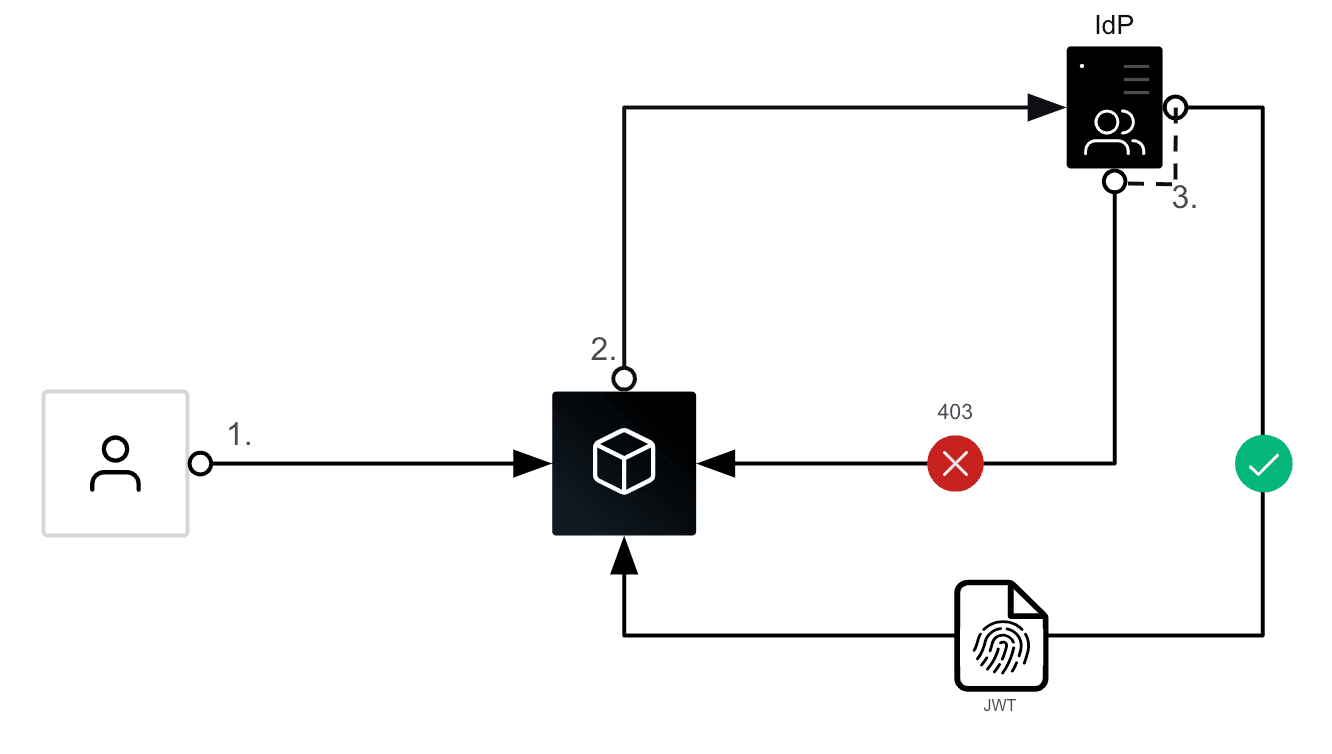
The access token usually comes in the form of a signed JSON Web Token (JWT). The JWT is signed by the IdP, which allows the RP to confirm the authenticity of the JWT. This confirmation can be done in a couple of ways:
- IdPs often have a token verification endpoint that you can submit the token to, and it will confirm whether or not it is valid.
- IdPs also publish JSON Web Key Sets (JWKS), which are a set of public cryptographic keys that can be used to verify the authenticity of the JWT signature.
»Vault as an OIDC provider
Vault having the ability to act as an OIDC provider means that if the identity exists within Vault, RPs can delegate AuthN to Vault as set out in the OIDC workflow outlined above. Here is a diagram of that same workflow with Vault as the IdP:
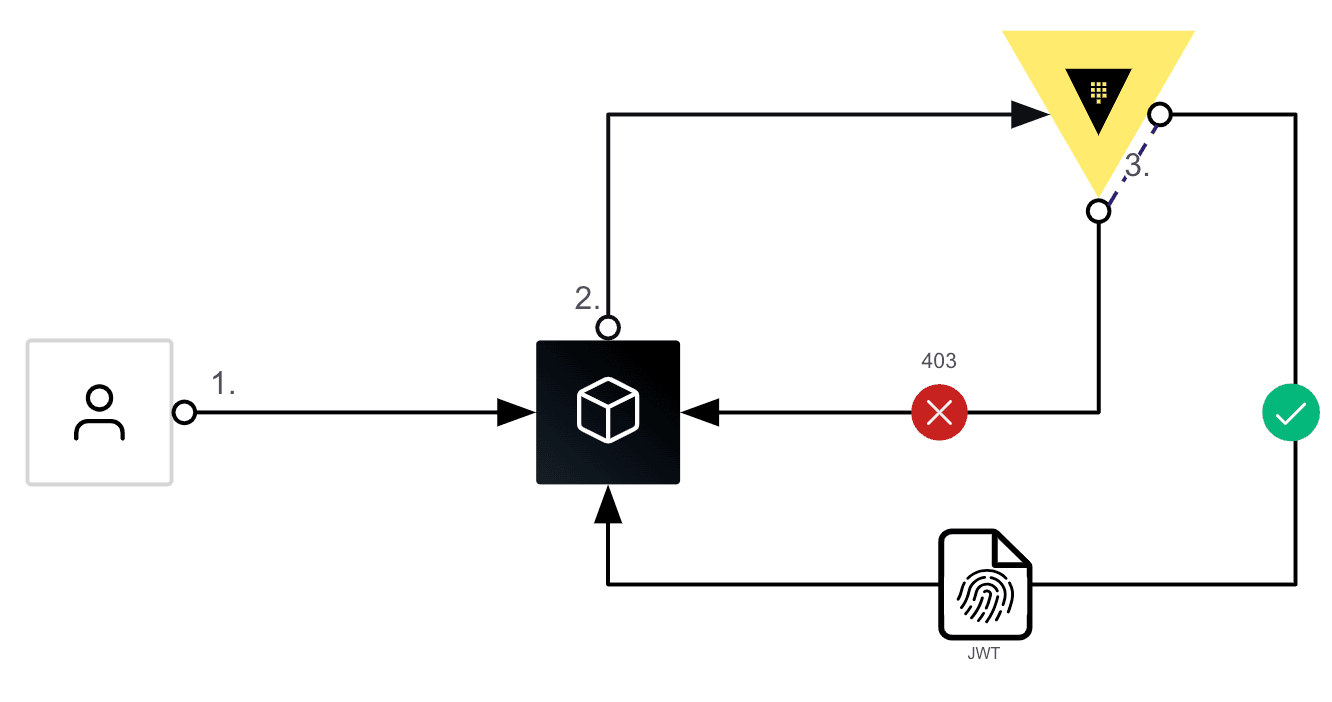
Vault’s role in this process is simple: authenticate users, issue signed JWTs, and verify JWT signatures.
»How to configure Vault as an OIDC provider
To configure Vault to act as an OIDC provider, you first need to enable the auth method that your users will authenticate with. The userpass auth method is a good example for a simple user database. The Terraform code below will enable this auth method:
resource "vault_auth_backend" "userpass" {
 type = "userpass"
}
In this code, no mount point has been specified so it will create it at the /userpass mount point by default. This is where your application will create new users.
Next you need to create a key that will be used to sign JWTs:
resource "vault_identity_oidc_key" "oidc_key" {
 name               = "my-key"
 rotation_period    = 3600
 algorithm          = "RS256"
 allowed_client_ids = ["*"]
 verification_ttl   = 7200
}
This code will configure Vault to create a signing key using the RS256 algorithm. You’ll want to automatically rotate this key every hour to keep it secure, and allow all client IDs to use this key to sign JWTs. This could be narrowed down to the client ID of the OIDC role created for your application.
The next step is to create an OIDC provider. This requires minimal configuration:
resource "vault_identity_oidc" "oidc" {}
Next, you will need to create an OIDC role that will be used when creating JWTs:
resource "vault_identity_oidc_role" "role" {
 key  = vault_identity_oidc_key.oidc_key.name
 name = "my-role"
template = <<EOF
{
 "email": {{identity.entity.metadata.email}},
 "username": {{identity.entity.name}}
}
EOF
 ttl = 3600
}
This role will ensure the required claims are included in any JWTs it issues. In this case, the role will include an email claim, which will populate from the user’s metadata, and a username which will be populated from the name of the entity in Vault.
The final configuration step is to create a policy in Vault that will allow authenticated users to request a signed JWT.
resource "vault_policy" "jwt" {
 name   = "jwt"
 policy = <<EOF
path "/identity/oidc/token/my-role" {
   capabilities = ["read"]
}
EOF
}
The API call to Vault uses the GET method so the policy only needs the read capability.
»Building an application as a relying party
Building an application can be split into two sections: user registration and AuthN.
»User registration
Onboarding new users to Vault requires the following steps:
- Creating a user in the userpass auth method
- Creating an entity for the user in the Identity secrets engine (this secrets engine is enabled by default)
- Creating an alias that ties the entity and the user together
- Create an OIDC assignment for the user so its identity can be issued by the OIDC provider.
There are several ways in which these steps can be implemented. The approach taken will depend on the language and framework being used and application specific requirements. For the purposes of this blog, Go has been chosen as the language and a granular approach has been taken to demonstrate the steps.
This example uses the official Go SDK for Vault and creates a dedicated function for each step.
The first step is to create the user in the userpass auth method:
func createUser(vc *vault.Client, userName string, password string) error {

   ctx := context.Background()

   userCreateRequest := schema.UserpassWriteUserRequest{
      Password: password,
   }

   _, err := vc.Auth.UserpassWriteUser(ctx, userName, userCreateRequest)
   if err != nil {
      log.Error(err)
      return err
   }

   return nil
}
This function takes the following as inputs:
- A Vault client. This configures the address for Vault and token used to authenticate to Vault.
- The username for the user. A limitation of the userpass auth method is that only alphanumeric characters, hyphens, and underscores can be used for the username. The username also must start and end with an alphanumeric character and not a hyphen or underscore character.
- The password for the user
A successful call to Vault will result in a 204 no content response, whilet an unsuccessful call will result in an error response. As a result, this function only returns an error type. Successful calls return nil.
The second step is to create an entity for the user.
func createEntity(vc *vault.Client, userName string, email string) (interface{}, error) {
   ctx := context.Background()

   metadata := map[string]interface{}{
      "email": email,
   }

   entityCreateRequest := schema.EntityCreateRequest{
      Disabled: false,
      Metadata: metadata,
      Name:     userName,
      Policies: []string{"jwt"}, // TODO - update this. currently hardcoded to the jwt policy
   }

   entityResult, err := vc.Identity.EntityCreate(ctx, entityCreateRequest)
   if err != nil {
      log.Error(err)
      return nil, err
   }

   return entityResult.Data, nil

}
This function takes the following inputs:
- A Vault client
- Username. This has to match the user created in the previous function
- Email address of the user. This is an optional implementation. The email address is written as metadata for the user and can be included as a claim in the JWT to help with data workflows. For example, this can be used to ensure the user only reads their data from a database.
The function returns an interface and an error. The interface contains the response data from Vault, which includes the entity ID. This will be needed later. The policies are currently hardcoded; however, this can be improved to pass in the policy list as a configuration parameter.
The third step is to create the alias that ties the user and the entity together:
func createAlias(vc *vault.Client, canonicalId string, userName string, mountAccessor string) (interface{}, error) {

   ctx := context.Background()

   aliasRequest := schema.AliasCreateRequest{
      CanonicalId:   canonicalId,
      MountAccessor: mountAccessor,
      Name:          userName,
   }

   aliasResponse, err := vc.Identity.AliasCreate(ctx, aliasRequest)
   if err != nil {
      log.Error(err)
      return nil, err
   }

   return aliasResponse.Data, nil
}
This function takes the following inputs:
- A Vault client
- The canonical ID of the entity. This was returned in the interface from the last function
- The username of the user created in the userpass auth method
- The mount accessor ID. This is the ID of the userpass auth method created in the Vault configuration steps
The function also returns an interface and error. The interface contains the alias ID returned from Vault.
The final step is to create an OIDC assignment:
func createAssignment(vc *vault.Client, entityId string, name string) error {
   ctx := context.Background()
   entityIdList := []string{entityId}

   assignmentRequest := schema.OidcWriteAssignmentRequest{
      EntityIds: entityIdList,
      GroupIds:  nil,
   }

   _, err := vc.Identity.OidcWriteAssignment(ctx, name, assignmentRequest)
   if err != nil {
      log.Error(err)
      return err
   }

   return nil
}
This function takes the following inputs:
- A Vault client
- The entity ID returned from the interface in the create-entity step
- A name for the assignment. For simplicity’s sake, it makes sense to name this the same as the username
The function returns only an error.
To put this all together, you can create the following function that unites these functions in the required workflow:
func UserCreate(userName string, password string, emailAddr string) map[string]string {
   vc := NewClient(os.Getenv("VAULT_ADDR"), os.Getenv("VAULT_TOKEN"))
   mountAccessor := os.Getenv("MOUNT_ACCESSOR_ID")

   createUser(&vc, userName, password)

   entityResult, err := createEntity(&vc, userName, emailAddr)

   // Assert that the returned value is a map[string]interface{}
   resultMap, ok := entityResult.(map[string]interface{})
   if !ok {
      log.Error("Unexpected type for entity result")
   }

   // Access the "id" field and assert that it is a string
   EntityIdValue, ok := resultMap["id"].(string)
   if !ok {
      log.Error("ID is not a string or not found in entity result")

   }

   log.Infof("Entity ID: %s", EntityIdValue)

   aliasResult, err := createAlias(&vc, EntityIdValue, userName, mountAccessor)
   if err != nil {
      log.Error(err)
   }

   aliasResultMap, ok := aliasResult.(map[string]interface{})
   if !ok {
      log.Error("Unexpected type for alias result")
   }
   aliasId, ok := aliasResultMap["id"].(string)

   err = createAssignment(&vc, EntityIdValue, userName)
   if err != nil {
      log.Error(err)
   }

   finalResult := make(map[string]string)
   finalResult["Username"] = userName
   finalResult["Entity ID"] = EntityIdValue
   finalResult["Alias ID"] = aliasId

   return finalResult

}
Things to note about this function:
- To configure the Vault client, this function reads the following environment variables
VAULT_ADDRandVAULT_TOKEN. - The mount accessor ID for the userpass auth method is passed in using the
MOUNT_ACCESSOR_IDenvironment variable - It takes the following inputs
- Username
- Password
- Email address
- It executes the other functions in chronological order
- It returns a collection of key/value pairs called a
map[string] stringand contains the following information:- Username
- Entity ID
- Alias ID
- The information contained in the map can then be written to your database
This function can then be added to an endpoint in your API and exposed to your frontend for user signup.
»User AuthN
Authenticating users to Vault is a 2-step process:
- Submit username and password to Vault for AuthN
- Generate a JWT for the authenticated user
Again these steps will be broken down into dedicated functions and another function will tie them together to implement the workflow.
The first step is to make a call to Vault to authenticate the user:
func userpassAuth(userName string, password string) (string, error) {
   ctx := context.Background()

   vc := NewClient(os.Getenv("VAULT_ADDR"), "")
   loginRequest := schema.UserpassLoginRequest{Password: password}

   vaultToken, err := vc.Auth.UserpassLogin(ctx, userName, loginRequest)
   if err != nil {
      return "", err
   }

   return vaultToken.Auth.ClientToken, nil
}
This function is slightly different to the other in terms of how it configures the Vault client. Because it is an AuthN call, the only configuration parameter required is the Vault address, so the client is configured within this micro-function. It takes these inputs:
- Username
- Password
It returns a string, which will contain the Vault token if the AuthN is successful, and an error for unsuccessful AuthN.
Next step is to generate a signed JWT for the authenticated user:
func generateToken(vc *vault.Client, roleName string) (interface{}, error) {
   ctx := context.Background()

   tokenResult, err := vc.Identity.OidcGenerateToken(ctx, roleName)
   if err != nil {
      log.Error(err)
      return nil, err
   }

   return tokenResult.Data, nil
}
This takes the following inputs:
- A Vault client. This can not be the same Vault client that the rest of the application uses because the token in this client will be the identity that the JWT is issued for.
- The OIDC role name. This was created during the Vault configuration process.
The function returns an interface which contains the JWT and an error.
The workflow can now be put together with this function:
func UserAuthenticate(userName string, password string) (string, error) {

   var jsonWebToken string
   vaultToken, err := userpassAuth(userName, password)
   if err != nil {
      log.Error(err)
      return "", err
   } else {

      authenticatedVc := NewClient(os.Getenv("VAULT_ADDR"), vaultToken)
      jwt, err := generateToken(&authenticatedVc, "my-role")
      if err != nil {
         log.Error(err)
         return "", err
      }

      jwtMap, ok := jwt.(map[string]interface{})
      if !ok {
         log.Error("JWT unexpected type")
      }

      jsonWebToken, ok = jwtMap["token"].(string)

   }
   return jsonWebToken, nil
}
This function creates a Vault client using the Vault token resulting from the AuthN step. This is to ensure that the JWT is created for the correct user. The OIDC role name is currently hard coded but this can easily be refactored to use environment variables. It takes the following as inputs:
- Username
- Password
It returns:
- A string containing the JWT
- An error if something goes wrong during the AuthN process.
»Validating a JWT
Once the user has been authenticated, the resulting JWT can be attached to subsequent application calls. Validating the JWT is essential for a number of reasons:
- To check the integrity of a token. This will ensure that the JWT is in fact a real token issued by Vault. This is another form of AuthN.
- To validate the integrity of the contents within the token. This will ensure claims within the JWT are not manipulated by malicious threat actors, leading to unauthorized access to application data.
- To check the claims within the token. This will ensure that the token is not expired and prevents replay attacks whereby a previously valid token is used for unauthorized data access.
In order to validate the token, you will need to create a function that can be used in a middleware function to ensure every application call made by a user is done using a valid JWT.
This function will validate the provided token:
func ValidateToken(token string) (bool, error) {
   vc := NewClient(os.Getenv("VAULT_ADDR"), os.Getenv("VAULT_TOKEN"))

   ctx := context.Background()

   clientId := os.Getenv("OIDC_CLIENT_ID")

   validateRequest := schema.OidcIntrospectRequest{
      ClientId: clientId,
      Token:    token,
   }
   validate, err := vc.Identity.OidcIntrospect(ctx, validateRequest)
   if err != nil {
      log.Error(err)
   }

   validateMap, ok := validate.Data["active"].(bool)
   if !ok {
      log.Error("JWT not valid")
   }

   var response bool
   switch validateMap {
   case true:
      response = true
   case false:
      response = false
   default:
      response = false
   }

   return response, nil

}
This function takes the token as an input and returns a true or false value based on whether or not the token is valid. The OIDC client ID is required for this to work. The function has been written to read the OIDC_CLIENT_ID environment variable for this purpose. This can then be used in a middleware function within your application.
»Recommendations and resources
As you go through configuring Vault as an IdP, it’s best practice to write output values in your Terraform code for the mount accessor ID of the userpass auth method and the client ID of the OIDC role, as these values are required when building your application. This Terraform module can be used to configure Vault to act as an OIDC provider.
When setting up the RP application to implement the OIDC workflow and building a user signup workflow, a few things to note are:
- The application can be made more efficient by using Goroutines or any multithreading approach and building them into your chosen framework. This will allow multiple requests to be handled in parallel. The unified workflows would each be scheduled on their own thread to make the application more scalable and able to handle higher traffic loads.
- It is better to use environment variables for static configuration values such as OIDC client ID and mount accessor ID.
- This approach makes several calls to Vault so the Vault cluster should be close to where the application is being run to reduce latency.
- Because so many calls are being made to Valut, there will naturally be an increased latency, which you will need to plan for.
If you would like to try this for your application, sign up for a HashiCorp Cloud Platform account and deploy a managed dedicated Vault Cluster in minutes.
You can also set up Vault as an IdP and integrate it with HashiCorp Boundary for secure remote access by following this tutorial.