
There are three telling security statistics in modern cloud and hybrid environments:
- Data breaches cost an average of $4.5 million per incident
- 74% of breaches involve a human element
- 9 out of 10 web application breaches result from stolen credentials
These three stats compel security and platform teams to closely examine their approach to cloud infrastructure security workflows from Day-0 through Day-N. There are three primary challenges every security team must solve pertaining to remote infrastructure access and credential/secrets management in the cloud:
- How will we manage and secure human and machine access credentials to cloud accounts and resources?
- How will we enable humans to remotely access cloud resources with just-in-time credentials when the need arises (e.g. a “break glass” emergency situation or to debug an application)?
- How will we enable workloads running on the cloud to access secrets?
What if organizations could address those challenges within a single repeatable workflow? Better yet, what if they could wire up all the necessary configurations at provision-time, so every time a new cloud infrastructure resource is created, security teams can rest assured that the standard patterns of Security Lifecycle Management are applied by default.
These kinds of “golden” approaches to infrastructure and security automation workflows lie at the core of The Infrastructure Cloud from HashiCorp, which delivers Infrastructure and Security Lifecycle Management (ILM and SLM) via the HashiCorp Cloud Platform (HCP). This post illustrates using HCP services to build a secure provisioning workflow that automates solutions to the aforementioned challenges.
This diagram represents the “golden path” workflow pattern modeled in this post:
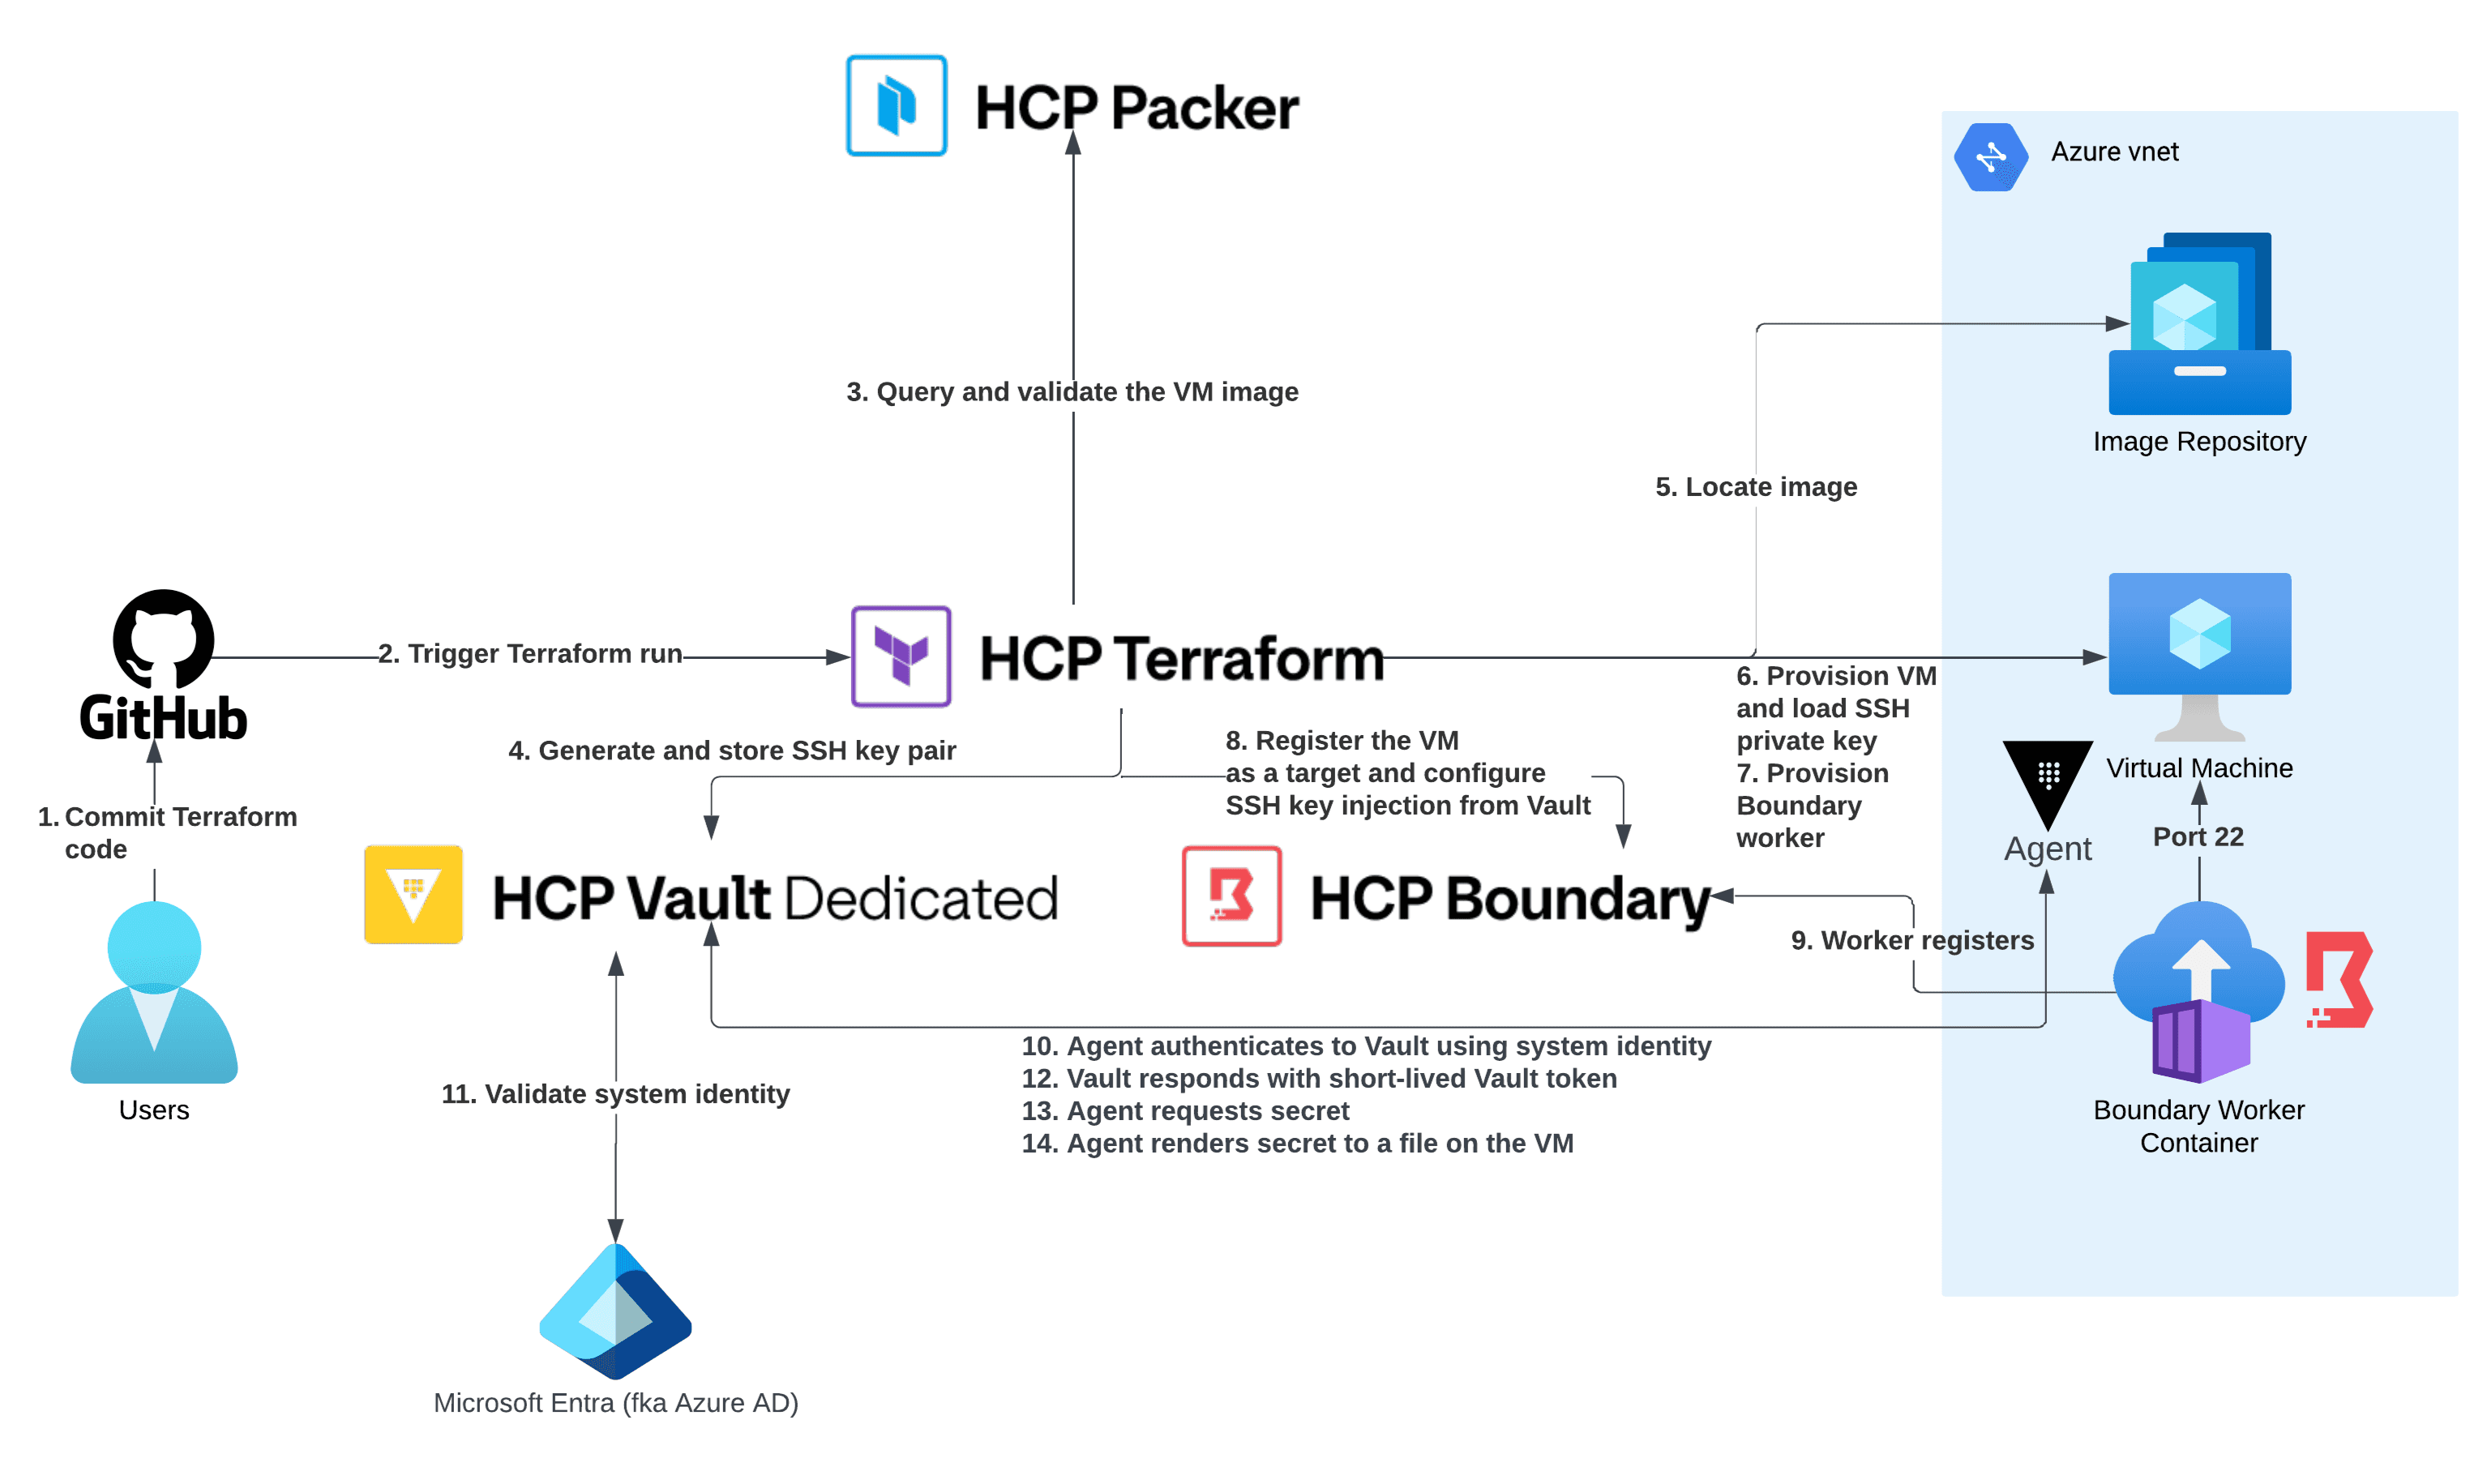
While this example uses Microsoft Azure, the same workflow can be applied to any cloud provider, as well as to multi-cloud and hybrid cloud environments. You can follow along with building this golden path by using the full source code found in this GitHub repository.
»Securing SSH access by default
In this example scenario, an application development team needs to deploy their app to a Linux-based virtual machine (VM) running in Azure. The application needs to access a sensitive text string in order to execute (this could be an API token, database connection string, etc.) Also, despite a broad preference for immutable infrastructure, developers and site reliability engineers may need SSH access to the VM to debug the application in case of an emergency.
The first step in creating the dev team’s VM is to generate an admin SSH key-pair. The public key must be trusted by the VM and the private key must be stored securely with role-based access controls (RBAC) and auditing.
This golden path will use the core ILM component of The Infrastructure Cloud, HashiCorp Terraform, to define and orchestrate all the pieces of this end-to-end secure provisioning workflow. Terraform is HashiCorp’s infrastructure as code solution and HCP Terraform is a SaaS platform that manages Terraform provisioning runs in a consistent and reliable environment. Key benefits of HCP Terraform include:
- Secure management of shared state and secret data
- Access controls for approving changes to infrastructure
- A private registry for sharing approved Terraform modules
- Detailed policy controls for governing the contents of Terraform configurations
- Day 2 visibility and optimization features like drift detection and a workspace explorer
All the infrastructure created in this post will be codified with Terraform and committed to GitHub. This walkthrough uses a GitOps workflow that integrates GitHub and HCP Terraform to trigger terraform plan and terraform apply as new commits are made. Configuring your HCP Terraform workspace and VCS connection is outside the scope of this blog.
Terraform lets you define resources that represent infrastructure artifacts. One such resource is called tls_private_key, which generates an SSH key pair:
#Create SSH keypair
resource "tls_private_key" "ssh_key" {
  algorithm = "RSA"
  rsa_bits  = 4096
}
Next, you need to put your keys somewhere safe. HashiCorp Vault is a centralized, API-driven secrets management system that handles the security lifecycle aspects of The Infrastructure Cloud. All the data in Vault is encrypted and protected with access-control list (ACL) policies. To avoid the burden of spinning up and managing your own Vault cluster, this post uses HCP Vault Dedicated, the HashiCorp-managed version of Vault Enterprise.
Terraform integrates with external systems via plugins known as providers. Often a set of credentials are needed to access the external system APIs called by a provider. This introduces the complexity of securing those credentials, also called the "secure introduction" or "secret zero" problem. Fortunately, HCP Terraform presents information about a Terraform workload to an external system — such as its workspace, organization, or whether it’s a plan or apply — and allows other external systems to verify that the claims are genuine. This is called workload identity. Each workload is issued a JSON Web Token (JWT) that is signed by HCP Terraform’s private key, and expires at the end of the plan or apply timeout.
HCP Terraform’s workload identity can be integrated with Vault to generate dynamic credentials for the Vault provider in your HCP Terraform runs. Dynamic provider credentials improve your security posture by letting you provision new, temporary credentials for each run. This workflow eliminates the need to manually manage and rotate credentials across an organization.
To configure dynamic provider credentials for Vault, establish the trust between HCP Terraform and HCP Vault Dedicated, set up a Vault role and policy, and configure your HCP Terraform workspace with the required variables shown here:
#Upload the policy
vault policy write tfc-workload tfc-workload-policy.hcl

#Configure TF workload identity auth to Vault
vault auth enable jwt
vault write auth/jwt/config \
    oidc_discovery_url="https://app.terraform.io" \
    bound_issuer="https://app.terraform.io"

#Create the role
vault write auth/jwt/role/tfc @vault-jwt-auth-role.json
You can now use Terraform’s Vault provider to create a new key-value secrets engine path and stash the SSH keys there:
#Store All SSH keys in Vault KV
resource "vault_kv_secret_v2" "example" {
  mount = "kv"
  name = "ssh/${var.vm_name}"
  data_json = jsonencode(
    {
      public_key_openssh  = tls_private_key.ssh_key.public_key_openssh,
      private_key_openssh = tls_private_key.ssh_key.private_key_openssh,
      public_key_pem      = tls_private_key.ssh_key.public_key_pem,
      private_key_pem     = tls_private_key.ssh_key.private_key_pem
      username            = var.vm_admin
    }
  )
}
Next, load the public key onto the machine. Your target cloud in this post is Microsoft Azure, so use Terraform’s Azure provider to create the VM and its associated networking components. The Azure provider’s resource called azurerm_linux_virtual_machine has an admin_ssh_key block that defines the admin username and SSH public key. The VM resource configuration references the key-pair created earlier:
admin_ssh_key {
    username   = var.vm_admin_username #adminuser
    public_key = tls_private_key.ssh_key.public_key_openssh
  }
When HCP Terraform applies the code, it will create SSH keys, store them in Vault, and provision the VM with the public key added to the SSH authorized_keys file — all in a single codified configuration.
»Human access to the virtual machine
The next step is to enable human operator access. This involves another product in the Infrastructure Cloud, HashiCorp Boundary. Boundary is a modern privileged access management (PAM) solution, consisting of a control plane and workers that proxy sessions to infrastructure. You can use the HashiCorp-managed HCP Boundary to run the control plane, register workers, and configure host endpoints with a default port and a protocol to establish a session (known as targets).
The Boundary Terraform provider orchestrates the steps required to enable human access to the VM, all within the provisioning workflow. Now register the new VM as an SSH target in Boundary and configure a connection between Boundary and Vault to let Boundary inject the SSH private key into the user’s session:
#Get the Boundary project
data "boundary_scope" "project" {
  name     = var.boundary_project_name
  scope_id = var.boundary_scope_id
}

resource "vault_token" "example" {
  policies  = ["tfc-workload"]
  no_parent = true
  renewable = true
  period    = "24h"
  metadata = {
    "purpose" = "boundary credential store token"
  }
}
#Create credential store
resource "boundary_credential_store_vault" "example" {
  name        = "HCP Vault"
  description = "HCP Vault Credential Store"
  address     = var.vault_addr
  namespace   = var.vault_namespace
  token       = vault_token.example.client_token
  scope_id    = data.boundary_scope.project.id
}

#Create credential library for the SSH keys
resource "boundary_credential_library_vault" "example" {
  name                = "${var.vm_name}-sshkeys"
  description         = "VM SSH keys"
  credential_store_id = boundary_credential_store_vault.example.id
  path                = vault_kv_secret_v2.example.path
  http_method         = "GET"
  credential_type     = "ssh_private_key"
  credential_mapping_overrides = {
    private_key_attribute = "private_key_pem"
  }
}
#Add the VM to Boundary
resource "boundary_host_catalog_static" "example" {
  name        = "azure-vm-catalog"
  description = "Azure VM Host Catalog"
  scope_id    = data.boundary_scope.project.id
}
resource "boundary_host_static" "example" {
  name            = var.vm_name
  host_catalog_id = boundary_host_catalog_static.example.id
  address = azurerm_linux_virtual_machine.example.private_ip_address
}

resource "boundary_host_set_static" "example" {
  name            = "azure-vm-host-set"
  host_catalog_id = boundary_host_catalog_static.example.id
  host_ids = [
    boundary_host_static.example.id
  ]
}
resource "boundary_target" "example" {
  name         = "${var.vm_name}-ssh"
  description  = "${var.vm_name}-SSH"
  type         = "ssh"
  default_port = "22"
  scope_id     = data.boundary_scope.project.id
  host_source_ids = [
    boundary_host_set_static.example.id
  ]
  injected_application_credential_source_ids = [
    boundary_credential_library_vault.example.id
  ]
  egress_worker_filter = var.boundary_egress_filter
  enable_session_recording = true
  storage_bucket_id        = var.boundary_session_bucket
}
resource "boundary_alias_target" "example" {
  name                      = "boundary_alias_target"
  description               = "Alias to target using host boundary_host_static.example"
  scope_id                  = "global"
  value                     = "ssh.${var.vm_name}.boundary"
  destination_id            = boundary_target.example.id
  authorize_session_host_id = boundary_host_static.example.id
}
The snippet above shows session recording is enabled on the Boundary target. This is a critical enterprise feature that records every SSH session initiated to that host for later review by security teams and auditors.
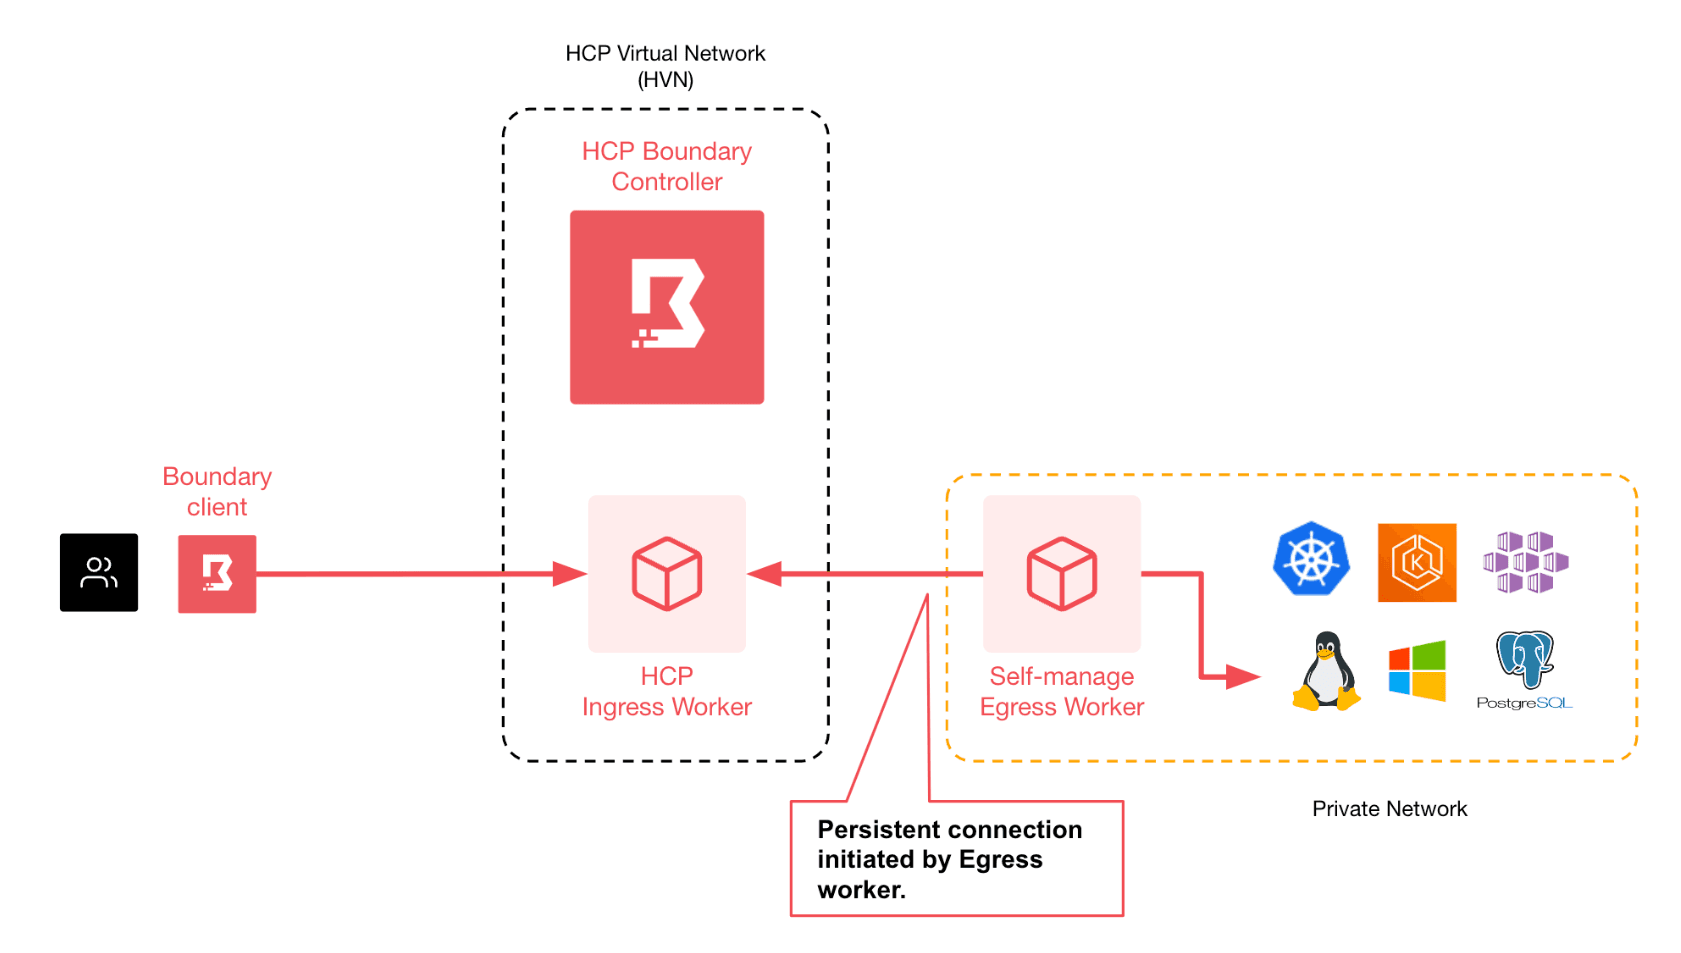
By design, the Azure VM does not have a public IP, it's on a private subnet. The users who need access to it reside outside the private network, so this is where Boundary’s multi-hop proxying capability comes in. If you place a Boundary worker into the same Azure virtual network (VNet) as the VM, you can leverage it as a reverse proxy.
The Boundary worker in Azure establishes a persistent outbound connection to an upstream worker that resides in HCP. The worker in Azure is configured as an egress worker and given an azure tag and an egress worker filter is set on the Boundary target. The filter matches workers that have the tag azure. When users connect to the Boundary target, Boundary will route the connection only to the workers that match the tags set in the target filter. Here is a diagram to help you visualize the routing:
Boundary workers can run on VMs, bare-metal servers, and containers. In this example, the worker will run as a container. This is an efficient way to run Boundary workers since containers are lightweight, fast, and can scale as demand changes. Spin up your Boundary worker in an Azure Container Instance using Terraform:
resource "boundary_worker" "az_worker" {
  scope_id = "global"
  name = "azure boundary worker 1"
}

resource "azurerm_subnet" "cg" {
  name                 = "container-group-subnet"
  resource_group_name  = var.resource_group
  virtual_network_name = azurerm_virtual_network.example.name
  address_prefixes     = ["10.0.3.0/24"]
  delegation {
    name = "delegation"

    service_delegation {
      name    = "Microsoft.ContainerInstance/containerGroups"
      actions = ["Microsoft.Network/virtualNetworks/subnets/join/action", "Microsoft.Network/virtualNetworks/subnets/prepareNetworkPolicies/action"]
    }
  }
}

resource "azurerm_container_group" "container" {
  name                = "boundary-worker-group"
  location            = var.az_location
  resource_group_name = var.resource_group
  ip_address_type = "Private"
  subnet_ids      = [azurerm_subnet.cg.id]
  os_type         = "Linux"
  restart_policy  = "Never"

  container {
    name   = "boundary-worker"
    image  = "hashicorp/boundary-enterprise"
    cpu    = 1
    memory = 2

    ports {
      port     = 9202
      protocol = "TCP"
    }
    environment_variables = { "HCP_BOUNDARY_CLUSTER_ID" = var.hcp_boundary_cluster_id, "WORKER_ACTV_TOKEN" = boundary_worker.az_worker.controller_generated_activation_token }
    volume {
      name       = "boundary-config"
      mount_path = "/boundary"
      git_repo {
        url = "https://github.com/bfbarkhouse/hashistack-secure-infra-workflow"
      }
    }
    commands = [
      "/bin/sh", "-c", "mv /boundary/hashistack-secure-infra-workflow/azure/boundary-worker-config.hcl /boundary/config.hcl; rm -rf /boundary/hashistack-secure-infra-workflow; /usr/local/bin/docker-entrypoint.sh server -config /boundary/config.hcl"
    ]
  }
}
You now have a fully automated, codified, and secured access workflow for operator access to the VM. When a properly authorized user logs into a Boundary client, they will see the VM as an available SSH target. When they click the Connect button, Boundary pulls the SSH private key from the Vault key-value path where it's stored and injects it into the session using protocol decryption. The key is never exposed to the user. The user is then proxied and authenticated to the VM within a recorded and time-restricted session. Since Boundary exposes APIs, it can be easily integrated into service management solutions as part of an approval workflow.
Here you can see the target listed in the Boundary Desktop UI:

»Automatic application secret retrieval
Now that you’ve solved two of the original challenges, it’s time to address the final one: the workload running on the VM needs to retrieve a secret at runtime.
Having a central secrets management system is a core tenet of modern IT security, but it's only as effective as the level of adoption by developers. Developers could implement application logic to authenticate to Vault, retrieve secrets, and manage the lifecycle of the Vault token. However, this requires application refactoring to make it “Vault-aware”, and developers often don’t have the bandwidth or Vault knowledge needed to refactor. Security teams requiring developers to refactor hundreds (or thousands) of applications creates significant cost and time implications, establishing barriers to adoption of secrets management.
To help lower the barrier to adoption by providing a more scalable and simpler way for applications to integrate with Vault, HashiCorp created Vault Agent. Vault Agent is a client daemon mode of the Vault binary. It has several uses, but one of its primary functions is to automatically authenticate to Vault, manage the lifecycle of the token, and fetch secrets from Vault, whether those are static secrets, dynamic credentials, or certificates. Your dev team’s VM will leverage Vault Agent to render secrets for use by applications without the need for custom application logic.
To install Vault Agent on the VM, adhering to the principles of immutability and codification, you will use another component in The Infrastructure Cloud: HashiCorp Packer. Packer will codify installation and configuration of the Vault Agent into the VM image, so it's up and running immediately after provisioning the VM. The Packer CLI builds the Azure VM image from an HCL template, pushes the image artifact to Azure, and registers the image metadata to HCP Packer.
HCP Packer is a hosted artifact registry that tracks the metadata of your golden images, with features including versioning, release channels, ancestry tracking, revocation, and Terraform integrations. This Terraform integration is important because it lets developers reference a golden image by querying HCP Packer rather than hard-coding the image identifier. This ensures that only fully tested, compliant, and patched images are used to provision VMs and containers.
Your VM will use an image built from a Packer HCL template using Azure’s standard Canonical Ubuntu 22.04 LTS as the base. With the help of Packer’s shell provisioner, it will layer on the Vault Agent binary, its configuration file, a systemd unit file, and a Consul template file used to render the secret out to a text file:
#Stage Vault
  provisioner "shell" {
    execute_command = "chmod +x {{ .Path }}; {{ .Vars }} sudo -E sh '{{ .Path }}'"
    inline = [
      "wget -O- https://apt.releases.hashicorp.com/gpg | sudo gpg --dearmor -o /usr/share/keyrings/hashicorp-archive-keyring.gpg",
      "echo \"deb [signed-by=/usr/share/keyrings/hashicorp-archive-keyring.gpg] https://apt.releases.hashicorp.com $(lsb_release -cs) main\" | sudo tee /etc/apt/sources.list.d/hashicorp.list",
      "apt update && sudo apt install vault"
    ]
    inline_shebang = "/bin/sh -x"
  }
  provisioner "shell" {
    execute_command = "chmod +x {{ .Path }}; {{ .Vars }} sudo -E sh '{{ .Path }}'"
    inline          = ["mkdir /vault"]
  }
  provisioner "file" {
    destination = "/tmp/agent-config.hcl"
    source      = "./agent-config.hcl"
  }
  provisioner "file" {
    destination = "/tmp/app-secret.ctmpl"
    source      = "./app-secret.ctmpl"
  }
  provisioner "file" {
    destination = "/tmp/vault.service"
    source      = "./vault.service"
  }
  provisioner "shell" {
    execute_command = "chmod +x {{ .Path }}; {{ .Vars }} sudo -E sh '{{ .Path }}'"
    inline          = ["mv /tmp/agent-config.hcl /etc/vault.d"]
  }
  provisioner "shell" {
    execute_command = "chmod +x {{ .Path }}; {{ .Vars }} sudo -E sh '{{ .Path }}'"
    inline          = ["mv /tmp/app-secret.ctmpl /etc/vault.d"]
  }
  provisioner "shell" {
    execute_command = "chmod +x {{ .Path }}; {{ .Vars }} sudo -E sh '{{ .Path }}'"
    inline          = ["mv /tmp/vault.service /usr/lib/systemd/system"]
  }
  provisioner "shell" {
    execute_command = "chmod +x {{ .Path }}; {{ .Vars }} sudo -E sh '{{ .Path }}'"
    inline          = ["systemctl enable vault.service"]
  }
}
Keeping in mind the need to secure credentials across the workflow, you need to decide how Vault Agent should authenticate to Vault. There needs to be an initial credential/identity to log in to Vault and get the token to use on subsequent requests for secrets.
One benefit of using a cloud platform to host infrastructure is that the platform creates identities for resources and lets external systems validate those identities. Using Vault’s Azure Authentication Method, you can configure Vault Agent auto-auth with the VM’s Azure-managed identity JWT token and map the identity to a Vault role that has ACL policy access to the application secret. This resolves the “secure introduction” problem by proving that the VM is a legitimate recipient for the secret and avoids managing yet another set of credentials. To configure the integration, log in to Vault, set up the Azure Authentication Method, and create a role for the agent:
#Upload the policy
vault policy write vault-agent vault-agent-policy.hcl

#Configure Azure auth method for Vault Agent
vault auth enable azure
vault write auth/azure/config \
    tenant_id=$YOUR_TENANT_ID \
    resource=https://management.azure.com/ \
    client_id=$YOUR_CLIENT_ID \
    client_secret=$YOUR_CLIENT_SECRET

#Create the role
vault write auth/azure/role/vault-agent-role \
    policies="vault-agent" \
    bound_subscription_ids=$YOUR_SUBSCRIPTION_ID
In the example configuration above, any resource from the Azure subscription can use the role "vault-agent-role" and access secrets based on its ACL policy "vault-agent". You can, of course, define finer-grained bindings.
Here’s the auto-auth snippet from the agent config file to include in the Packer image:
auto_auth {
  method {
    type = "azure"
    namespace = "admin"
    config = {
      authenticate_from_environment = true
      role = "vault-agent-role"
      resource = "https://management.azure.com/"
    }
  }
After building the image and registering it in HCP Packer, the next step is to configure Terraform to provision the VM from it. First you need to query the latest version from HCP Packer using the HCP provider:
# Locate the Packer built image
data "hcp_packer_artifact" "secure-infra-workflow" {
  bucket_name   = var.packer_bucket_name
  channel_name  = var.packer_channel_name
  platform      = var.packer_platform
  region        = var.packer_region
}
Then set an environment variable on the VM that tells Vault Agent the address of the Vault cluster to connect to. By using variables injected at provision time, you can use the same VM image across different environments such as dev, test, staging, and production. Use cloud-init to do this:
#Injecting Vault cluster address to .env file used by systemd
data "template_cloudinit_config" "vault-config" {
  gzip = true
  base64_encode = true
  part {
    content_type = "text/cloud-config"
    content = "bootcmd: [echo VAULT_ADDR=${var.vault_addr} >> /etc/vault.d/vault.env]"
  }
}
The code to provision the Linux VM resource references the image you looked up in HCP Packer and inserts the cloud-init config into the VM’s custom_data. Notice the VM has a system-assigned identity:
resource "azurerm_linux_virtual_machine" "example" {
  name                = var.vm_name
  resource_group_name = var.resource_group
  location            = var.az_location
  size                = var.vm_size
  source_image_id = data.hcp_packer_artifact.secure-infra-workflow.external_identifier
  admin_username      = var.vm_admin
  custom_data = data.template_cloudinit_config.vault-config.rendered
 identity {
    type = "SystemAssigned"
 }
»Putting it all together
All the pieces to solve the three security challenges are now codified with Terraform. Run an HCP Terraform plan in your workspace and review the output:
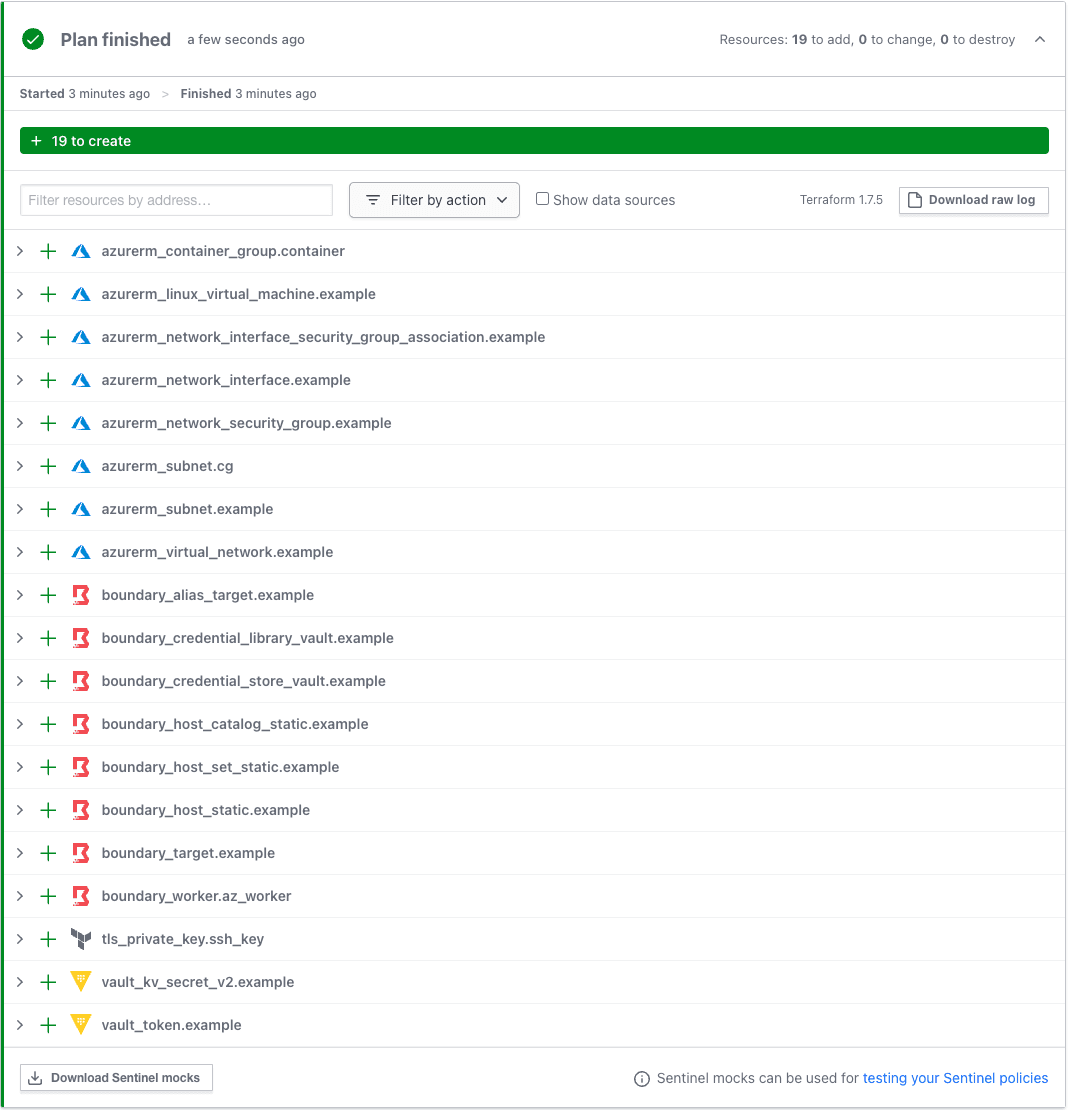
Now you have one provisioning workflow to create and store SSH keys, create a VM for an application from a golden image, access secrets, and register the VM into a remote access system.
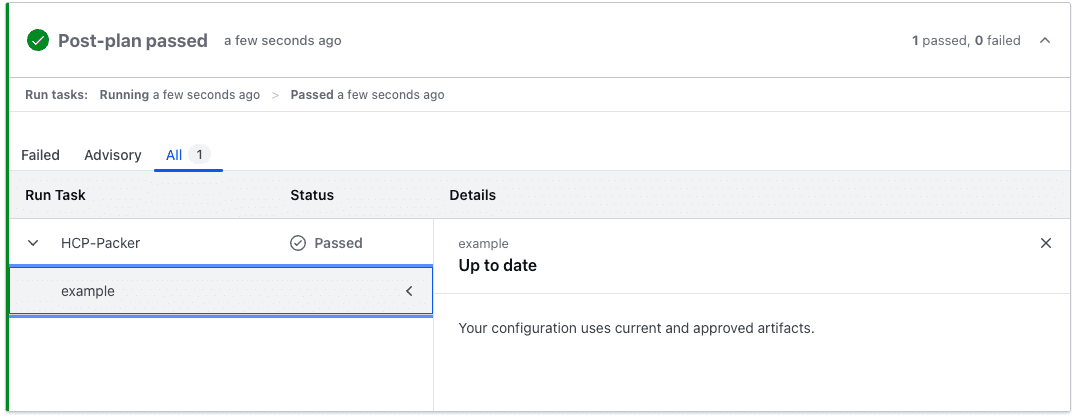
Note that there is a Terraform run task configured that validates the Packer image being used is valid and not revoked:
Apply the plan and provision everything. Log into the VM through Boundary to verify Vault Agent rendered the application secret to the file as expected:

»Getting started with an iterative approach
While it might seem daunting to adopt all the components presented in this blog post, you can get started with an iterative approach. Signing up for the HashiCorp Cloud Platform gives you immediate access to free-tier versions of all the products used in this tutorial.
It makes sense to start your Infrastructure Cloud journey by getting your secrets under management with HCP Vault Dedicated, then move on to adopting infrastructure as code with HCP Terraform and scale up to codified image management with HCP Packer and identity-based access management with HCP Boundary. The investment to enable a secure provisioning workflow will be well worth it to strengthen and speed up your organization’s ILM and SLMSecurity Lifecycle Management practices.
For more tutorials on using HashiCorp solutions, visit our HashiCorp Developer education site and watch our demo video series. If you’d like to discuss your specific infrastructure and security transformation challenges, our sales and solutions engineers are here to listen.
The full source code referenced in this post can be found in the Secure Infrastructure Workflow GitHub repo.